Categories
Forex Course

139. How Professionals Trade The Different Market States?

Introduction

In this series of different states of the market, we understood the terminology and the concepts involved. However, in the forex market, if we do not go practical, there is the least use to the concept. In other words, one must understand how to trade in the market, knowing its state. In this final lesson of the series, we shall dive deep into the topic and understand how to apply them in the market.

Trading a Trend

Trading a trending market is the simplest and safest way to trade in the market. This is because, in a trend, it is evident on which party is dominating the market. For example, in an uptrend, it is clear that the buyers are more powerful than sellers. And hence, we look for buying opportunities rather than selling.

In a trend, the market makes higher highs and higher lows. In other words, the market moves in one direction with temporary pullbacks in the opposite direction. These pullbacks (retracements) typically turn around to the original trend direction at the support and resistance levels. So, to trade a trend, we wait for the market to make a higher high / lower low and retrace to the S&R level, before triggering the buy or sell.

Consider the below chart of USD/CAD. The market is in a clear downtrend. The market made a new lower low by breaking below the grey ray. It then retraced back to the S&R area (grey ray) and is currently moving sideways. And this sideways movement in the market has high significance.

After the sellers made a new low, the buyers began to show up. They made it until the S&R level. And the market is currently in a range. As per the definition of a range, we know that there is strength from both the parties. In other words, the buyer who was temporarily dominating the market is slowing down as they are unable to make a higher high. And this price action is happening in the S&R area of the sellers. Therefore, we can conclude that the sellers are here to continue their downtrend.

One can enter when the price is at the top of the range (resistance) or when it starts to fall from the resistance. Placing the stop-loss few pips above the S&R level, and a take profit at the Low, is the safest approach to trade a trend.

Trading a Range

In a range, the market moves between levels – Support and Resistance. In this type of market, there is power from both buyers and sellers. Typically, the market shoots up from the support and drops from the resistance. However, randomly buying at support and selling from resistance is not the right way to trade a range like a professional. To trade a range with high odds in your favor, you must be aware of the overall trend. And you place your bets on the direction of the overall trend.

Consider the below chart of NZD/CAD. We can clearly see that the market is in a range. But, looking from the left, the market is in a strong uptrend, and the price is holding above the S&R level (grey ray). In the current market, we see that the price dropped below the bottom of the range, touched the S&R level, and shot right back up into the range. Thus, confirming that the big buyer is preparing to do the buys.

Since the price strongly reacted off from the S&R level and held above the support of the range, we can prepare to go long on the market. Stop-loss from this trade would be below the S&R level, while the target point would be at the top of the range. In hindsight, the buyers were able to push the market above than the resistance.

This brings us to the end of this series. We hope you found this lesson and the previous chapters interesting and informative. Stay tuned until we release our new set of lessons.

[wp_quiz id=”79656″]
Categories
Forex Course

137. Differentiating between a Retracement and a Reversal

Introduction

Broadly speaking, there are three states in the market – trend, range, and channel. If we were to go a little more in detail, a market has components like retracement and reversal. Identifying and differentiating between a retracement and reversal is a skill in itself. In this lesson, let’s go and understand what these terms mean and how to differentiate them.

What is Retracement?

Retracement is the terminology usually associated in a trending market. We know that in a trending market, the price moves in one specific direction. For instance, an uptrend is defined as a sequence of higher highs and higher lows. As per the definition of an uptrend, the prices do not keep moving higher and higher continuously.

After trending up to a certain point, the price temporarily moves in the opposite direction. This movement against the original trend is referred to as retracement. Technically, the price action from a higher high to the higher low is called a retracement.

Uptrend Example

Downtrend Example

What is a Reversal?

A reversal can be defined as the overall change in the direction of the market. A market can reverse from an uptrend to a downtrend, or from a downtrend to an uptrend.

Reversal to the Upside

In this type of reversal, initially, the market trends in a downtrend making lower lows and lower highs. Later, the market goes into a transition state where the price typically ranges for a while. In other words, the price stops making lower lows and lows highs. Instead, it makes equal lows or higher lows. Finally, the market starts to trend north by making higher highs and lower lows.

Reversal to the Downside

This reversal happens when the market transits from an uptrend to a downtrend. In an uptrend, the price makes higher highs and higher lows. But, when the trend begins to diminish, the higher highs turn into equal highs, and higher lows start to become equal lows. Finally, when the seller’s pressure comes in, the price begins to make lower lows and lower highs, forming a downtrend. Thus, the complete scenario is referred to as a reversal.

Predicting a possible reversal or retracement in the market is pretty challenging. If you’re stuck in a position and unsure if it is a retracement or a reversal, you may try the following options to manage the trade:

  • Hold onto your positions by keeping the stop loss as it is. If it is a retracement, you can ride the trade, else get stopped if it is a reversal. This is the simplest approach.
  • If you are more inclined towards a reversal than a retracement, then you may close your positions. Based on where the market breaks through, you can look for re-entry. But, you might have to compromise on the risk: reward.
  • You could close the entire position and stay away from the pair and look for other opportunities. This is the safest option possible, especially for conservative traders.
[wp_quiz id=”79176″]
Categories
Forex Course

136. Learning To Trade The Ranging Market?

Introduction

A Range is a state of the market where the prices move back and forth between the upper bound and the lower bound. A ranging market is also referred to as a choppy, sideways, or a flat market. Unlike a trend, the prices do not move in one specific direction for a long time. A range on a time frame, when looked on a smaller time frame, the price trends in one direction for a while, reverses its direction, and trends in the opposite direction.

Understanding Support and Resistance

Knowing support and resistance is an essential concept to understand a range. These two terms form the basis of a range.

Support

In simple words, support is the level in the market where the prices tend to go up. It is the region where the buyers are interested to aggressively buy the security, causing the prices to shoot up. In other words, it is an area where there is a high demand for the currency pair. A level can be regarded as support when the price reacts multiple times (with power) from that area.

Resistance

Resistance is a level in the market where the prices tend to drop. It is the price where sellers are willing to sell or short sell the asset. They prevent the market from going higher from a specific level. Resistance is no different from that of supply.

Resistance can be understood in terms of buyers. It is an area in the market where the buyers are not interested in buying at that price as they find it expensive. Since there is no demand from the buyers, the prices drop. And when it drops to the support area, the buyers show up again. Thus, due to a higher demand than supply at the support region, the prices rise.

The combination of both support and resistance makes a range. For instance, let’s say the market drops to the $5 mark every time it touches the $10 price. Visually, the market is moving sideways, and such a market is referred to as a range. Here, the $5 price is the support level, and the $10 price is the resistance. A similar example of the same is illustrated below.

ADX indicator for ranging markets

The Average Directional Index indicator can be applied to determine if the market is trending or ranging. A value above 25 indicates that the market is in a strong trending state, while a value of less than 25 signifies that the market is in a consolidation (range) state.

Below is the live chart of AUD/CAD on the 4H time frame. Looking at the chart from a bird’s eye perspective, the market started as an uptrend, held for a while, continued with the same trend, and is currently ranging again. In this sequence, we can observe that the ADX was below the 25-mark line when the market was consolidating, and greater than 25 when it was trending upwards.

We hope you found this lesson on ranging markets interesting and informative. In the next lessons, we shall get into more detail and understand concepts like retracements and reversal. Happy learning!

[wp_quiz id=”78971″]
Categories
Forex Course

134. Knowing the State of the Market

Introduction

Many newcomers and novice traders believe that the market moves in a random direction. They think it is all about the fundamental factors that keep the market going. In reality, the market does move based on fundamental factors, but it doesn’t imply that the prices move in random directions. The prices on the charts move in a specific direction as they are nothing but the past transactions of the big institutional players.

Charts tell a lot about the market environment. It clearly determines who is in control of the market – the buyer or the sellers. Based on this, there are three states of the market:

  • Trend
  • Range
  • Channel

Broadly speaking, in any market, be it Stock, commodity, currency, or cryptocurrency, the prices move only these three states. Let us understand each of them.

Of course, there are several types of chart patterns, but they all fall in one of the types on a bigger picture. All technical traders must have an understanding of the market environment. Whatever be the strategy, it will work applied in the right state of the market. Also, every type of market has its own concepts to trade.

Trend

The most evident type of market is a trending market. At the same time, it is one of the most confusing states to understand. A trending market is a type where the prices make Higher High & Higher Low sequences or Lower Low & Lower High sequences. In other words, in a trending market, the prices make a Higher High / Lower Low, retrace to the Support & Resistance, and continue with the same pattern.

A trending market is a type that can be found in any type of market. That is, even in ranges and channels, trends can be spotted (in a miniature picture).

Based on the direction of the market, we can divide trends into two types –

Uptrend (Bullish) – A market that faces upwards is an uptrend. The price makes Higher Highs and Higher Lows. It is a market where the buyers (bulls) are in control of the market. Note that a Higher High alone cannot be regarded as an uptrend.

Downtrend (Bearish) – A market whose trajectory is downwards is referred to as a downtrend. The price moves by making Lower Lows and Lower Highs. In this market, the sellers (bears) dominate the market.

Range

A ranging market is a type where the price does not create Higher Highs of Lower Lows. Thus, it moves sideways. There is a certain price shoots up and a price where it drops. It moves within these two prices. In this market, both buyers and sellers are strong. For example, if we say the market is ranging between 0.1200 and 0.2400, it means that the buyers are pushing up the market to 0.2400 from 0.1200, while the sellers are hitting it right back down to 0.1200.

Channel

A channel is basically a tilted channel. In other sense, a channel is a trend that is quite weak. In a channel, the price does try to make a Higher Highs or Lower Lows but retraces deeply before going for the next set. In a trend, the market respects the Support & Resistance, but the channel does not.

We hope you were able to get a gist on the states of the market. In the coming article, we shall elaborate on each of the types and understand how to trade them.

[wp_quiz id=”81457″]
Categories
Forex Basic Strategies

Pro Scalping Technique By Combining Stochastic With Bollinger Bands

Introduction

Scalping is a trading strategy that helps traders to take advantage of minor price movements on lower timeframes. It is one of the quite popular ways of trading the Forex market. There are many successful scalpers who make a lot of money by scalping the minor price moves. To be a scalper, we must be emotionally intelligent and have the ability to make quick decisions.

Scalpers place anywhere from 0 to a few hundred trades in a single day. Ideally, smaller movements in price are easier to catch compared to the longer moves. Typically while day trading, if the win/loss ratio is less than 50 percent, traders still make money. On the other hand, in scalping, it is critical to win most of the trades. Otherwise, we will end up on the losing side.

Stochastic Oscillator

Stochastic is a wonderful indicator developed by George C. Lane in late 1950. This indicator doesn’t follow the price or volume like other popular indicators in the market.  Instead, it follows the speed and momentum of the changes that occur in price before the trend formation. Stochastic is a range bounded indicator, and it oscillates between the 0 and 100 levels.

Typically, a reading above 80-level is referred to as the overbought signal, and a reading below the 20-level indicates an oversold signal. The Stochastic indicator consists of two lines, where one reflects the actual value of the indicator for each session, and another reflects its three-day simple moving average. The intersection of these lines indicates the reversal in price action.

Bollinger Bands

Bollinger Bands is a technical indicator developed by John Bollinger in the 1980s. It is a leading indicator, and it consists of two bands and a centerline. Out of the two bands, one stays above the price action, and the other stays below. Both of these bands contract and expand depending on the market’s volatility. When price action hits the lower band, it indicates a buy trade, and when it hits the upper band, it indicates a sell trade.

The Strategy

The strategy we are going to discuss is one of the most basic but effective scalping strategies ever used in the market. The idea is to apply both indicators (Bollinger Band & Stochastic) on the price chart. When the price action hits the lower Bollinger band, and the Stochastic is at the oversold area, it is an indication for us to go long. Conversely, when the price action hits the upper Bollinger band and if the Stochastic is at the overbought area, we can go short.

In the chart below, we can see that our strategy has generated a few buy/sell signals in the EUR/AUD Forex pair. The price action was in an overall uptrend. When both of the indicators gave us the signal, we took both buy and sell entries accordingly. In the chart below, the buy trades have given us some good profits, but in the sell trades, the profit was comparatively less. Always remember that these things are quite common in scalping. If you are an aggressive scalper, trade both buy sell signals. But if you are a trader who prefers to scalp the market with the trend, follow the next strategy.

Scalping The Market By Following The Trend

Buy Example

The chart below represents an uptrend in the EUR/AUD Forex pair. As you can see, by following our strategy, this pair has given us three buy signals, and all the trades were quite healthy and have performed well in the market. If you scalp the market by following the trend, it is easy to make big gains. For scalping, it is required to put smaller stops. Hence, always go for 4 to 5 pip stop-loss and 10 to 15 pip target. You can also exit your positions when the price hits the upper Bollinger band.

Sell Example

The below 3-minute chart of the GBP/JPY forex pair represents a couple of sell trades. As you can see, all the sell trades in this pair performed very well. We can also observe that every time the price action prints a brand new lower low. We took all the five selling trades on a single trading day, an all of them hit the take-profit range. So if we scalp the market by following the trend, it will be quite easy to make some profits from the market. The red arrows on the Stochastic and Bollinger Band indicators represent the sell signals.

Scalping The Ranges

Just like the trends, it is easy to scalp the ranges as well. In fact, the ranges are even easier to scalp than the trend because the support and resistance lines of the range offer extra signals for us. For ranges, all you need to do is to hit the sell when price action hits the top of the range and hit buy when prices hit the range bottom. If you add the Bollinger Bands and Stochastic indicator, the signals generated by the market will be stronger.

The chart below indicates a couple of buy/sell signals in the GBP/JPY 3-minute Forex chart. As you can see, we have gone long when prices hit the bottom of the range, combined with our strategy. The same applies to the sell-side. We have gone short when the price action hits the top of the range while respecting our strategy rules.

Conclusion

Scalping trading involves entering a trade for a shorter period of time to take advantage of small price fluctuations. When you enter a trade, it is advisable to risk lesser money and place as many trades as you can. We must have control over our inner greed and aim for smaller targets. In the beginning, it will be difficult for you to scalp the market as the smaller timeframes move way faster. You need to train your eyes a bit to understand the lower timeframes properly. Always try to scalp with a bigger trading account because the trading commissions can quickly eat up the smaller accounts.

Categories
Forex Daily Topic Forex Price-Action Strategies

Breakout Length: Key to Trend’s Strength

In today’s lesson, we are going to demonstrate the relation between the trend’s strength and breakout length. The breakout length usually represents one-fourth of a potential trend. If the breakout length is 25 pips, the trend may sustain up to 100 pips before making a big correction or long consolidation. It is important for breakout traders since the market often makes a breakout; confirms the breakout. However, the price does not head towards the trend direction. Let us clarify this by the examples below.

The price has been bearish upon making a bearish engulfing candle. The last swing low is quite far. This means the breakout length looks good for the sellers. The more the breakout length, the better it is for the traders.

The chart produces a bullish engulfing candle in between. This is bad for the sellers. The price may find its new resistance to produce a bearish reversal candle to make a breakout at the lowest low. This means the breakout length most probably needs to be adjusted.

The price seems to have found its new resistance here. It produces a do candle followed by a bearish engulfing candle. This means it produces an evening star. If the price heads towards the South and makes a breakout, the sellers may go short upon breakout confirmation. However, they must calculate new breakout length from the new resistance to the lowest low.

Here comes the breakout candle. This is an explicit breakout. The sellers are to wait for the price to make a breakout confirmation. If the next candle closes below the breakout candle, the sellers may trigger a short entry.

The confirmation candle looks to be an A+ breakout confirmation candle as well. However, do not forget the distance the price has already crossed. The price has crossed about 70% length considering the breakout length. Thus, the price may make a bullish correction. It usually happens when the price finds a new level of support/resistance. Let us proceed to the next chart.

The chart produces a big bullish engulfing candle, which changes the entire scenario. It happens when the price is about to make a correction. Sometimes corrective wave changes the trend. The sellers if the blindly trigger a short entry after the breakout confirmation without calculating breakout length and trend’s strength, they are to take a loss here.

Breakout strategy traders must calculate breakout length to determine how far the price could go. If it crosses more than 50% to confirm the breakout, it is better to skip such entries.


Categories
Forex Course

74. Using Moving Averages To Identify The Trend

Introduction

In the previous lessons, we have understood the two types of Moving Averages and the difference between them. We have also seen which Moving Average should be used in different market conditions and the one that must be preferred most of the time. From this crouse lesson, let’s explore the real-time applications of Moving Averages and how we can find accurate trades using this indicator.

One of the simplest, yet important use of Moving Average is to determine the direction of the trend. This can be done by plotting the indicator on the chart and then deciding the position of candlesticks with respect to the line of Moving Average.

The ideal way of identifying a trend using MA is this – If the price action tends to stay above the moving average line, it usually signals an uptrend. Likewise, if the price action remains below the moving average line, it indicates a downtrend.

This approach of establishing the trend is too simplistic and also has a significant drawback. Let us understand that with the help of an example.

Below is the EUR/USD price chart, and we have added a 10-period MA line to it. According to the rules of MA, since the price is above the MA, we should be going ‘long’ in this currency pair.

Due to a news event, price drops suddenly and closes below the MA (in the below chart). So, this changes our plan, which means now we should be thinking of going ‘short’ in the currency pair. But before we do that, let us see what happens to the price in the next few candles.

The below image shows that the price fakes out and does not continue its downward trend. Hence, if we would have gone short, that would have resulted in the price hitting our stop-loss resulting in a loss. Let’s understand the problem with this setup.

The strategy mentioned above is right, but the problem is that we are using a single period MA line stand-alone and not combining it with any other indicator. The best way to use MA for determining a trend is by plotting an extra Moving Average line on the charts instead of just one. It will give us a clearer idea if the pair is trending up or down depending on the sequence of the MAs.

The best way is to check if the ‘faster’ moving average is above the ‘slower’ moving average for an uptrend, and vice versa for a downtrend. In the below chart, we can see that the ‘faster’ SMA is above the ‘slower’ SMA, and this shows the strength of the uptrend. Also, the fake-outs that happen because of news releases will also have less impact on the indication given by the Moving Averages. Combining this knowledge with trendlines can help us decide if we have to go ‘long’ or ‘short’ in the currency pair.

Conclusion

Moving Averages can be useful for establishing the direction of a trend, but it should never be used stand-alone. If not other indicators, additional moving averages itself can be combined with an existing moving average to decide the direction of the trend. In the next article, we will be discussing how we can enter a trade using moving averages and profit from this indicator.

[wp_quiz id=”65733″]
Categories
Forex Daily Topic Forex Price Action

Riding on a Trend is rewarding

The trend is the trader’s friend. To be able to spot the trend and reversal point are the two most important factors of price action trading. In the Forex market on the minor charts, trend changes in a second. However, the trend usually continues on major charts such as the H4, the daily as well as weekly. In today’s lesson, we are going to demonstrate an example of how we can ride on a trend and make most of it.

The chart shows that after making a strong bearish move, the price produces three consecutive bullish corrective candles. It finds its support and creates a bearish engulfing candle closing below consolidation support. The sellers may trigger a short entry right after the last candle closes. Let us proceed to the next chart.

The price heads towards the South and hits 1R. Look at the last candle. The candle comes out as a bearish engulfing candle as well after a long consolidation. However, the sellers on this chart shall skip taking this entry for its shallow consolidation. Let us find out what happens next.

The price again consolidates and produces another bearish engulfing candle. The sellers may trigger another short entry right after the last candle closes. This is the second entry of the trend.

As expected, the price again heads towards the South. This time the price moves with strong bearish momentum. The sellers again make some profit here. Let us proceed to the next chart.

The chart after producing one stronger bearish candle consolidates. This time the chart presents an A+ trade setup with deep consolidation and a strong bearish engulfing candle. The sellers may trigger another short entry here with 1R.

This is what tells the story of the Forex market. This one has been the best entry so far on this chart. However, the price does not head towards the trend’s direction as expected. Nevertheless, it hits the target again (1R). The sellers again make some pips. Altogether, it offers three entries and this is called riding on a trend. By looking at the chart, it seems it may provide more. The buyers must stay out of this chart until it produces a strong bullish reversal.

Meanwhile, the sellers shall keep eying on the chart to go short with the same process. It does not happen so often but when it does, traders shall make most of it. As they say, “Trend is your Friend,” and we have just demonstrated that riding on a trend is very rewarding.

Categories
Forex Trading Guides Ichimoku

Ichimoku Kinko Hyo Guide – A walk through a trade.

Ichimoku Kinko Hyo Guide – A walk through a trade.

I want to preface this guide with a screenshot of my account.

Trade History
Trade History

The screenshot is a series of some of the trades I’ve made in early April 2019. I do this because this guide on trading with Ichimoku will target the trade that is highlighted. Additionally, I think it is important that if I am showing you an example of a trade for a guide, I should show that I had skin in the game. There are a great many guides and strategies that authors, analysts, and traders suggest, but few will share if they took the trade. The highlighted trade for the EURGBP is the trade I will be using for this guide. It is a great example of the trading methodology I use with the Ichimoku System.


Multiple Timeframe Analysis – Daily, 4-Hour, and 1-Hour

The Ichimoku Kinko Hyo system is most effective when utilizing multiple timeframes. It is the only way that I use the Ichimoku system. In my trading, I use the Daily, 4-hour, and 1-hour time frames. Multiple timeframes are extremely useful in filtering your trade entries and ensuring higher probability trade setups. The process below will go through the process I used to take the trade.

Step One – Daily Chart Check: Price greater than Kijun-Sen, NOT inside the Cloud.

Step One - Check Daily Cloud
Step One – Check Daily Cloud

The very first thing I check is the daily chart. If the price is inside the Cloud on the daily chart, I skip the chart. It’s dead to me. If the price is not inside the Cloud, I then look for where the price is in relation to the Kijun-Sen. The daily chart determines my trading direction. If the price is above the Kijun-Sen, I only take long trades. If the price is below the Kijun-Sen, I only take short trades.

Step Two – 4-Hour Chart Check: Price above the Cloud, Chikou Span above candlesticks.

Step Two - Check 4-hour chart.
Step Two – Check the 4-hour chart.

If the daily chart determines the direction of my trading, the 4-hour provides the filter for the entry chart (the 1-hour chart). The only things I am concerned about with the 4-hour chart is that the Chikou Span is above the candlesticks, and that price is above the Cloud. Preferably, the Chikou Span would also be in ‘open space’ – but I don’t use it as a hard rule. I have not found the open space to be as important during the change of a trend or corrective move.

(a note about ‘Open Space’ – Open Space is a condition where the Chikou Span won’t intercept any candlesticks over the next five to ten trading periods. When the Chikou Span is in open space, this represents ease of movement in the direction of the trend with little in the form of resistance (or support) ahead.)

The EURGBP trade we are analyzing is a good example of why, at the current position, I don’t consider the open space as strict as I would on the hourly. I want to refer you back to the daily chart. If, on the daily chart, both price and the Kijun-Sen are below the daily cloud, but price moves above the Kijun-Sen – I don’t consider the open space variable as important on the 4-hour chart.

Step Three – 1-Hour Chart Check

Step Three - 1-hour Entry
Step Three – 1-hour Entry

The 1-Hour chart is my entry chart. As long as Step One and Step Two are true, the 1-hour chart is where the bread and butter of the trading occurs. My entry rules are this:

  1. Future Span A is greater than Future Span B.
  2. Chikou Span above the candlesticks and in ‘open space’ – for five periods.
  3. Tenkan-Sen is greater than Kijun-Sen
  4. Price is greater than the Tenkan-Sen and Kijun-Sen.

I generally look for a profit target of 20-40 pips, depending on the FX pair. For example, on the NZDUSD, I would look for 20 pips, and on the GBPNZD, I would look for 40 pips. But there are some hard technical reasons to leave a trade before that profit target is hit. The list below represents my exit rules on the 1-hour Chart – I exit the trade if any of these conditions occur.

  1. Exit if Chikou Span below candlesticks for more than three consecutive candlesticks.
  2. Exit if price enters the 1-hour Cloud.
  3. Exit if Tenkan-Sen below the Kijun-Sen for more than five candlesticks.

Step Four – Reentry Rules

Step Four - Reentry
Step Four – Reentry

Entry rules are fine, but the problem isn’t always finding the entry. One of the hardest problems is creating rules for re-entering a trade. Mine are as follows:

  1. Tenkan-Sen and Kijun-Sen must be above the Cloud.
  2. Chikou Span above the candlesticks.
  3. Price greater than Kijun-Sen and Tenkan-Sen.

A quick summary of steps taken

  1. Checked the daily chart, the price was above the daily Kijun-Sen. The trade direction is long/buy.
  2. Check the 4-hour chart, the price was above the Cloud, and the Chikou Span was above the candlesticks.
  3. All 1-hour rules confirmed an entry; profit taken at 40 pips.
  4. Re-entered trade on 1-hour chart, exited when price entered the 1-hour Cloud.


Sources: Péloille, Karen. (2017). Trading with Ichimoku: a practical guide to low-risk Ichimoku strategies. Petersfield, Hampshire: Harriman House Ltd.

Patel, M. (2010). Trading with Ichimoku clouds: the essential guide to Ichimoku Kinko Hyo technical analysis. Hoboken, NJ: John Wiley & Sons.

Linton, D. (2010). Cloud charts: trading success with the Ichimoku Technique. London: Updata.

Elliot, N. (2012). Ichimoku charts: an introduction to Ichimoku Kinko Clouds. Petersfield, Hampshire: Harriman House Ltd.


Categories
Ichimoku

The Three Principles – Timespan Principle

The Three Principles – Timespan Principle

In another correlation to Western analysis, Hosada’s Ichimoku Kinko Hyo system has a timing component within the system. The numbering system used in Ichimoku is unique when compared to Western analysis. The reason for the numbering and counts in Ichimoku is related to the cultural importance of some numbers in Japan versus others. Numbers that would be considered ‘lucky’ in Japan are the same numbers in the West and many other cultures – particularly 7 and 9. But those numbers themselves are not what is important. How, exactly, this numbering and count system came to be developed in the fashion that it was developed I do not know. The following is directly from Ichimoku Chats – An Introduction to Ichimoku Kinko Clouds by Nicole Elliot – I heavily suggest getting her book (the 2nd edition). The important numbers are:

9, 17, 26, 33, 42, 65, 76, 129, 172, 257

If you ever study the work of WD Gann, then these numbers are not only familiar but non-random.

Numbering

Numbering the candlesticks in a pattern is done with traditional Arabic numbers (1,2,3,4,5, etc.) and English letters (A, B, C, D, E, etc.). When counting how many candles are in a trend/wave, the last candle in an uptrend is counted as the first in the down wave and vice versa. See below:

Timespan Principle - Candle Counts
Timespan Principle – Candle Counts

Notice that candle 19 is also A, candle H is also 1. Also, notice that the time counts (total number of candles) in this ‘N’ wave all represent essential numbers in the Ichimoku number system. 19 is close to 17, H is close to 9, and 8 is close to 9.

Kihon Suchi – ‘Day of the turn.’

Nicole Elliot’s work is fantastic – it’s refreshing to read an analyst and trader who updates her work and goes through the grueling process of keeping it relevant. Kijun Suchi (‘the day of the turn’). The Kihon Suchi is the Hosada’s Timespan Principle put into practice. It is very similar to the use of Gann’s cycles of the Inner Year or horizontal Point & Figure counts to identify turns in the markets. Let’s use the image above again as an example. Below, I’ve separated the ‘N’ wave into A, B, and C.

Timepsan Principle - Combined Counts
Timespan Principle – Combined Counts

When adding the number of bars in A, B, and C, we always subtract 1 from each wave after the first. For example, if we counted five waves and the total was 100 bars, we would subtract 4 from 100; 96. On the chart above, the total number of bars of A, B, and C is 33 bars. We subtract 2 from 33 to get 31. This is where the Timespan Principle using Kihon Suchi comes into play. We should be able to project the end of the down drive that will occur after wave C. Does it work? Let’s see.

Timespan Principle - A+B+C = D
Timespan Principle – A+B+C = D

Below is another example. In reality, the use of the Timespan Principle is a very simplified version of a phenomenon known as a foldback pattern. But Japanese analysis focuses on the quality of equilibrium, so it makes sense to see this kind of behavior from a method that focuses on balance in all things.

Timespan Principle - Symmetrical Inverse Head & Shoulder Pattern
Timespan Principle – Symmetrical Inverse Head & Shoulder Pattern


Sources: Péloille, Karen. (2017). Trading with Ichimoku: a practical guide to low-risk Ichimoku strategies. Petersfield, Hampshire: Harriman House Ltd.

Patel, M. (2010). Trading with Ichimoku clouds: the essential guide to Ichimoku Kinko Hyo technical analysis. Hoboken, NJ: John Wiley & Sons.

Linton, D. (2010). Cloud charts: trading success with the Ichimoku Technique. London: Updata.

Elliot, N. (2012). Ichimoku charts: an introduction to Ichimoku Kinko Clouds. Petersfield, Hampshire: Harriman House Ltd.


Categories
Ichimoku

Ichimoku – The Two Clouds Discovery

The Two Clouds Discovery

In Manesh Patel’s book, Trading with Ichimoku Cloud – The Essential Guide to Ichimoku Kinko Hyo Technical Analysis, he made a fantastic discovery. When I first read his work, I almost missed it. Whether he knows it or not, Mr. Patel made a discovery and an observation that his peers have not written about in their work. I call this the ‘Two Clouds Discovery.’ It’s one of those moments where you know you’ve probably been aware of this phenomena, but no one put words to it. It’s one of those things where you go, ‘huh, why didn’t I think of that?’ or ‘I can’t believe no one else noticed this.’

Two Clouds

The Two Clouds discovery puts a label on the component we already know: the Kumo (Cloud). The names we are giving to these two components are the Current Cloud and the Future Cloud. The Current Cloud is where price action is currently trading. The Future Cloud is the further point of Senkou Span A and Senkou Span B – so Future Senkou Span A and Future Senkou Span B. It’s important to think of it this way:

The Current Cloud is the average of the Tenkan-Sen and Kijun-Sen from 26 periods ago.

The Future Cloud is the current average of the Tenkan-Sen and Kijun-Sen.

And here is the main point and of the Two Clouds Discovery: When a significant trend change occurs, the Future Cloud is thin with both the current Senkou Span and Senkou Span B pointing in the direction of the Future Cloud.

The image below is Gold’s daily chart. Using the market replay feature in TradingView, I have used November 20th, 2018, as the starting point for this article. It’s important to remember what we are looking for: Current Senkou Span A and Current Senkou Span B pointing in the direction of Future Senkou Span B and Future Senkou Span A.

First, we look to see if the Future Cloud is thin. The thickness or thinness of the Cloud is going to be very subjective, but I believe most people can determine whether something is thick or thin based on the instrument they trade and the timeframe they are trading in. For Gold, this is a thin cloud.

Thin Future Cloud

Next, we want to see if the Current Senkou Span A and Current Senkou Span B are pointing in the direction of the Future Cloud – they are.

Current Senkou Span A and Current Senkou Span B

Now, let’s see what happens when we populate the screen with the price action that occurred after November 20th, 2018. What we should see if a significant trend change is occurring when both the Current Senkou Span A and Current Senkou Span B are pointing in the direction of a thin Future Cloud.

Bull Move

Go through any Daily or Weekly chart and find a thin Cloud and then utilize the market replay – odds are you will see what I have discovered: a high positive expectancy rate of markets trending strongly when price is trading near where the current Senkou Span A and current Senkou Span B are pointing towards the direction of a thin Future Cloud.


Sources: Péloille, Karen. (2017). Trading with Ichimoku: a practical guide to low-risk Ichimoku strategies. Petersfield, Hampshire: Harriman House Ltd.

Patel, M. (2010). Trading with Ichimoku clouds: the essential guide to Ichimoku Kinko Hyo technical analysis. Hoboken, NJ: John Wiley & Sons.

Linton, D. (2010). Cloud charts: trading success with the Ichimoku Technique. London: Updata.

Elliot, N. (2012). Ichimoku charts: an introduction to Ichimoku Kinko Clouds. Petersfield, Hampshire: Harriman House Ltd.


Categories
Ichimoku

Ichimoku Strategy #2 – K-Cross, The Day Trading Strategy

The Kijun-Sen Crossover (Crossunder) Strategy is the second in my series over Ichimoku Kinko Hyo. There are two trades setups provided for the long and short side of a market. This strategy also comes from Manesh Patel’s book, Trading with Ichimoku Clouds: The essential guide to Ichimoku Kinko Hyo technical analysis.

Patel called this the day-trading strategy. He warned that this trading strategy has the lowest risk factor out of all of his strategies. The positive expectancy rate is lower, and so being stopped out of trades is a normal consequence of this strategy. He also indicated that the win/loss ratio could be extremely high.

Kijun-Sen Cross Bullish Rules

  1. Price crosses above the Kijun-Sen.
  2. Tenkan-Sen greater than the Kijun-Sen.
    1. If the Tenkan-Sen is less than the Kijun-Sen, then the Tenkan-Sen should be pointing up while the Kijun-Sen is flat.
  3. Chikou Span in open space.
  4. Future Senkout Span B is flat or pointing up.
    1. If Future Senkou Span A is less than Future Senkou Span B, then Future Senkou Span A must be pointing up.
  5. Price, Tenkan-Sen, Kijun-Sen, and Chikou Span should not be in the Cloud. If they are, it should be a thick cloud.
  6. Price not far from the Tenkan-Sen or Kijun-Sen
  7. Optional: Future Cloud is not thick.
K-Cross Strategy Bullish Entry


Kijun-Sen Cross Bearish Rules

  1. Prices cross below the Kijun-Sen.
  2. Tenkan-Sen less than the Kijun-Sen.
    1. If the Tenkan-Sen is less than the Kijun-Sen, then the Tenkan-Sen should be pointing up while the Kijun-Sen is flat.
  3. Chikou Span in open space.
  4. Future Senkou Span B is flat for pointing down.
    1. If Future Senkou Span A is greater than Future Senkou Span B, then Future Senkou Span A must be pointing down.
  5. Price, Tenkan-Sen, Kijun-Sen, and Chikou Span should not be in the Cloud. If they are, it should be a thick Cloud.
  6. Price not far from the Tenkan-Sen or Kijun-Sen
  7. Optional: Future Cloud is not thick.
K-Cross Strategy Bearish Entry


Sources: Péloille Karen. (2017). Trading with Ichimoku: a practical guide to low-risk Ichimoku strategies. Petersfield, Hampshire: Harriman House Ltd.

Patel, M. (2010). Trading with Ichimoku clouds: the essential guide to Ichimoku Kinko Hyo technical analysis. Hoboken, NJ: John Wiley & Sons.

Linton, D. (2010). Cloud charts: trading success with the Ichimoku Technique. London: Updata.

Elliot, N. (2012). Ichimoku charts: an introduction to Ichimoku Kinko Clouds. Petersfield, Hampshire: Harriman House Ltd.

Categories
Forex Harmonic

The Bat Pattern

Harmonic Pattern Example: Bearish Bat

The Bat Pattern

The Bat Pattern is another harmonic pattern that was not identified by Gartley, but instead by the great Scott M. Carney – found in Volume One of his Harmonic Trading series (I believe that Mr. Carney’s work is essential in your trading library).

I am particularly grateful to Carney’s work because it was his work that introduced me to a very powerful Fibonacci retracement level: 88.6%. Previously, I have followed Connie Brown’s suggestions in her various books utilizing only the 23.6%, 50%, and 61.8% Fibonacci levels – the 88.6% is now a near-constant in my own analysis and trading. That particular level, the 88.6% level, is the primary level to reach with the Bat pattern.

One of the key characteristics of this pattern is the strength, power, and speed of the reversals that occur after a confirmed and completed pattern is verified. As a Gann based trader, this is the pattern I personally look for to identify the ‘confirmation’ swing in a new trend (the first higher low in a reversing downtrend and the first lower high in a reversing uptrend).

Bat Pattern Elements

  1. B wave must be less than the 61.8% retracement of XA – ideally the 38.2% or 50%.
  2. BC projection must be at least 1.618.
  3. The AB=CD pattern is required and is often extended.
  4. C has an expansive range between 38.2% and 88.6%.
  5. The 88.6% Fibonacci retracement is a defining and particular level to the Bat Pattern.
  6. The 88.% D retracement is the defining and exact limit of the end of this pattern.

Ideal Bullish Bat Conditions

  1. 50% retracement of XA.
  2. Exact 88.6% D retracement of XA.
  3. BC wave 200%.
  4. Alternate AB=CD 127% is required.
  5. C should be inside the 50% and 61.8% retracement range.

Ideal Bearish Bat Conditions

  1. B wave must be less than the 61.8% retracement of XA – ideally the 38.2% or 50%.
  2. BC projection must be at least 88.6%.
  3. BC projection minimum of 161.8% with the max extensions between 200% to 261.8%.
  4. AB=CD is required, but the Alternate 127% AB=CD is ideal.
  5. C wave retracement can vary between the 38.2% to 88.6% retracement levels.


Sources: Carney, S. M. (2010). Harmonic trading. Upper Saddle River, NJ: Financial Times/Prentice Hall.  Gilmore, B. T. (2000). Geometry of markets. Greenville, SC: Traders Press.  Pesavento, L., & Jouflas, L. (2008). Trade what you see: how to profit from pattern recognition. Hoboken: Wiley.

Categories
Forex Harmonic

The Butterfly Pattern

Butterfly Harmonic Pattern Example: Bearish Butterfly

The Butterfly

The Butterfly pattern is a harmonic pattern discovered by Bryce Gilmore. Gilmore is the author of Geometry or Markets (now in its 4th Edition, initially published in 1987)– a must-read for those interested in harmonics patterns. He is the creator of his proprietary software called WaveTrader. The Butterfly is one of the most potent harmonic patterns because of the nature of where it shows up. Both Carney and Pesavento stress that this pattern typically shows the significant highs and significant lows of a trend. In fact, in utilizing multiple time frame analysis, it is not uncommon to see several Butterfly patterns show up in various timeframes all at the end of a trend (example: the end of a bull trend can show a bearish butterfly on a daily chart with a 4-hour and 1-hour chart showing a bearish butterfly ending at the same time). This pattern is an example of an extension pattern and is generally formed when a Gartley pattern (the Gartley Harmonic pattern) is invalidated by the CD wave moving beyond X. From a price action perspective, this is the kind of move where one would ‘assume’ a new high or low should be established, but extreme fear or greed takes over and causes prices to accelerate in both volume and price to end a trend.

Failure, Symmetry, and Thrust

Pesavento identified three crucial characteristics of the Butterfly pattern.

Thrust – C should be observed as an indicator of whether a Gartley or Butterfly pattern will form. He indicated specific Fibonacci levels that are important for gaps – but that is important for equity markets that are rife with gaps. That is not important for us in Forex markets (gaps in Forex are rare intra-week and typically form only on the Chicago Sunday open, Forex also has an extremely high degree of gaps filling). He noted that thrusts out of the CD wave point to a high probability of new 161.8% extensions rather than a 127.2% extension.


Symmetry – The slope of the AB and CD wave in the AB=CD should be observed strictly. Depending on how steep the angle is on the CD wave, this could indicate a Butterfly pattern is going to be formed. Pesavento also noted that the number of bars should be equal (10 bars in AB should also be 10 bars in CD). Regarding the steepness of the CD wave, this is where Gann can become instrumental. In my trading, and depending on the instrument and market, I utilize Gann’s various Squares (Square of 144, Square of 90, Square of 52, etc.). If you use a chart that is properly squared in price and time, there is very little ambiguity involved in identifying the speed of the slope of a CD wave.


Failure Signs – Very merely put, Pesavento called for close attention to any move that extends beyond the 161.8% XA expansion. And this is an excellent point because one of the most dangerous things we can do as traders is an attempt to put to much weight on a specific style of analysis. It’s easy to think, ‘well, the Butterfly pattern is strong, so if it completes that must be the high or low.’ That is a very foolish and dangerous assumption to make. When markets, even Forex, make new highs or lows in their respective trends, that is generally a sign of strength. So while the Butterfly pattern does indicate the end of a trend – common sense confirmation is still required. The Butterfly pattern should help confirm the end of a trend, not define it.


The Five Negations

Continuing on with the great work of Pesavento and Jouflas, they identified five conditions that would invalidate a Butterfly pattern:

  1. No AB=CD in the AD wave.
  2. A move beyond the 261.8% extension.
  3. B above X (sell) or B below X (buy).
  4. C above A or C Below A, respectively.
  5. D must extend beyond X.


Ideal Butterfly Pattern Conditions

Carney identified six ideal conditions for a Butterfly pattern. You will note that the combination of Pesavento and Jouflas’s work greatly compliments Carney’s.

  1. Precise 78.6% retracement of B from the XA wave. The 78.6% B retracement is required.
  2. BC must be at least 161.8%.
  3. AB=CD is required – the Alternate 127% AB=CD is the most common.
  4. 127% projection is the most critical number in the PRZ (Potential Reversal Zone).
  5. No 161.8% projection.
  6. C should be within its 38.2% to 88.6% Fibonacci retracement.

Sources: Carney, S. M. (2010). Harmonic trading. Upper Saddle River, NJ: Financial Times/Prentice Hall.  Gilmore, B. T. (2000). Geometry of markets. Greenville, SC: Traders Press.  Pesavento, L., & Jouflas, L. (2008). Trade what you see: how to profit from pattern recognition. Hoboken: Wiley.

Categories
Forex Indicators

The Truth About Moving Averages

Moving Averages

Of all the technical indicators that exist, moving averages are probably the most well known. Moving averages are also one of the only technical indicators ever used by market news broadcasters. Moving averages are generally one of the first types of indicators that new analysts and traders will learn about because they simple to calculate and simple to interpret. But are moving averages useful for trading? Are they appropriate for trading?

Dangers of Moving Averages

I want to preface any further commentary on moving averages by saying I am strictly opposed to their use. Outside of any singular purpose for their use, I will never advocate for their use of an analytical tool or a trading tool. The reasons for this opinion are my own trading experience, and the experience of teaching students – who have all (myself included) fell into the old trap of moving average crossover systems and the lies that are sold about their usefulness and profitability. That is not to say they are not helpful, useful, or profitable – but the temptation to believe in their positive expectancy and profitability is often too hard to avoid.


Moving Averages: A simple visual representation of data

20-period Simple Moving Average

The orange line on the chart above is a moving average — specifically, a Simple Moving Average (SMA). A Simple Moving Average is a line that is plotted, showing the average close of a defined number of periods. On the chart above, it is a 10-period moving average. Meaning it is taking the last ten candlestick closes, adding them up, dividing that number by ten, and then displaying it as a line. But a Simple Moving Average is just one type of average. There is an enormous amount of various moving averages, each with their specific calculations. The chart below shows only some of those different moving averages, all with a 10-period average.

Various moving averages

From the image above, you can probably say that, depending on the moving average used, some averages are more responsive to price changes than others. Some move a lot; some move just a little. There is a myriad of different reasons why one moving average would be used over another, and there are specific moving averages that to be used only with particular trading systems and methods. Now, after I’ve bashed moving averages, I think it’s essential that I do show some examples of moving averages positively. The first would be using a long period moving average on a higher time frame. For example, a standard method of determining whether a stock is bullish or bearish is to use a 200-period on a daily chart. If a stock is trading above the 200-day average, it is considered bullish; if it is trading below, it is bearish.

200-day Moving Average of S&P500

Another example of a trading system using moving averages effectively would be Goichi Hosada’s Ichimoku Kinko Hyo system. This system will be discussed in much greater detail in another article, but the Ichimoku system is based almost entirely on moving averages. There is a significant difference between Western moving averages and Japanese moving averages. The Tenkan-Sen and Kijun-Sen in the Ichimoku system are calculated using the mid-point of the default periods. The utilization of the mid-point is particular not to just the Ichimoku system but is indicative of a large amount of Japanese analysis, which focuses on ‘balance’ and ‘equilibrium.’ So while I do rail against the use of Western moving averages, the use of the Ichimoku system’s moving averages is undoubtedly a significant exception due to it being a full trading system and one of the few trading systems that are a proven and profitable system.

Ichimoku Kinko Hyo
Categories
Forex Indicators

Let’s Trade Divergences!

Trading with Divergences

Almost all forms of technical analysis involve the use of lagging indicators – or lagging analysis. There are very few indicators that use any type of leading analysis. That is because we don’t know what will happen. All we can do is interpret what kind of future behavior may occur based on past events – this is the basis of all psychology and significant portions of medicine: we can only predict future behavior by analyzing past behavior. Now, just because most of the tools and theories used in technical analysis are lagging in nature – it doesn’t mean that there is no method of leading analysis.

Divergences are one method of turning lagging analysis into leading analysis – it’s not 100% accurate, but divergences can detect anomalies and differences in normal price behavior. Divergences are useful in identifying when a significant trend may be ending or when a pullback may continue in the prior trend direction. Let’s review some of those now.

Divergences are easily one of the most complex components to learn in technical analysis. First, they are challenging to identify when you are starting. Second, it can be confusing trying to remember which divergence is which and if you compare highs or lows. It is essential to know those divergences themselves are not sufficient to decide whether or not to take a trade – they help confirm trades.

When we look for divergences, we are looking for discrepancies between the directions of highs and lows in price against another indicator/oscillator. The RSI is the oscillator used for this lesson. We are going to review the four main types of divergences:

  1. Bullish Divergence
  2. Bearish Divergence
  3. Hidden Bullish Divergence
  4. Hidden Bearish Divergence

Bullish divergence

Bullish Divergence

A bullish divergence occurs, generally, at the end of a downtrend. In all forms of bullish divergences, we compare swing lows in price and the oscillator. For a bullish divergence to happen, we should observe price making new lower lows and the oscillator making new higher lows. When bullish divergence occurs, prices will usually rally or consolidate.

Bearish divergence

Bearish Divergence

A bearish divergence is the inverse of a bullish divergence. A bearish divergence occurs near the end of an uptrend and gives a warning that the trend may change. In all forms of bearish divergence, we compare swing highs in price and the oscillator. For a bearish divergence to happen, we should observe price making new higher highs and the oscillator making new lower highs.

Hidden divergences

The last two divergences are known as hidden divergences. Hidden does not mean that it is difficult to see or hard to find – rather, it shows where a short term change in direction is actually a continuation move. Think of it as a pullback or a throwback in a larger uptrend or downtrend. Hidden divergences tell you of a probable continuation of a trend, not a broad trend change. If you combine these with common pullback and throwback patterns such as flags and pennants, then the identification and strength of a hidden divergence can yield extremely positive results.

Hidden Bullish Divergence

Hidden Bullish Divergence

A hidden bullish divergence can appear in uptrends and downtrends but is only valid if there is an existing uptrend. It’s easier to think of hidden bullish divergences as pullbacks or continuation patterns. For hidden bullish divergences, we should observe price making new higher lows and the oscillator making new lower lows. The expected price behavior is a continuation of higher prices.

Hidden Bearish Divergence

Hidden Bearish Divergence

Our final divergence is hidden bearish divergence. Just like hidden bullish divergence, hidden bearish divergence can appear in both uptrends and downtrends but is only valid in an existing downtrend. Hidden bearish divergence is identified when price makes lower highs, and the oscillator makes new higher highs. We should observe a resumption in the prior downtrend when hidden bearish divergence is identified.

Key Points

Regular Bullish Divergence
  • End of a downtrend.
  • Often the second swing low.
  • Price makes new Lower Lows, but the oscillator makes Higher Lows.
  • Trend changes to the upside.
Regular Bearish Divergence
  • End of an uptrend.
  • Often the second swing high.
  • Price makes Higher Highs, but the oscillator makes Lower Highs.
  • Trend changes to the downside.
Hidden Bullish Divergence
  • Valid only during an uptrend.
  • Price makes Higher Lows, but the oscillator makes a Lower Low.
  • The trend should continue to the upside.
Hidden Bearish Divergence
  • Valid only during a downtrend.
  • Price makes Lower Highs, but the oscillator makes Higher Highs.
  • The trend should continue to the downside.

Final words

It may be confusing trying to remember which divergence is which and you’ll find yourself asking questions such as, “do I use highs on this divergence or lows?” It’s easier to think about measuring divergences like this:

All Bullish divergences are going to compare lows to lows – lows in price and lows in an oscillator.

All Bearish divergences are going to compare highs to highs – highs in price and highs in an oscillator.

Categories
Forex Candlesticks Forex Daily Topic

Three Facts about Candlesticks you Never Knew About

Candlesticks are great because it makes trends visual at first glance. But most candlestick users stay just with that trait and don’t go more in-depth.

Of course, everybody knows some candlestick patterns such as Morning and Evening Stars, Haramis, Dojis and Shooting stars, but what’ is hiding inside the candlestick?. How to extract market sentiment from its shape or pattern?

So, let’s begin!

1 – Unwrapping a Candlestick

A candlestick is condensed information of the price action within its timeframe. The corollary is that if we go to a shorter timeframe, the candlestick now is a pattern of several candlesticks.

In the chart here we see the unwrapping of a 4H candle into 30-min parts

Three Facts about Candlesticks you Never Knew About

Chart 1 – 4H Hammer Candlestick unwrapped into 30-min candles.


We notice that the candle has one segment dominated by sellers and the other part controlled by buyers.

Which sentiment dominates in sellers at the bottom?

  • To the first class belong those traders who could no longer hold the pain of being long and close their position.
  • The second class is made of those who came late to the trend and sold believing the trend will last forever, or quite so.

Which sentiment dominates in the way back up?

  • Late sellers realized that they were in the losing side, so they needed to close their shorts. That meant, they have to buy, adding to the bullish fuel
  • Longs that were taken out of their position see frustrated how the price moves up without them. Hence, some of them retake their longs, while others don’t dare, afraid this is going to be another bull squeeze.

2.- Impulse or correction?

There are only two stages in the market: Impulses and corrections of previous impulses. So how to spot the price is in an impulsive or corrective phase?

Three Facts about Candlesticks you Never Knew About II

Chart 2 – Candlesticks: impulses and corrections.

Impulses break resistances and move with a clear direction. Impulses are what make trends. Corrections move in ranges, lack direction, and usually retraces some or all the advances of the previous impulse.  People usually think in trends as composed by many candlesticks or bars, but we now know that a single candlestick is composed by many shorter-timeframe candlesticks. Therefore, we cannot be surprised if we state that a trend can be made of a single candlestick. That applies also to corrective movements. A corrective movement can be summarised in a single candlestick.

How to know if a candle is impulsive or corrective?

To spot an impulse look for a candlestick with a large body and almost no wicks or shadows. To spot a corrective movement look for small-bodied candles with or without wicks ( usually with wicks).  Sometimes we find both characteristics in a candlestick. That may mean it is a combination of impulse and correction. That is ok since there is no law that forbids the start of a correction or impulse in the middle of the timeframe of a candle. Sorry, the universe is not perfect!

3.- Who is in control?

Once we know facts 1 and 2, we are in the position to spot who controls the price action: buyers or sellers.

One clue is, of course how the candlestick closes, but the other clue is where are and how long are wicks. If we spot several candlesticks with large lower wicks we could reason that the buyers are pushing the price above the bottom of the candlesticks. If wicks happen on top we could deduct the opposite: Sellers selling the rally.

Three Facts about Candlesticks you Never Knew About III

Chart 3 – Candlesticks: Wicks show who controls the price action

A downward trend with a lot of lower wicks is weak. That applies to an upward trend with lots of upper wicks.  Therefore, we can detect the market sentiment by just observing the wick appearance on the candlesticks.


Final words

So now we know that there is much more than just fancy colors and trend visualization. We have to inspect and pay attention to body and wicks, also called shadows by Steve Nison. The information provided by a single or a group or candlesticks is worth the time spent.


Categories
Forex Basics

Everything you should master to Detect Trends, and more!

Introduction

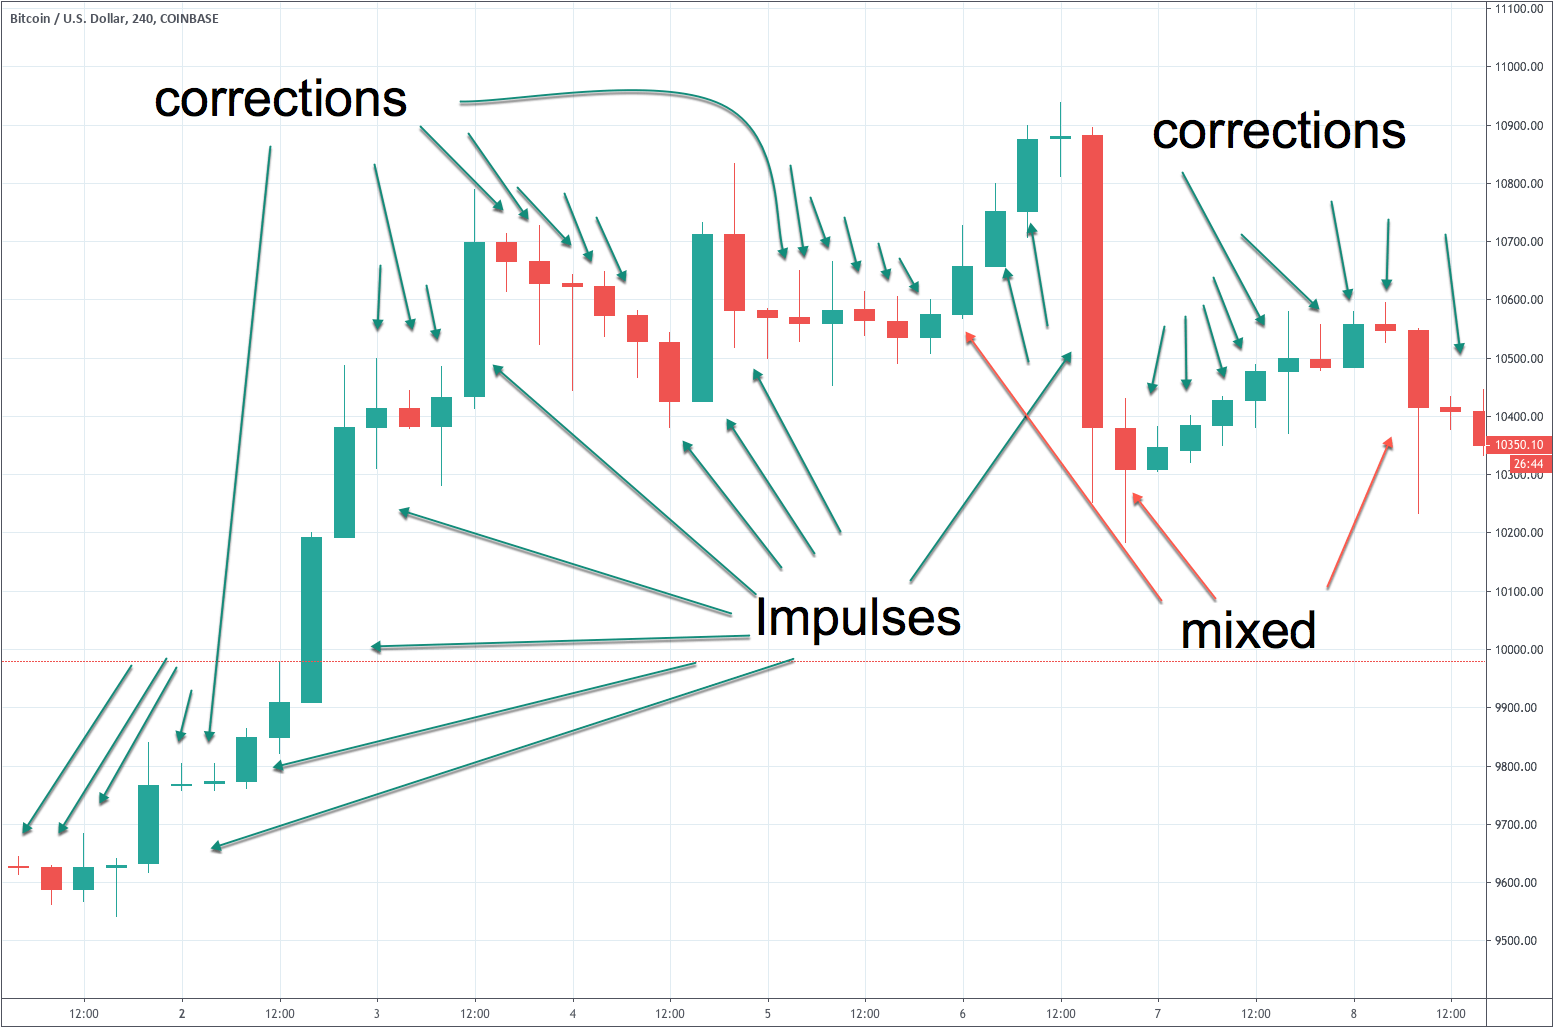
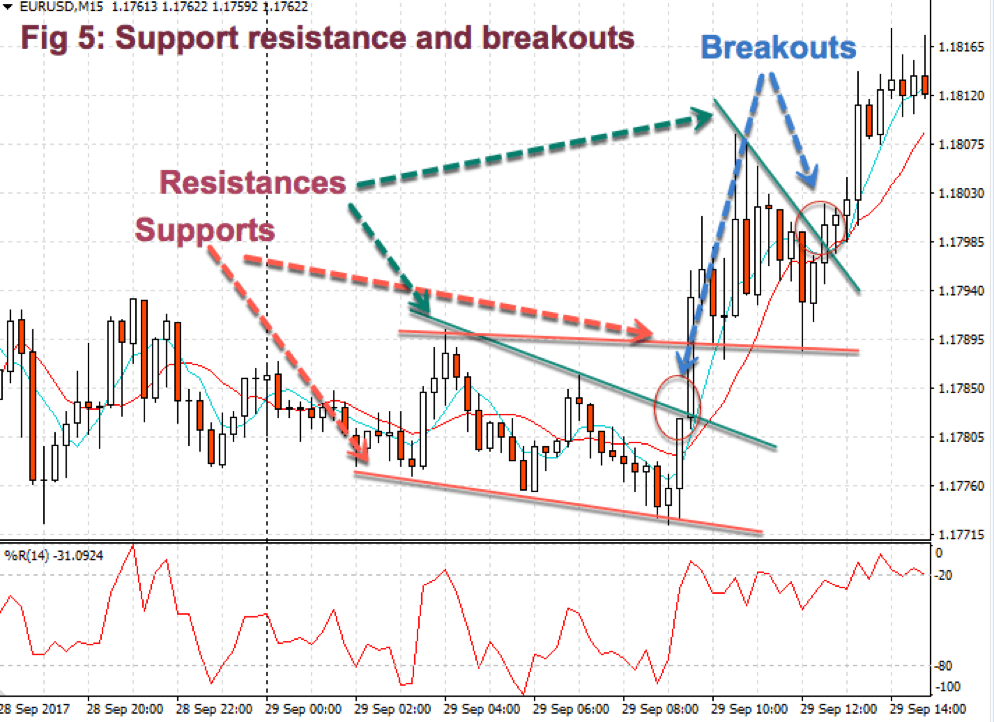
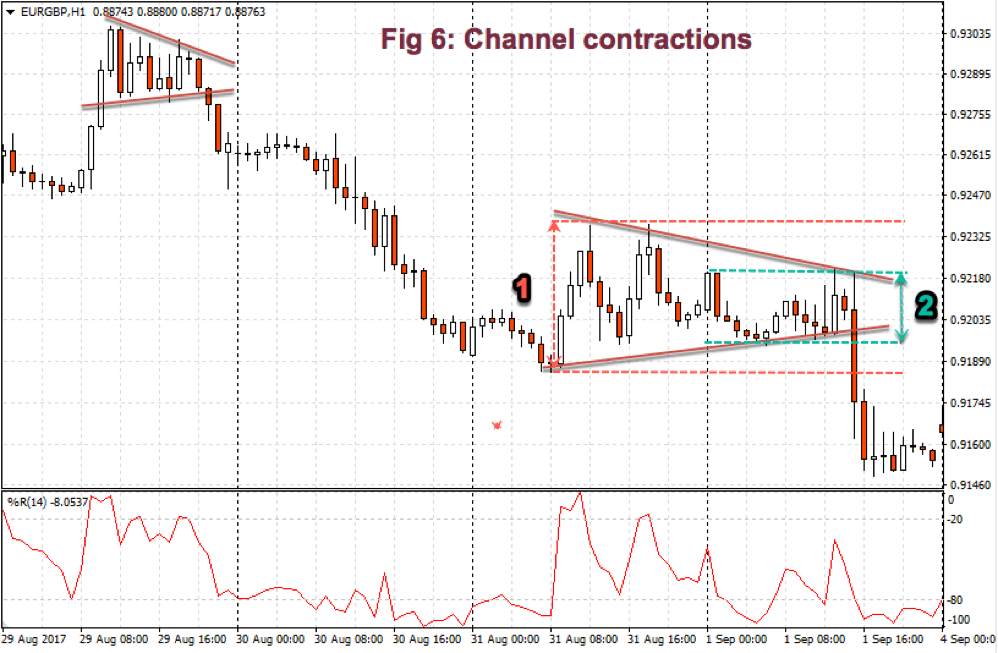
In chapter 1, we’ve set the foundations of market classification, what a trend is about, and the dissection of a trend in its several phases. Then we talked about its two dissimilar wave parts: an impulsive wave, followed by a corrective wave.  We dealt with support, resistance, and breakouts. Finally, we talked about channel contractions.

In this second chapter, we’ll learn the methods available in the early discovery of trends: Trendlines, moving averages, and Bollinger band channels.

Trendlines

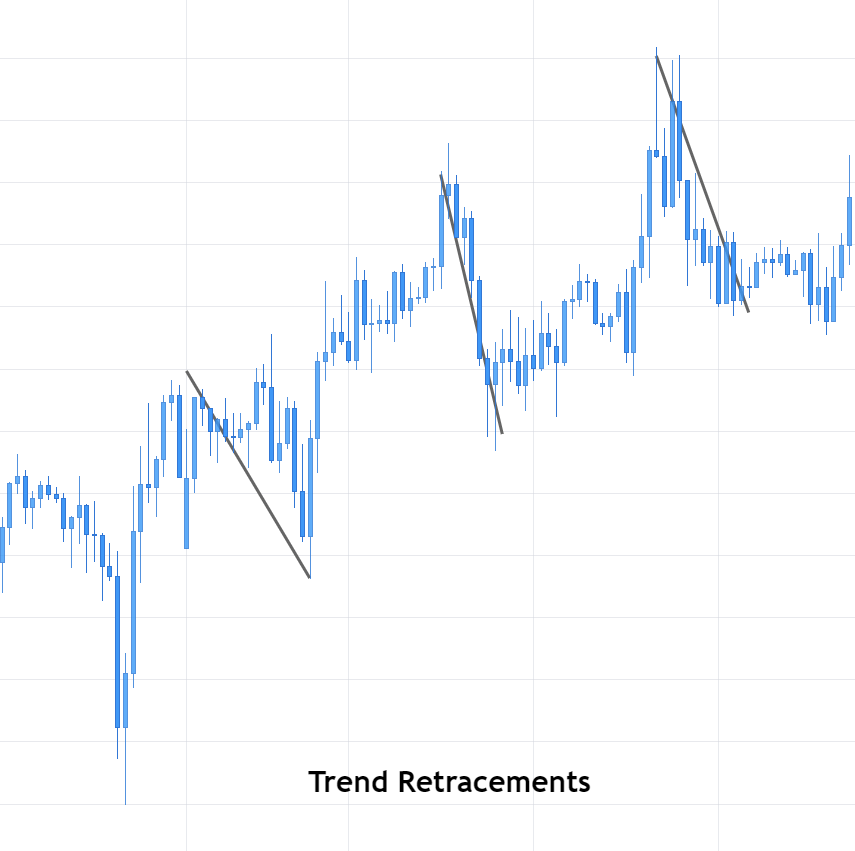
A trendline is a line drawn touching two or more lows or highs of a bar or candlestick chart. The convention is to draw the line touching the lows if it’s an uptrend and the tops on a downtrend. Sometimes both are drawn to form a channel where the majority of prices fit.

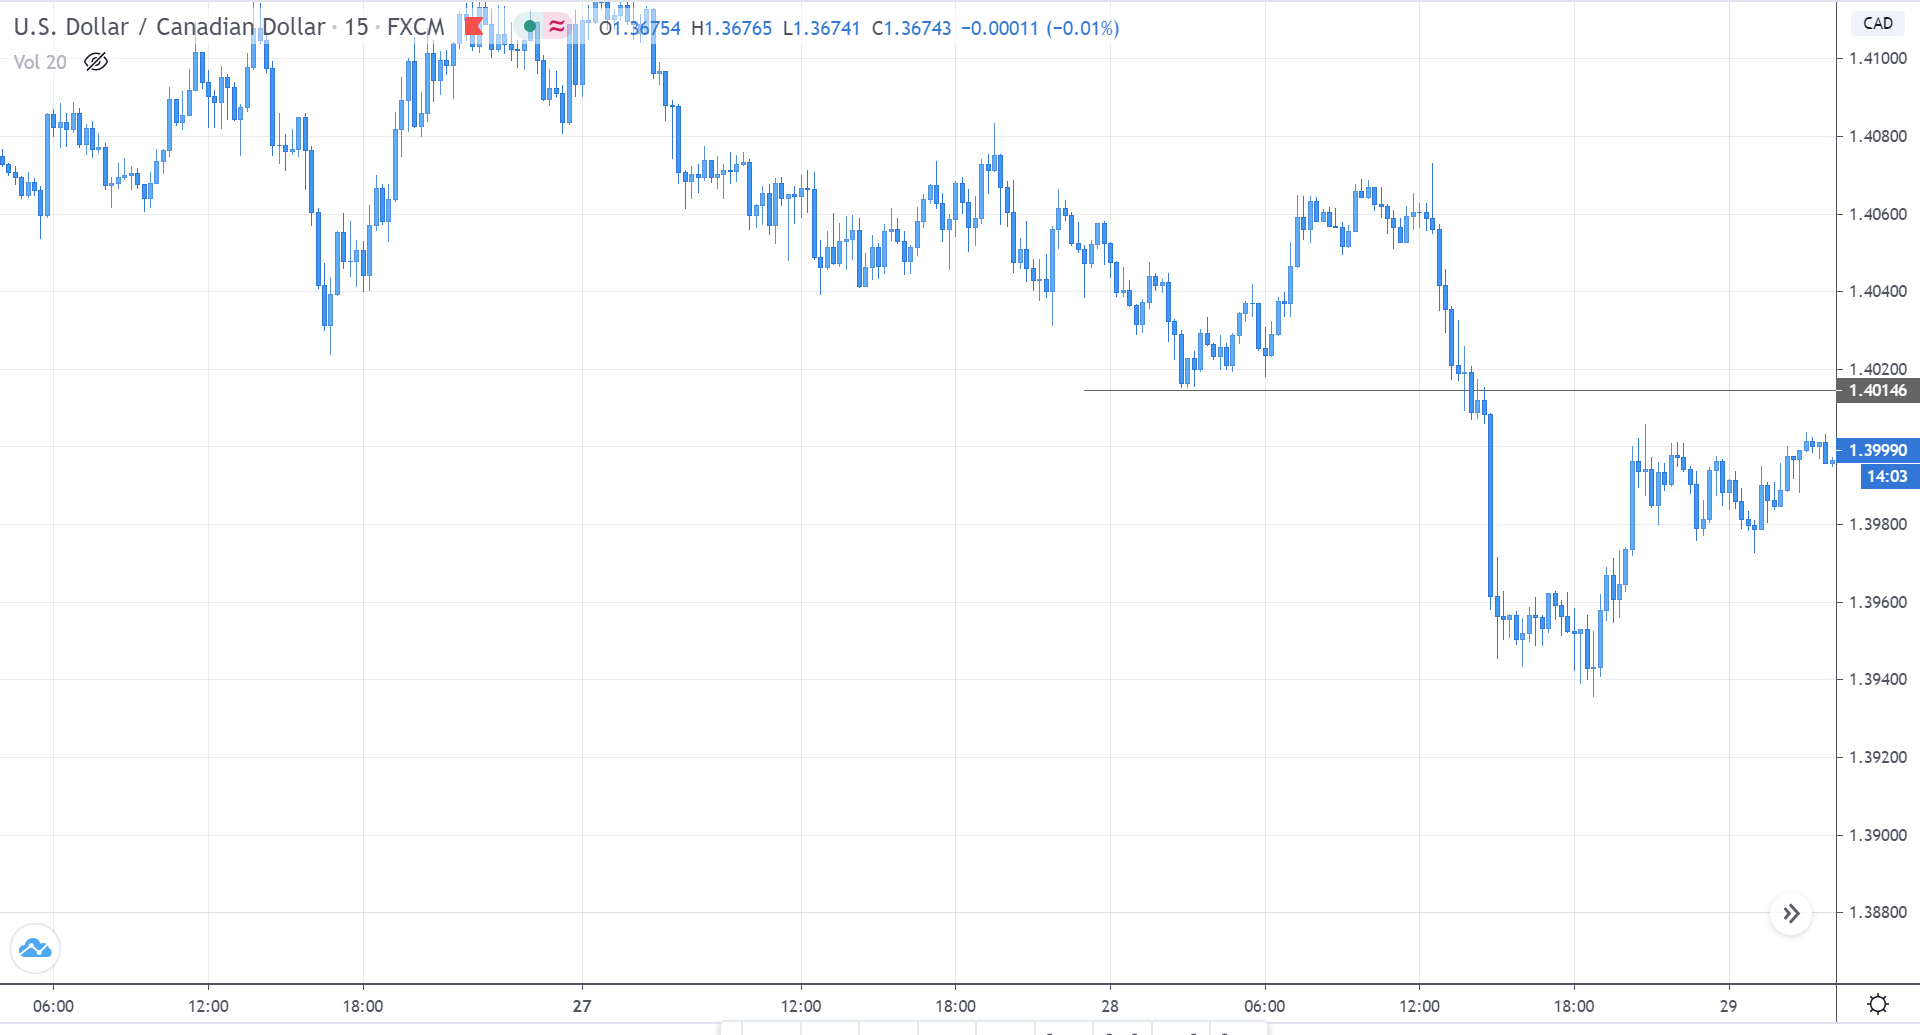
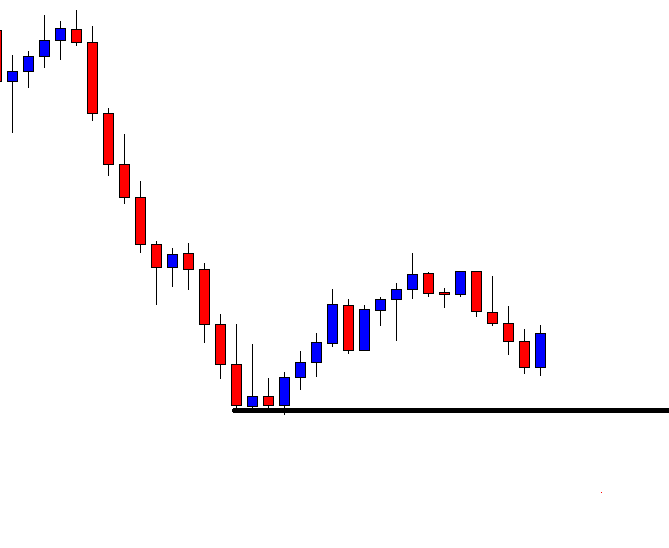
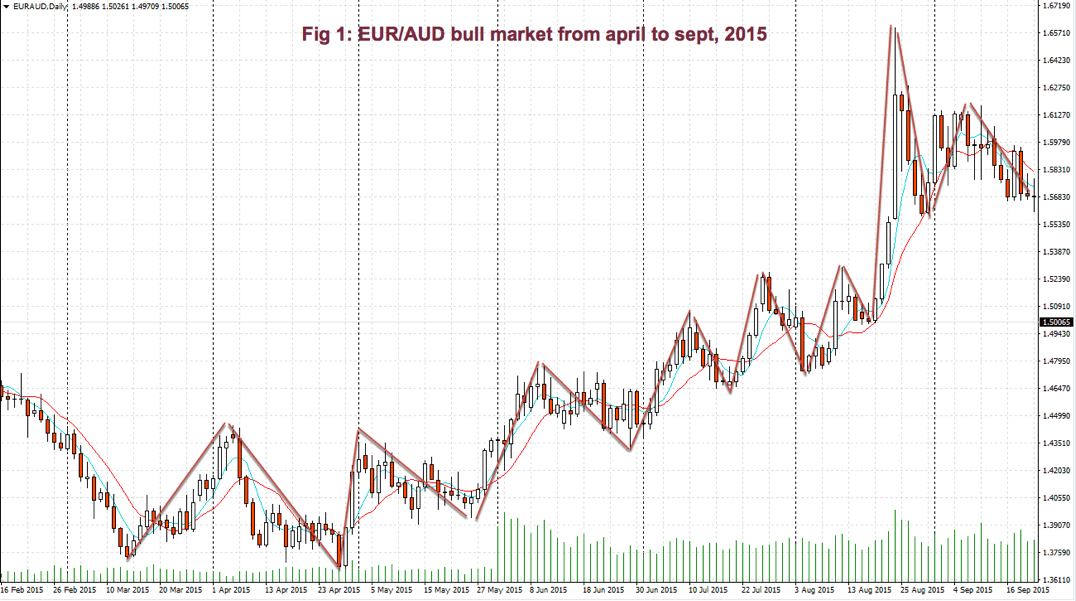
As we see in Fig. 1 the trendline tends to draw resistance levels or supports where the price finds it difficult to cross, bouncing from there, although not always this happens. In Fig. 1 the first trendline has been crossed over by the price, and during the following bars, the slope of the downtrend diminished.  We saw, then, that the first trendline switched its role and now is acting as price support.

When the second trendline was crossed over by the price, a bottom has been created, and a new uptrend started. After a while trending up, we might note that we needed a second trend line to more accurately follow the new bottoms because the uptrend has sped up, and the first trendline is no longer able to track them.

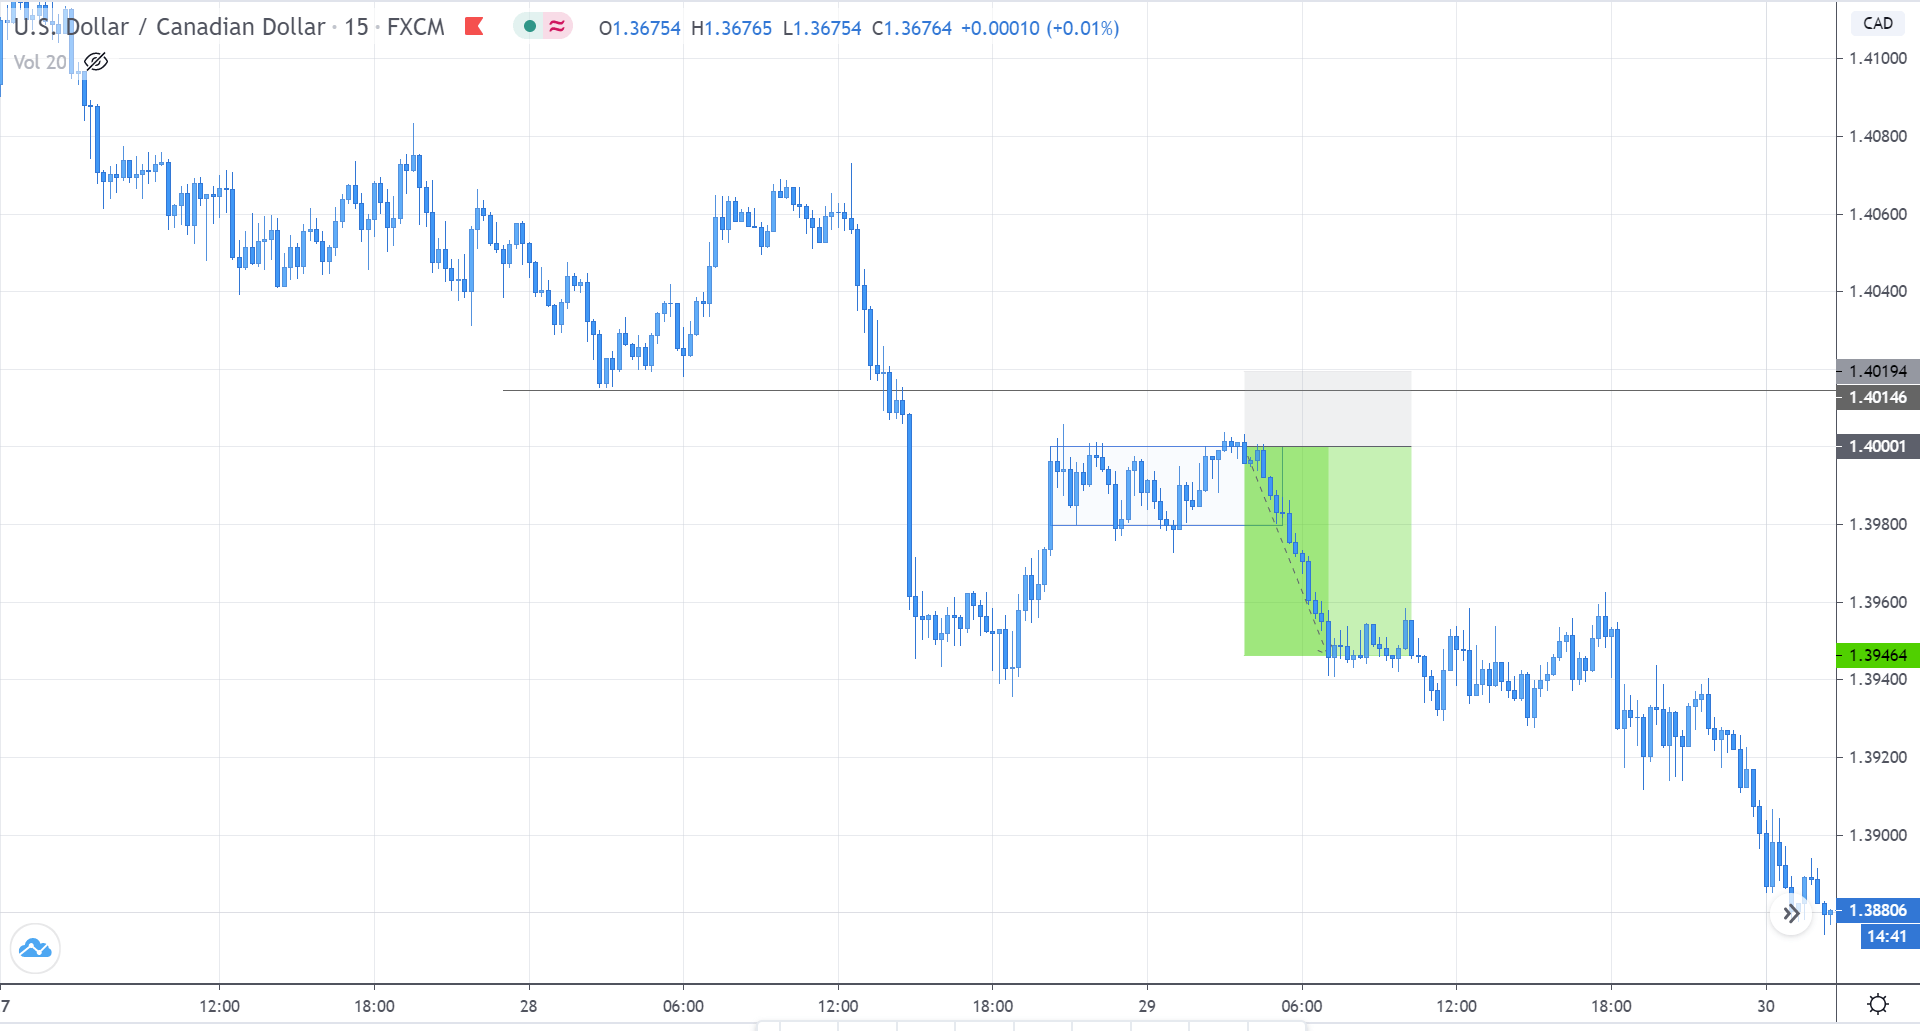
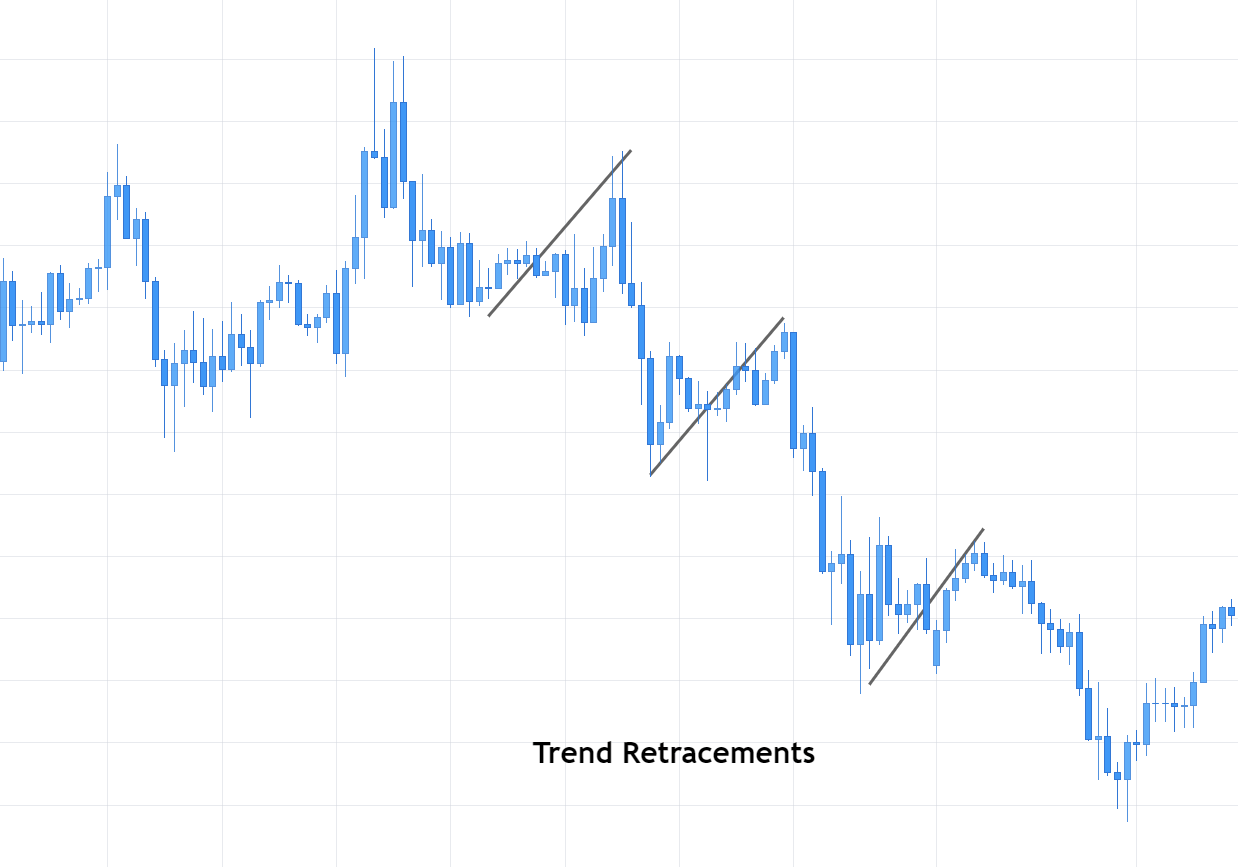
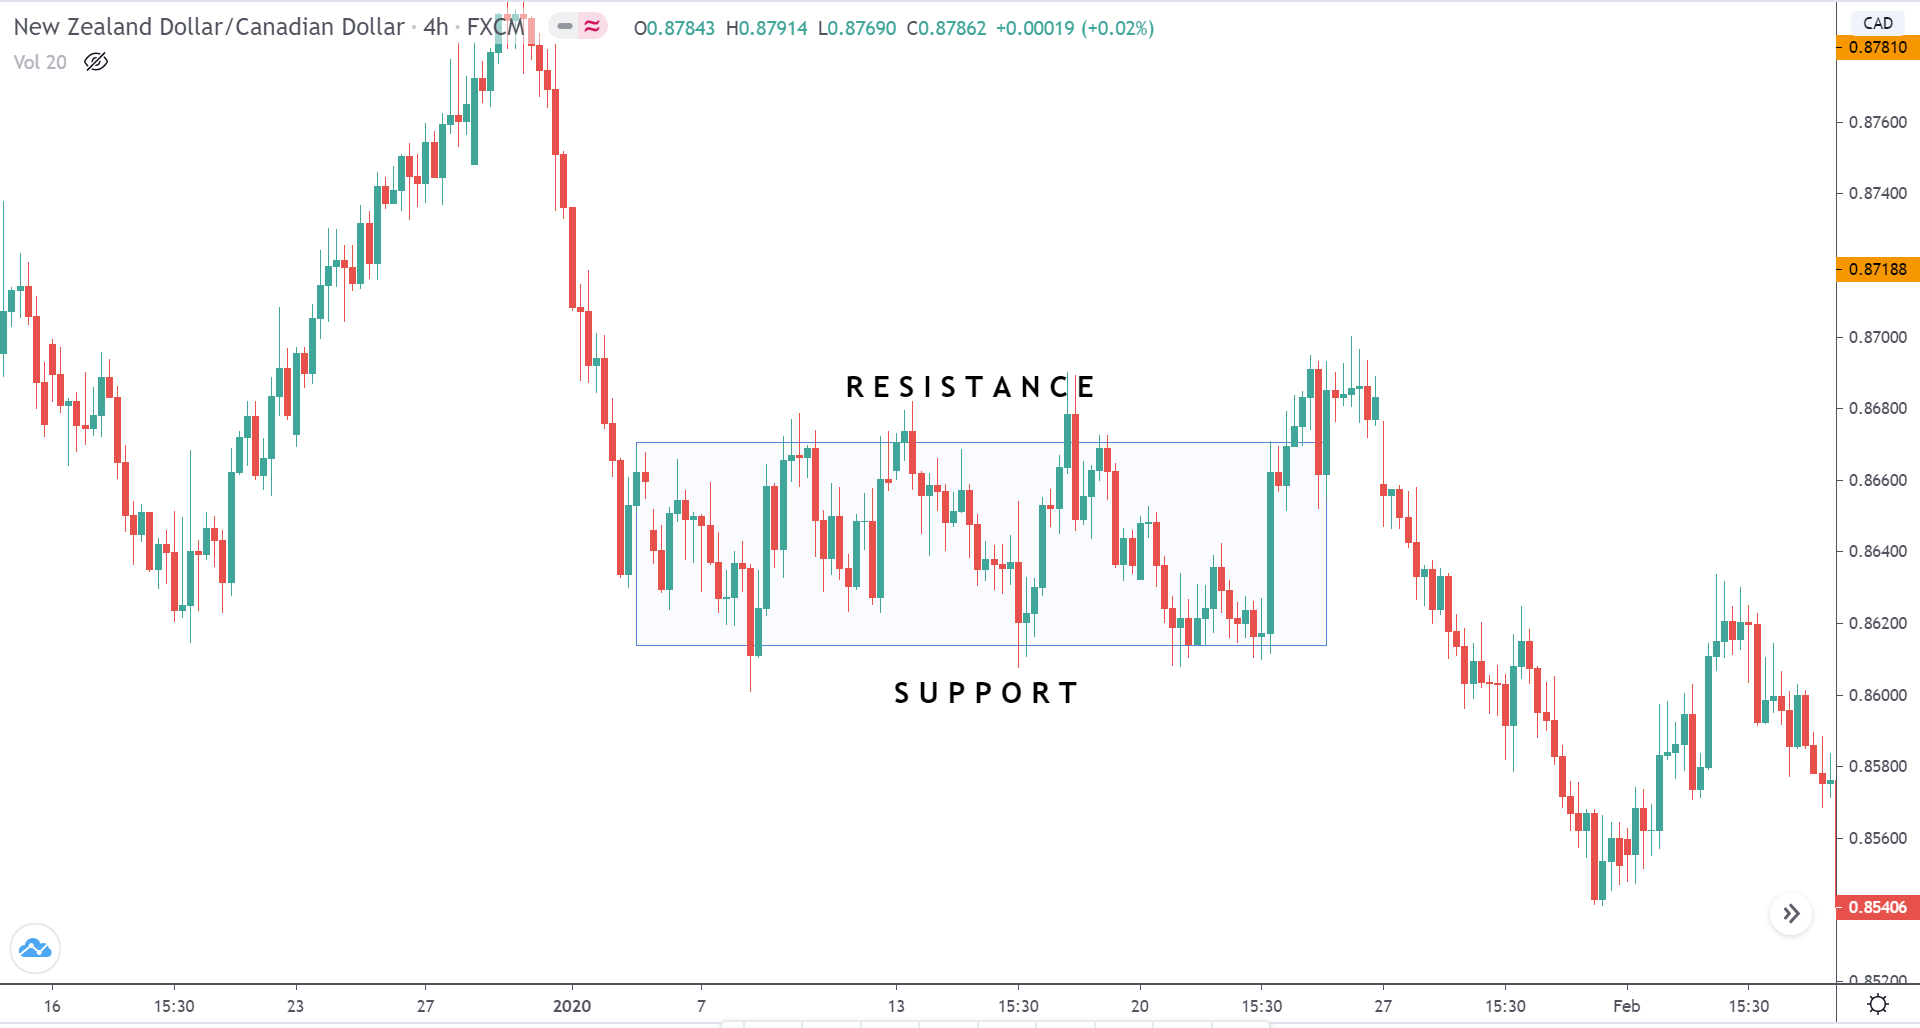
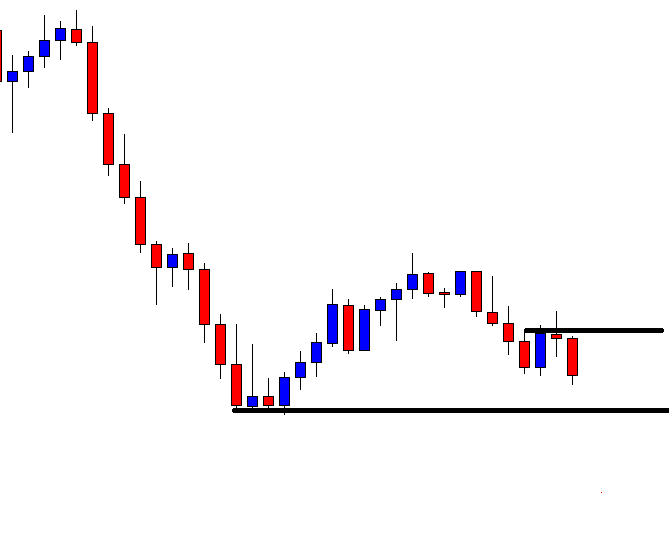
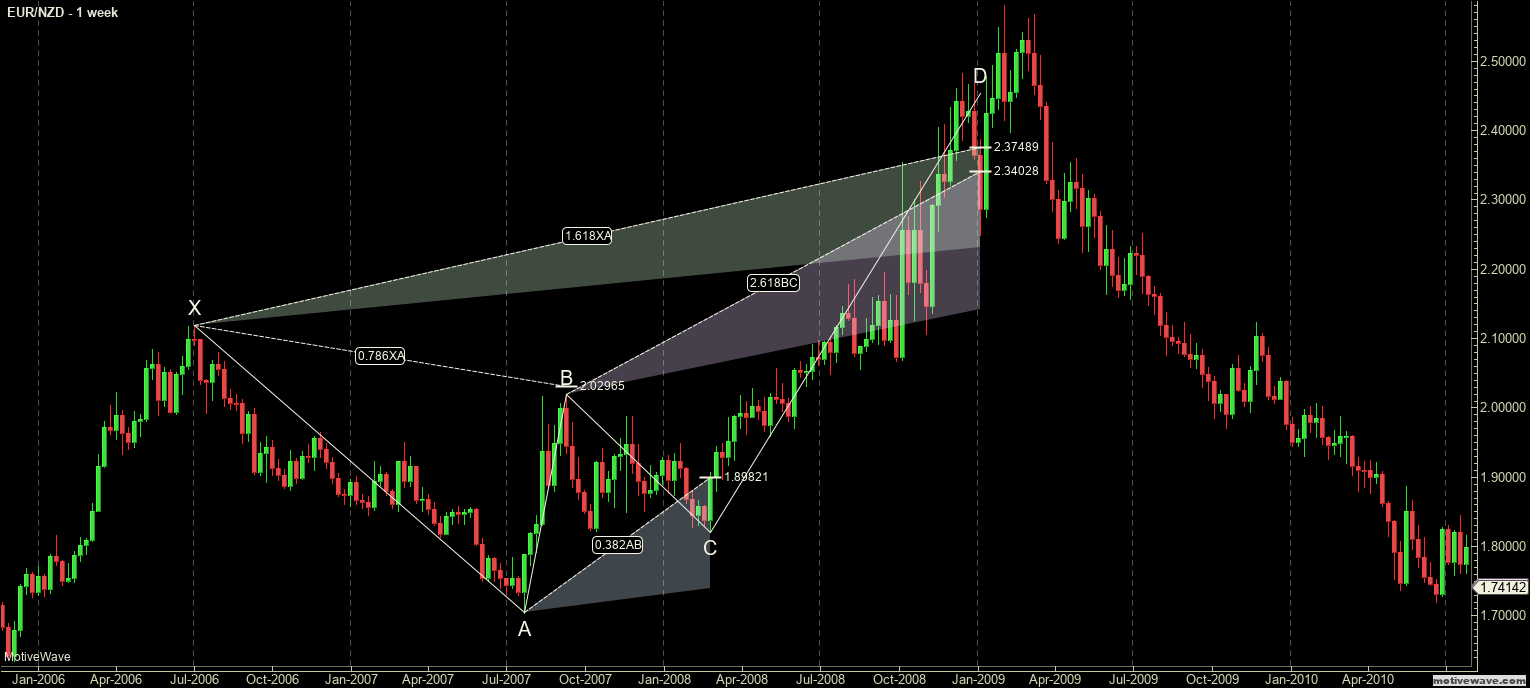
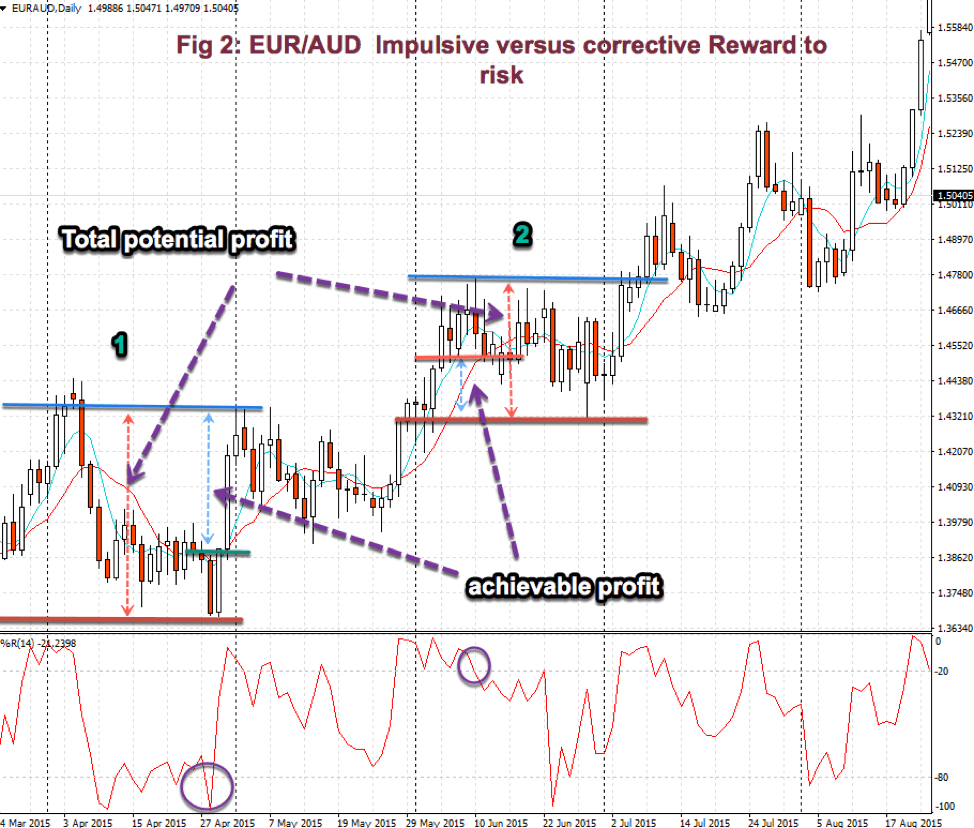
Fig. 2 shows two channels made of trendlines, one descending and the other ascending. The trendline allows us to watch the volatility of the trend and the potential profit within the channel. The trend, as is depicted, has been drawn after it has been developing for a long lapse. Therefore, it’s drawn after the fact.  If we look at the descending channel, we observe that during the middle of the trend, the upper trendline doesn’t touch the price highs. So, this channel would look different at that stage of the chart.

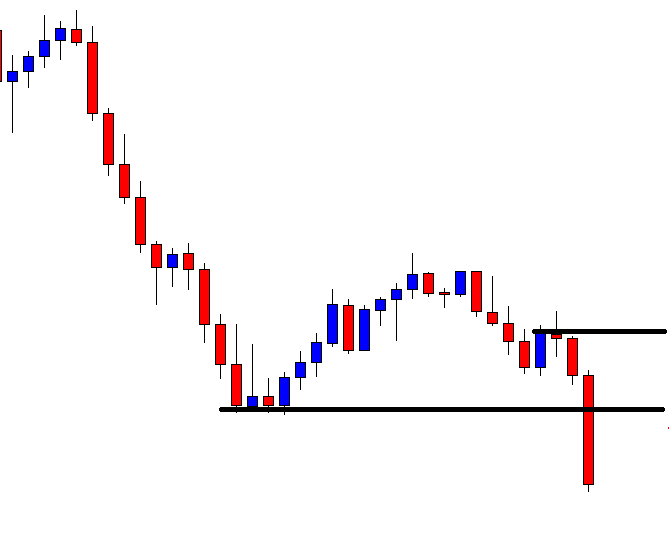
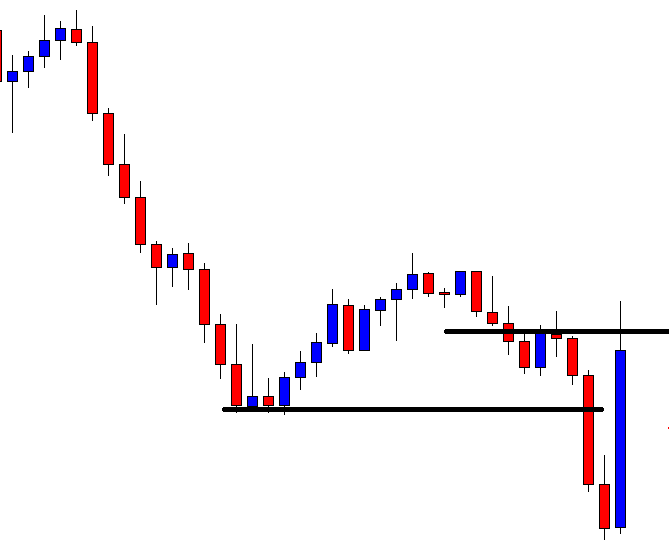
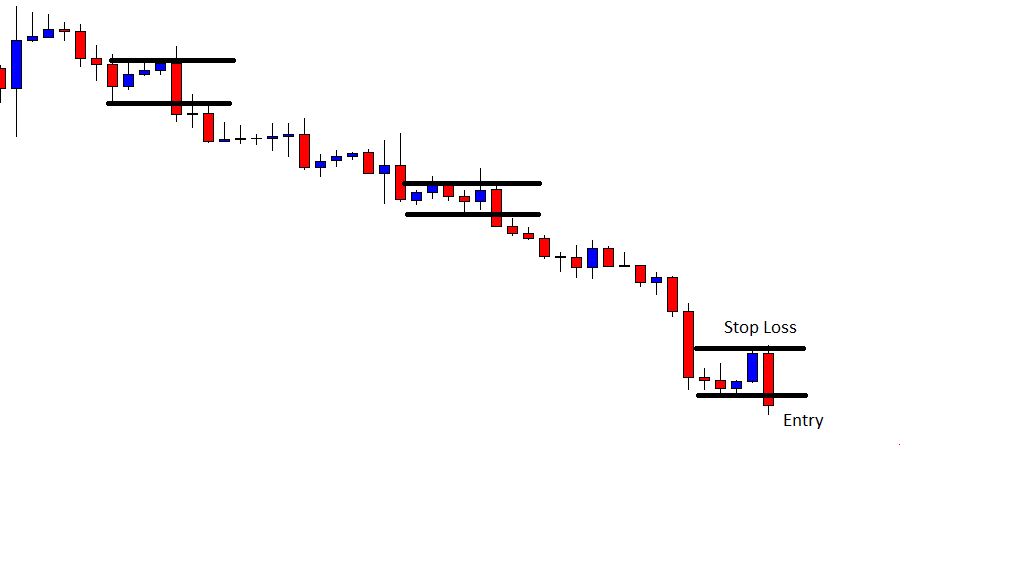
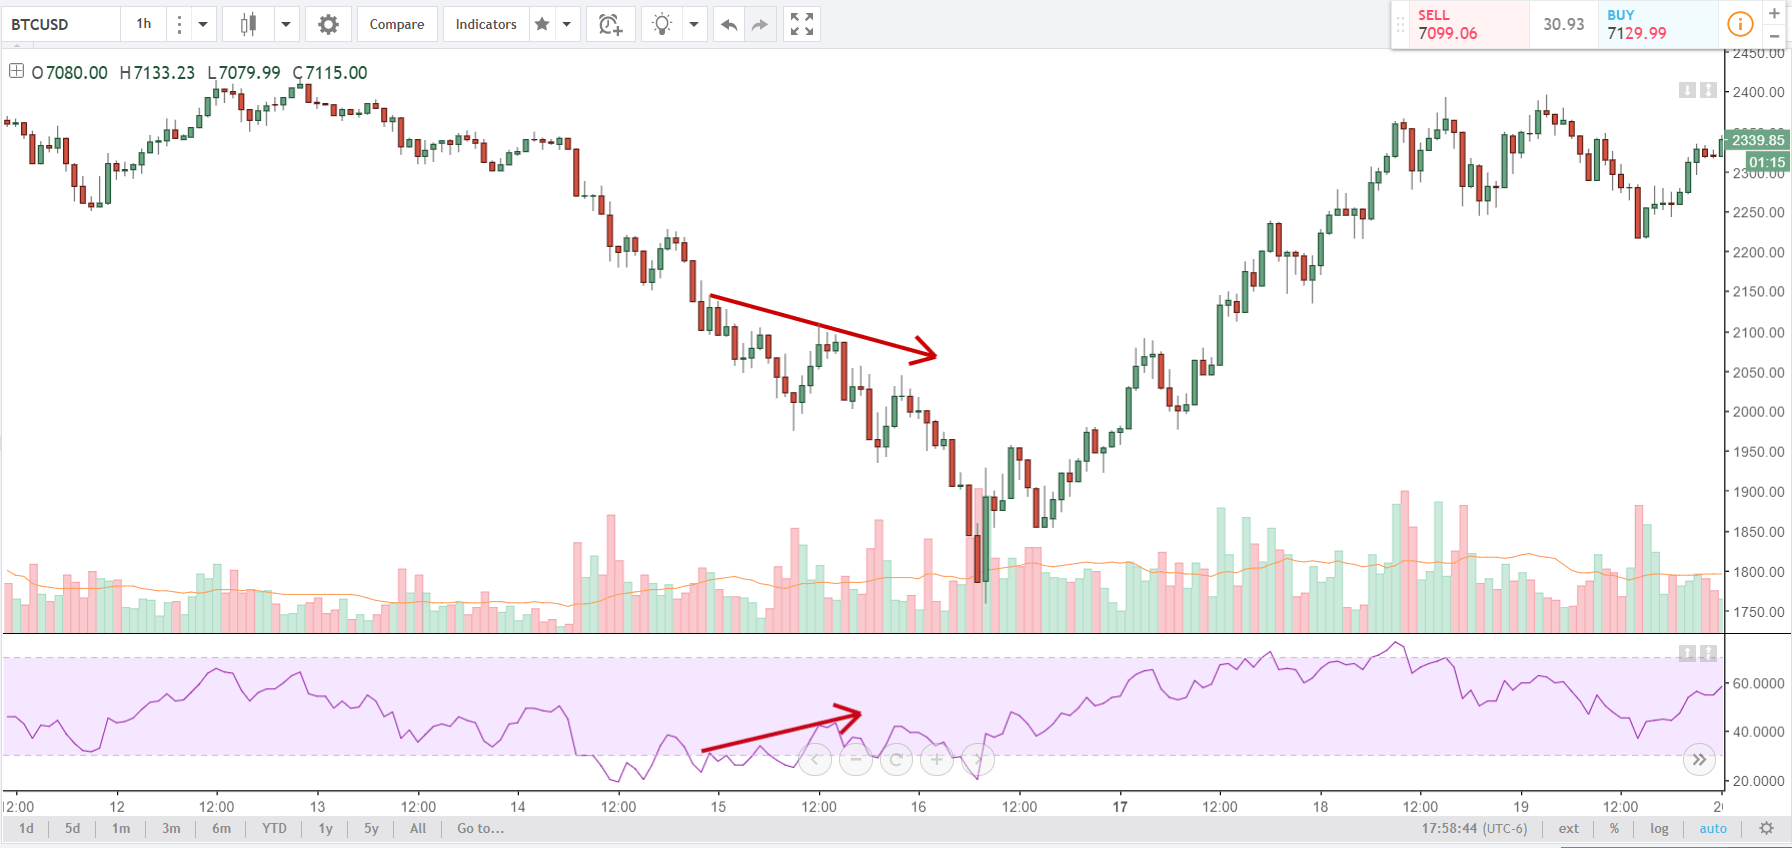
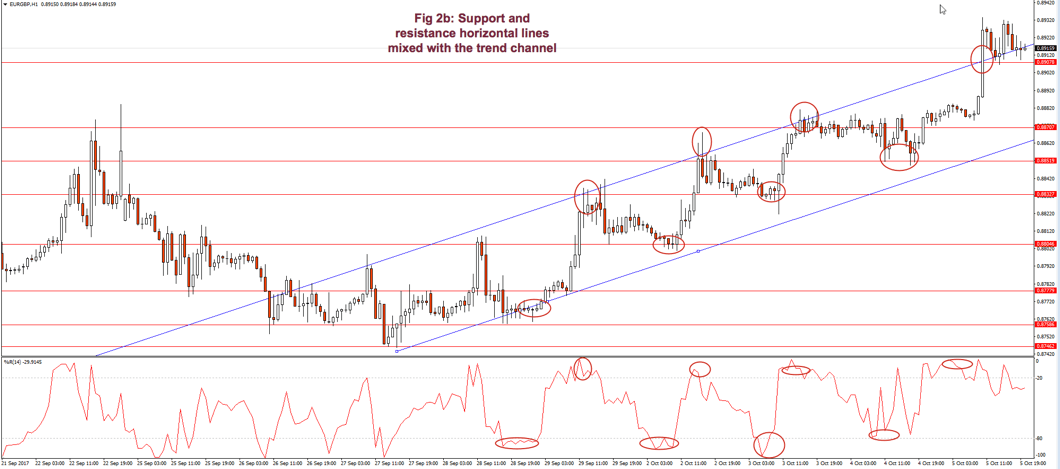
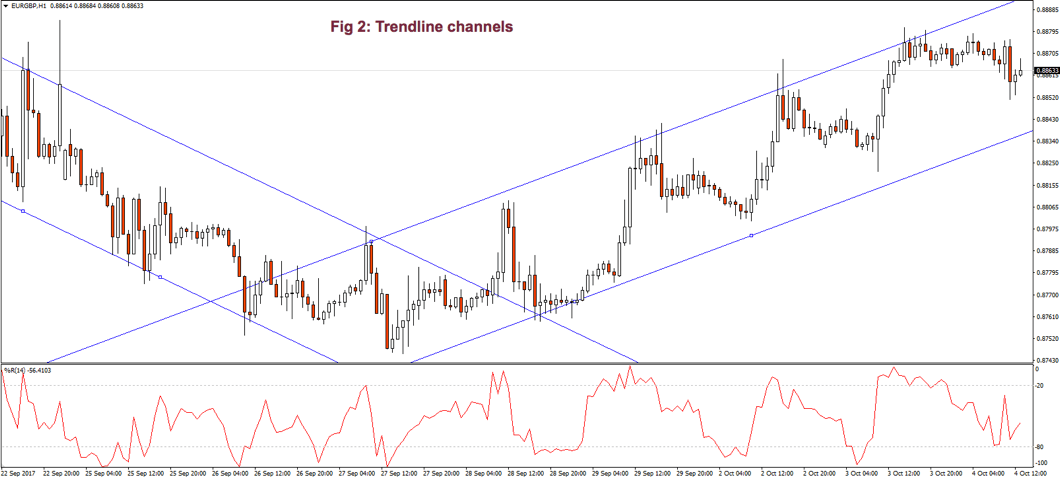
I find more reliable the use of horizontal lines at support and resistance levels and breakouts/breakdowns at the end of a corrective wave. But, if we get a well-behaved trend, such as the second leg in fig 2, a channel might help us assess the channel profitability and assign better targets to our trades. If we use horizontal trendlines together with the trend channel (see Fig 2.b) it’s possible to better visualize profitable entry points and its targets, and, then, compute its reward to risk ratio.  The use of the Williams %R indicator (bottom graph) confirms entry and exit points.

Fig. 2b graph’s horizontal red lines show how resistance becomes the support in the next leg of a trend.

As a summary:

  • A trendline points at the direction of the trend and acts as a support or as a resistance, depending on the price trend direction.
  • If a second trendline is needed, we should pay attention if it shows acceleration or deceleration of the price movement.
  • If the price crosses over or crosses under the trendline, it may show a bottom or a top, and a trend change.
  • A trendline channel helps us assess the potential profitability and assign proper targets to our next trade.

Moving Averages (MA)

Note: At the end of this document, an Appendix discusses some basic statistical definitions, that may help with the formulas presented in this section, although reading it isn’t needed to understand this section.

Some centuries back, Karl Friedrich Gauss demonstrated that an average is the best estimator of random series.

Moving averages are used to smooth the price action. It acts as a low-pass filter, removing most of the fast changes in price, considered as noise. How smooth this pass filter behaves, is defined by its period. A moving average of 3 periods smoothens just three periods, while a 200-period moving average smoothens over the last 200 price values.

Usually, a Moving Average is calculated using the close of every bar, but there can be any other of the price points of a bar, or a weighted average of all price points.

Moving averages are computationally friendly. Thus, it’s easier to build a computerized algorithm using moving average crossovers than using trendlines.

Most Popular types of moving averages

Simple Moving Average(SMA):

The simple moving average is computed as the sum of all prices on the period and divided by the period.

The main issue with the SMA is its sudden change in value if a significant price movement is dropped off, especially if a short period has been chosen.

Average-modified method (AvgOff)

To avoid the drop-off problem of the SMA, the computation of an avgOff MA is made using and average-modified method:

Weighted moving average

The weighted moving average adds a different weight to every price point in the period of calculation before performing the summation. If all weights are 1, then we get the Simple Moving Average.

Since we divide by the sum of weights, they don’t need to add up to 1.

A usual form of weight distribution is such that recent prices receive more weight than former prices, so price importance is reduced as it becomes old.

w1 < w2 < w3… < wn

Weights may take any form, most popular being Triangular and exponential weighting.

To implement triangular weighting on a window of n periods, the weights increase linearly from 1 the central element (n/2), then decrease to the last element n.

Exponential weighting is an easy implementation:

EMAt = EMAt-1 + a x (pt Et-1)

Where a, the smoothing constant, is in the interval 0< a < 1

The smoothing property comes at a price:  MA’s lags price, the longer the period, the higher the lag of the average. The use of weighting factors helps reducing it. That’s the reason traders prefer exponential and weighted moving averages: Reducing the lag of the average is thought to improve the edge of entries and exits.

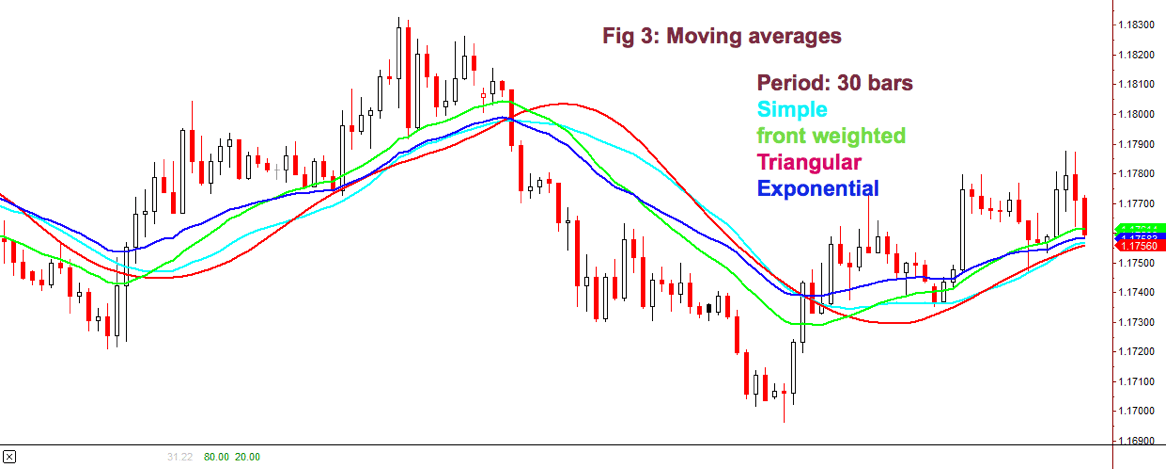
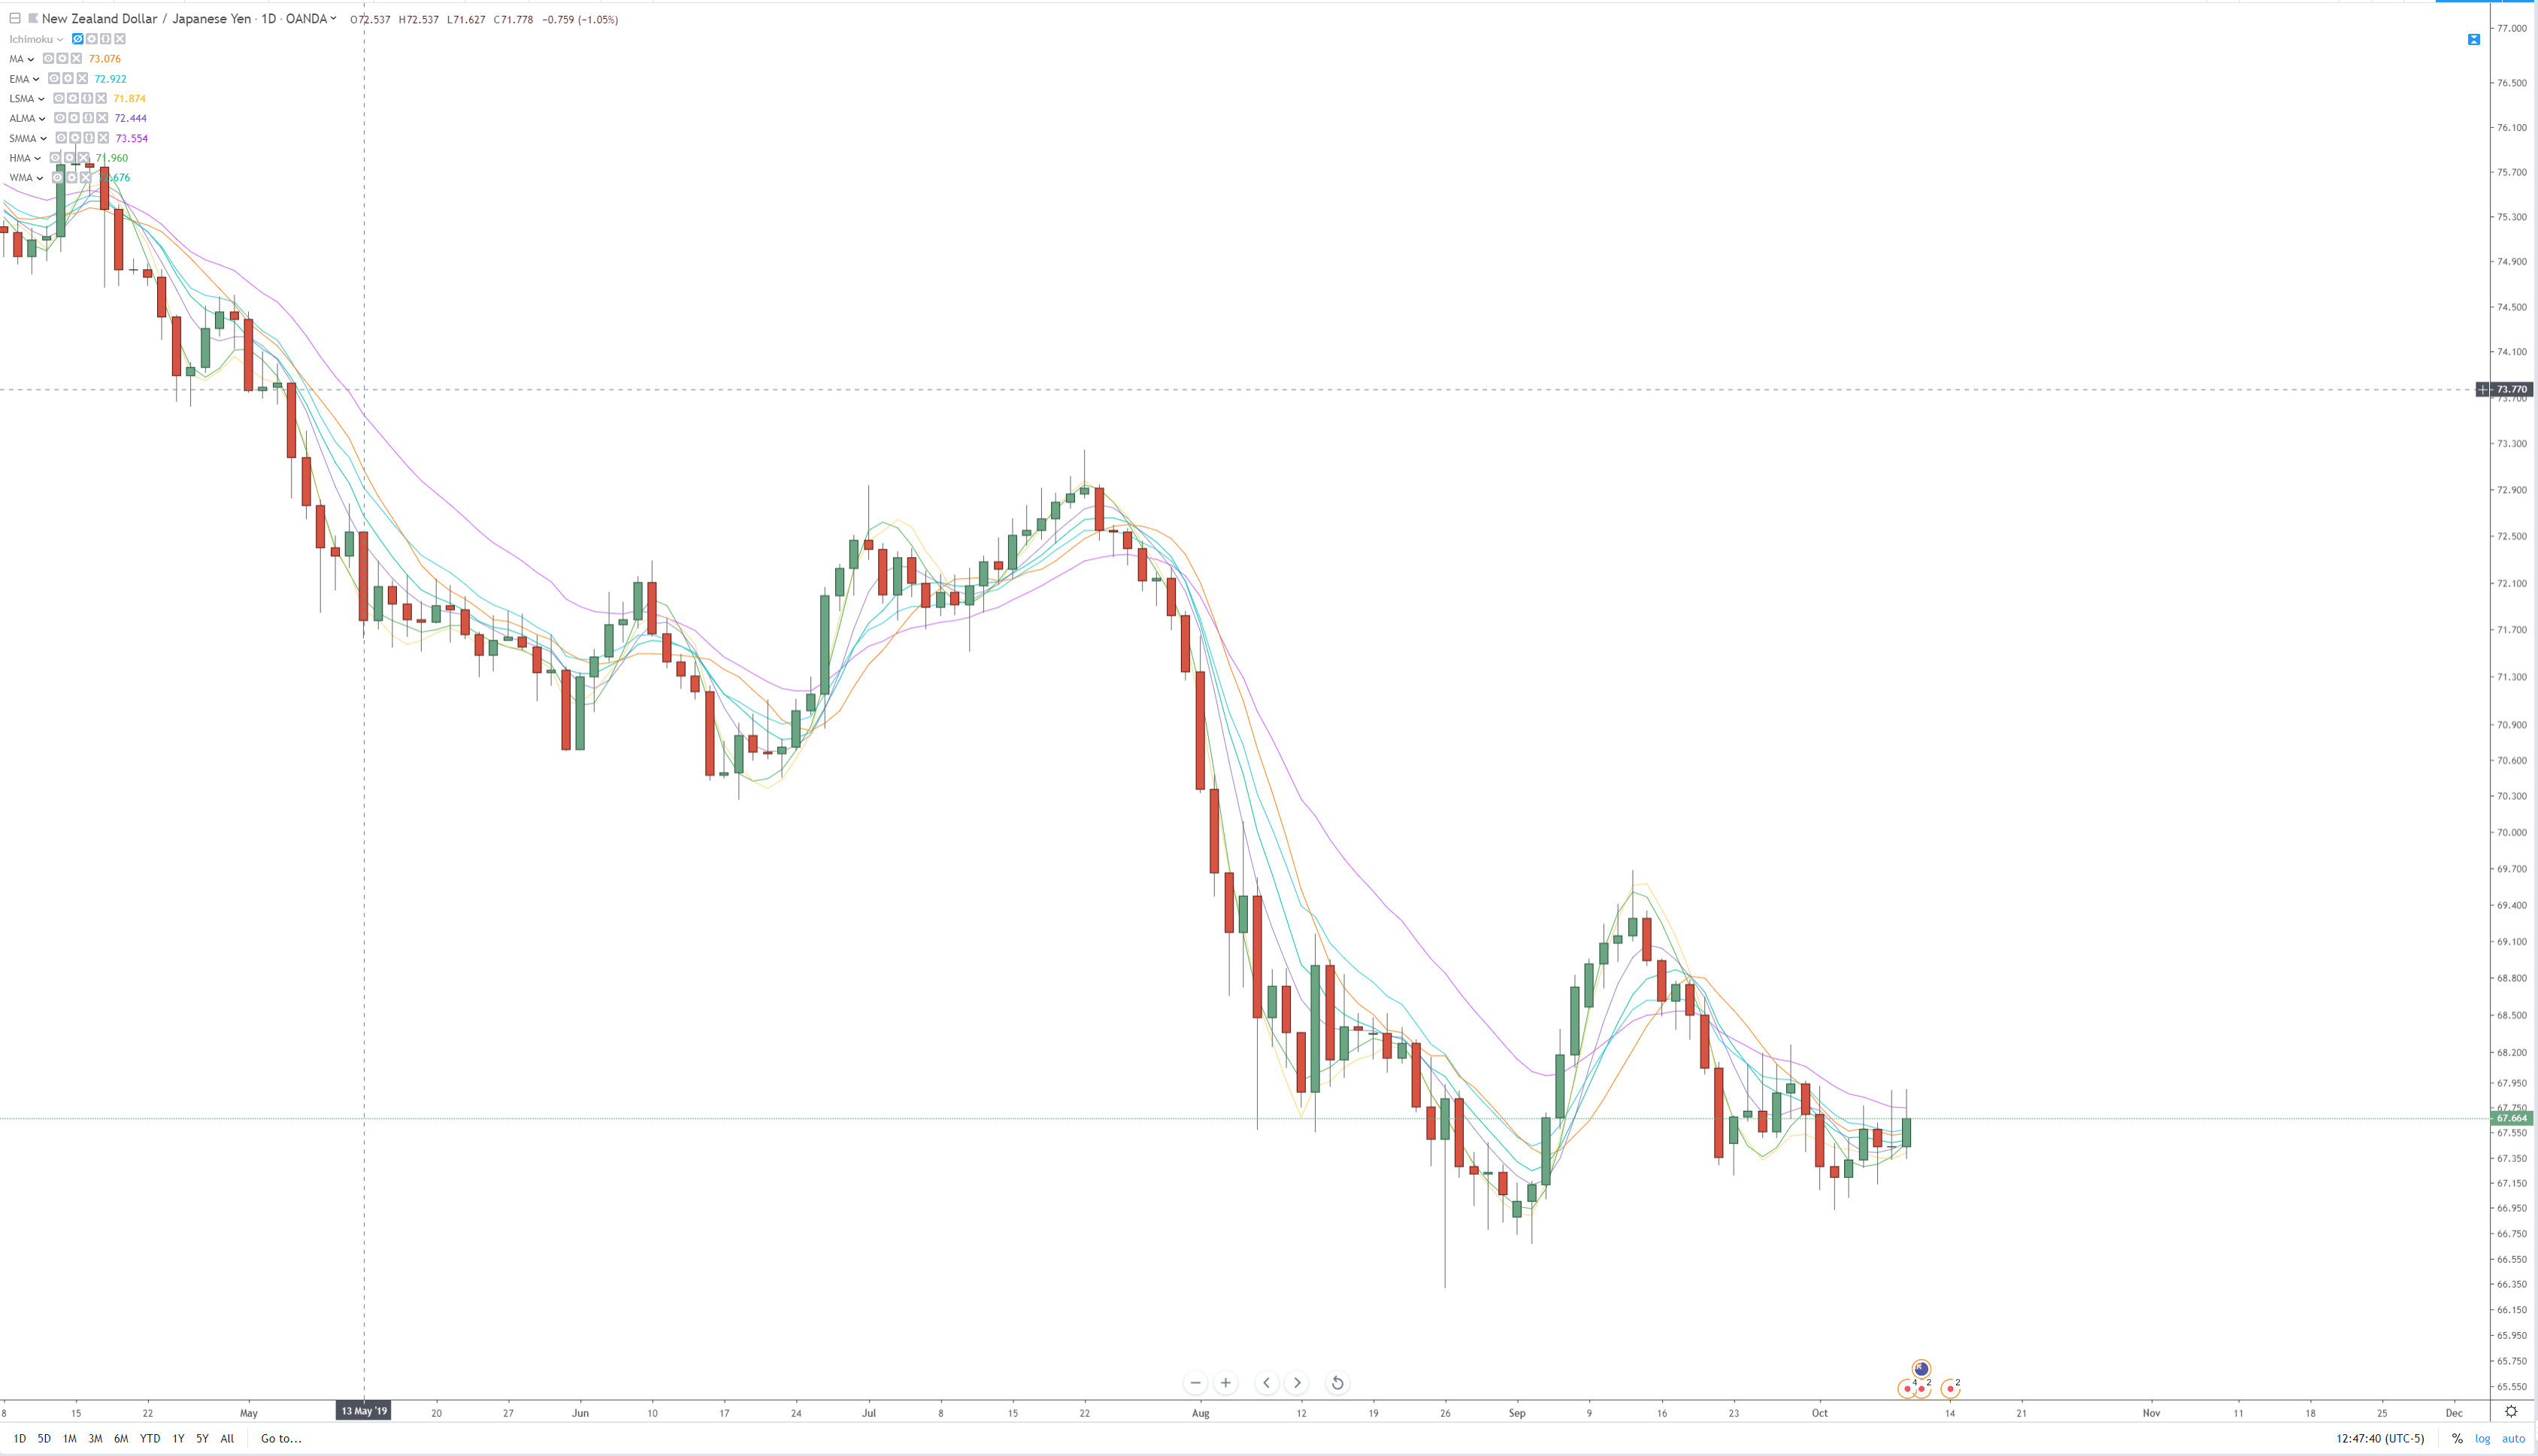
Fig 3 shows how the different flavors of a 30-period MA behave on a chart. We may observe that the front-weighted MA is the one with a slope very close to prices, Exponential MA is faster following price, but Triangular MA is the one with less fake price crosses, along with simple MA: The catch is: We need to test which fits better in our strategy. The experience tells that, sometimes, the simpler, the better.

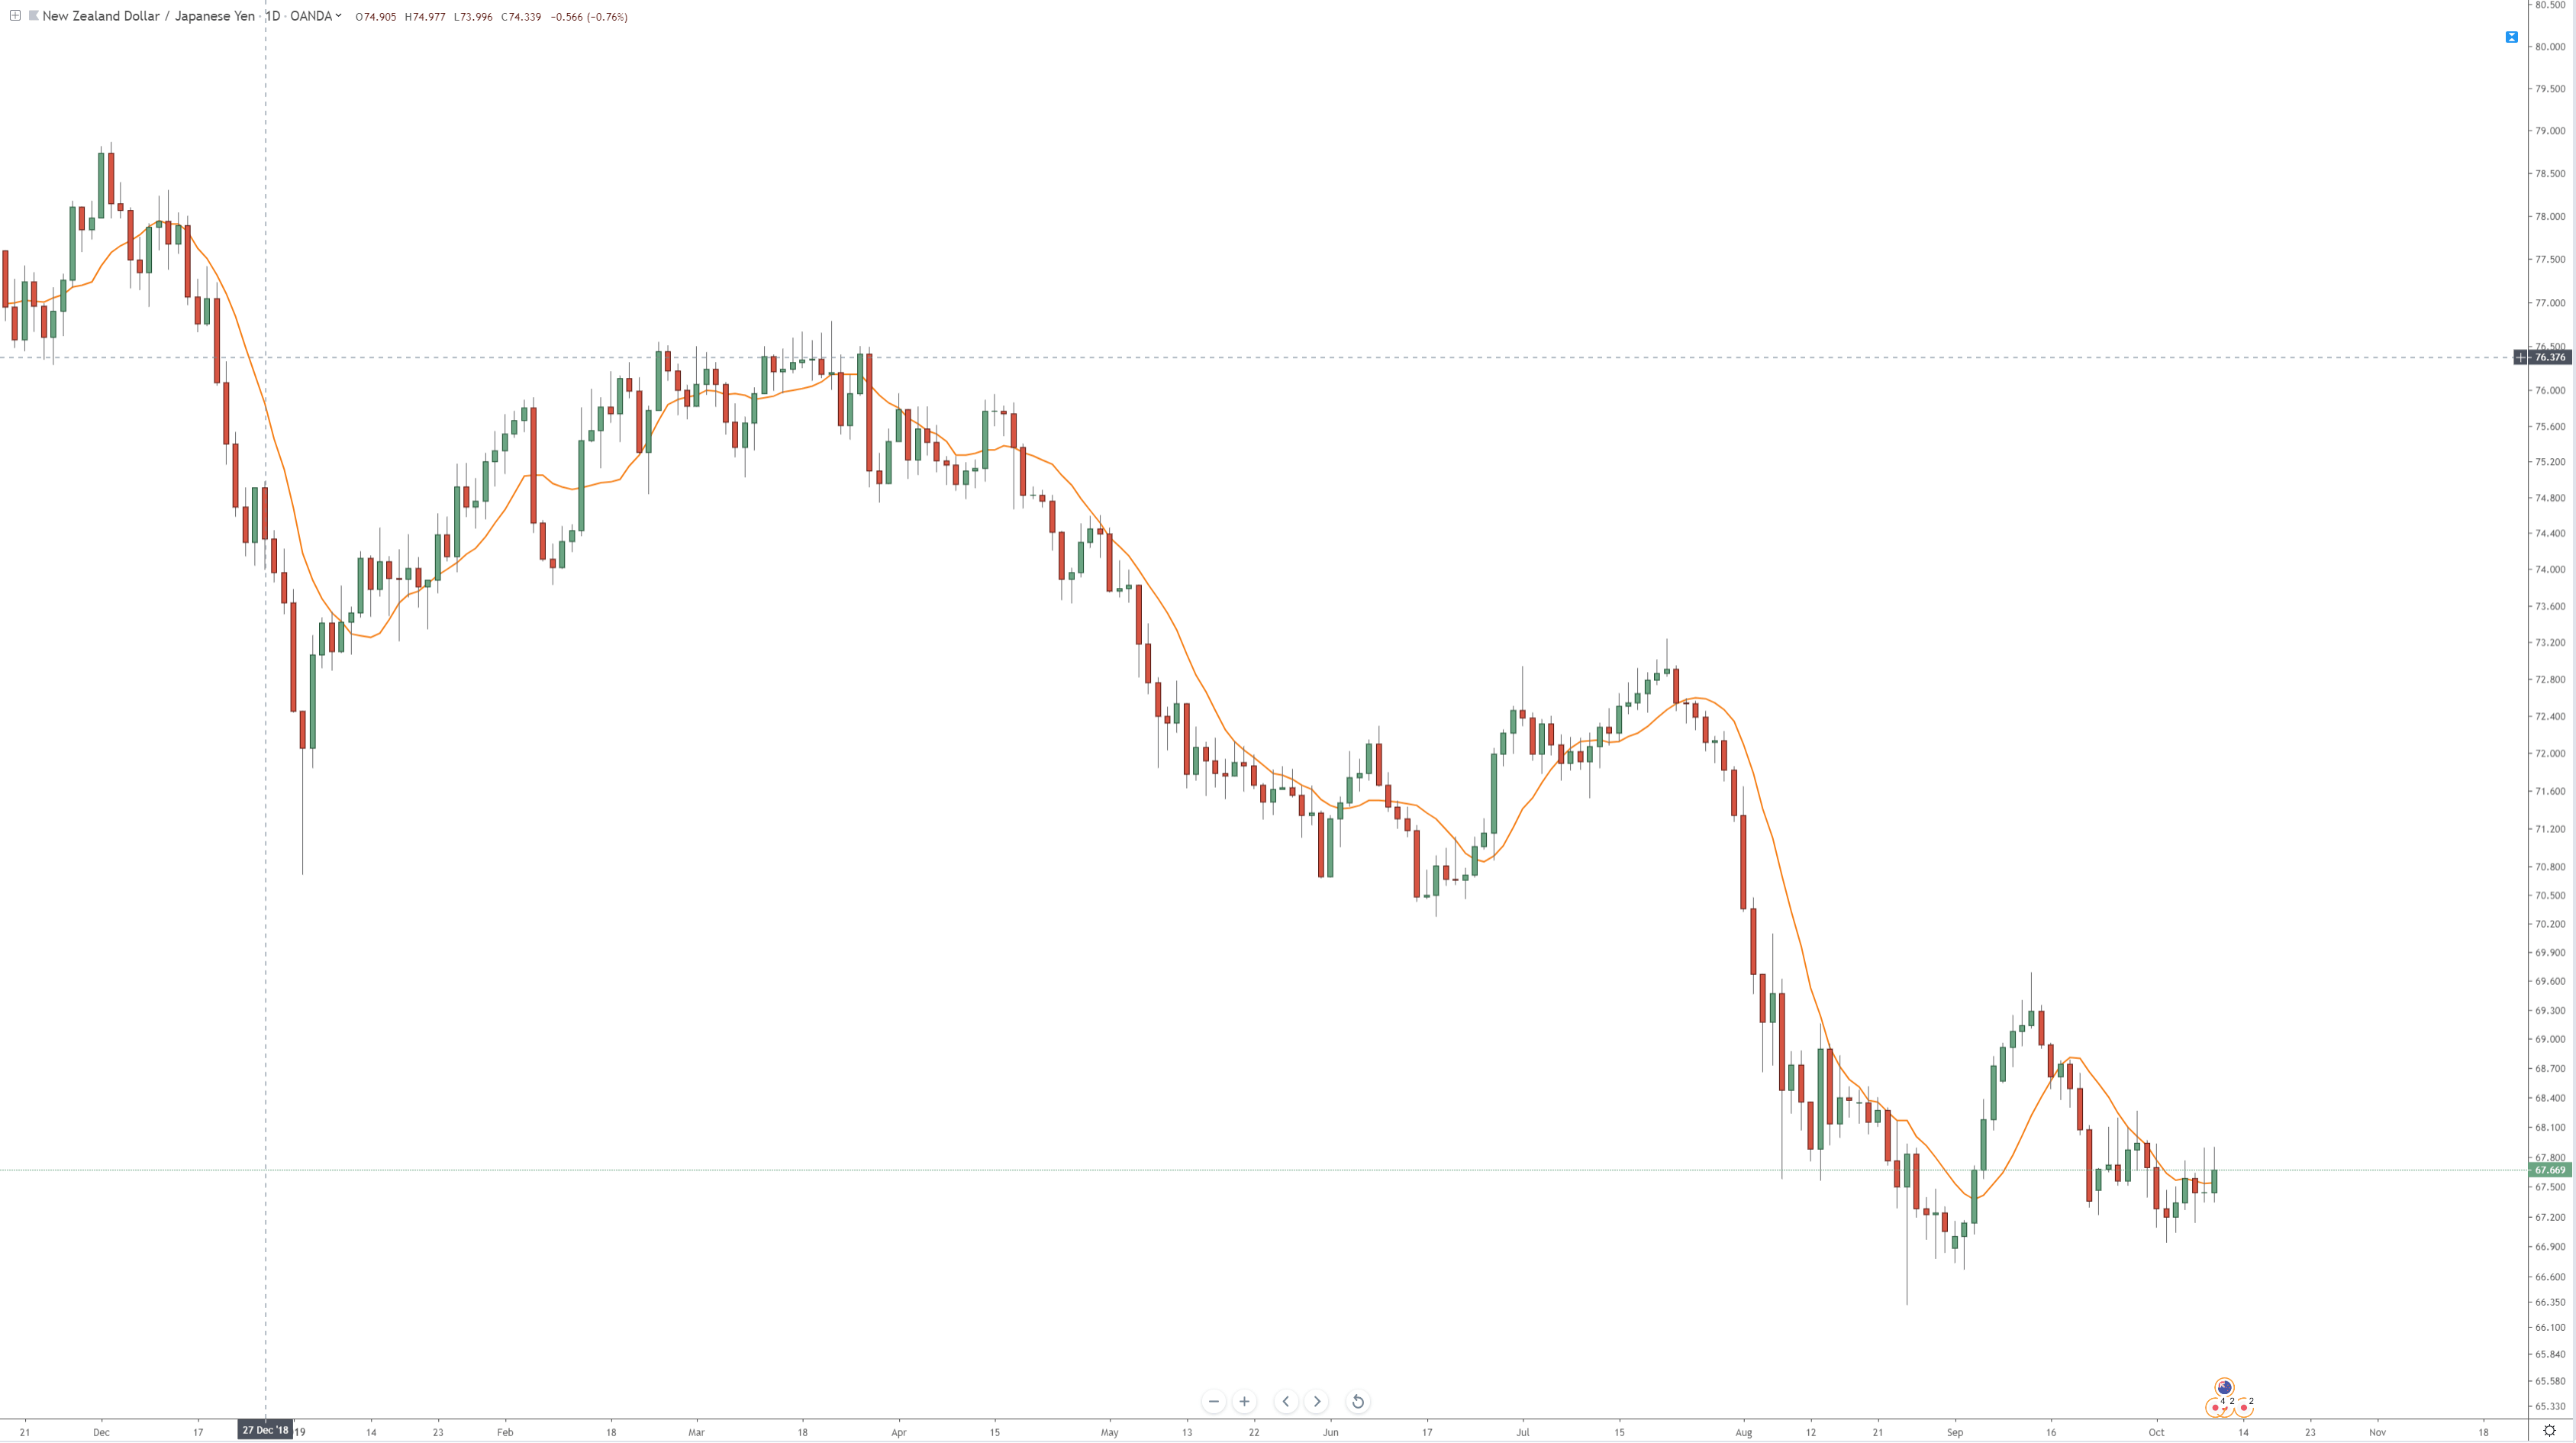
Detecting the trend using a moving average is simple. We select the average period to be about half the period of the market cycle. Usually, a 30 day/bar MA is adequate for short-term swings.

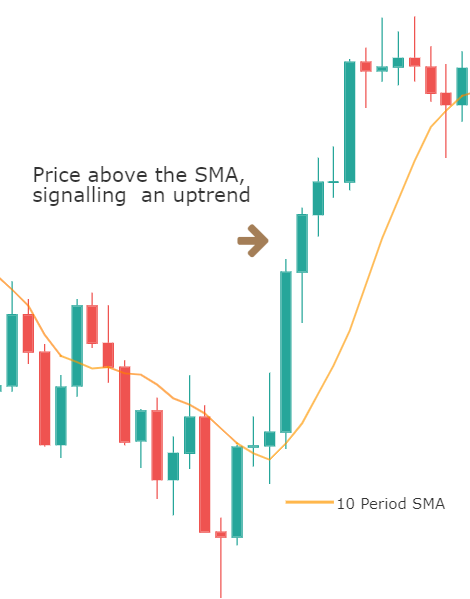
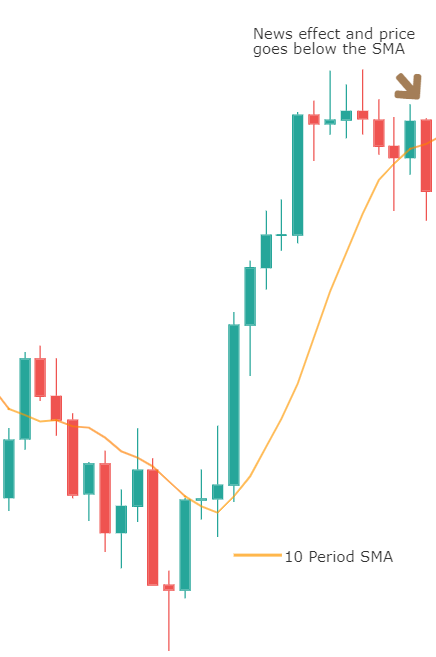
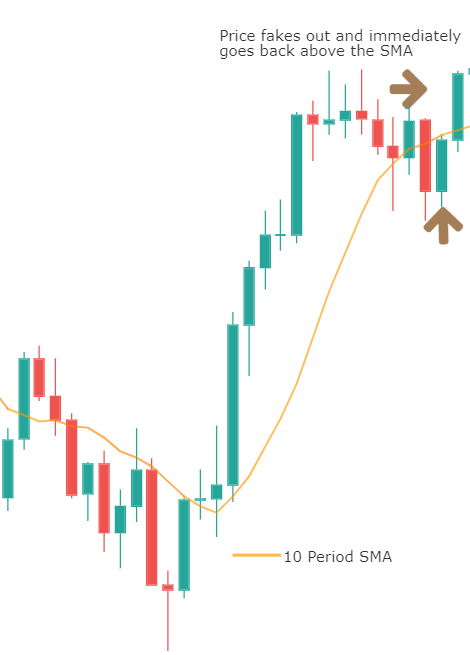
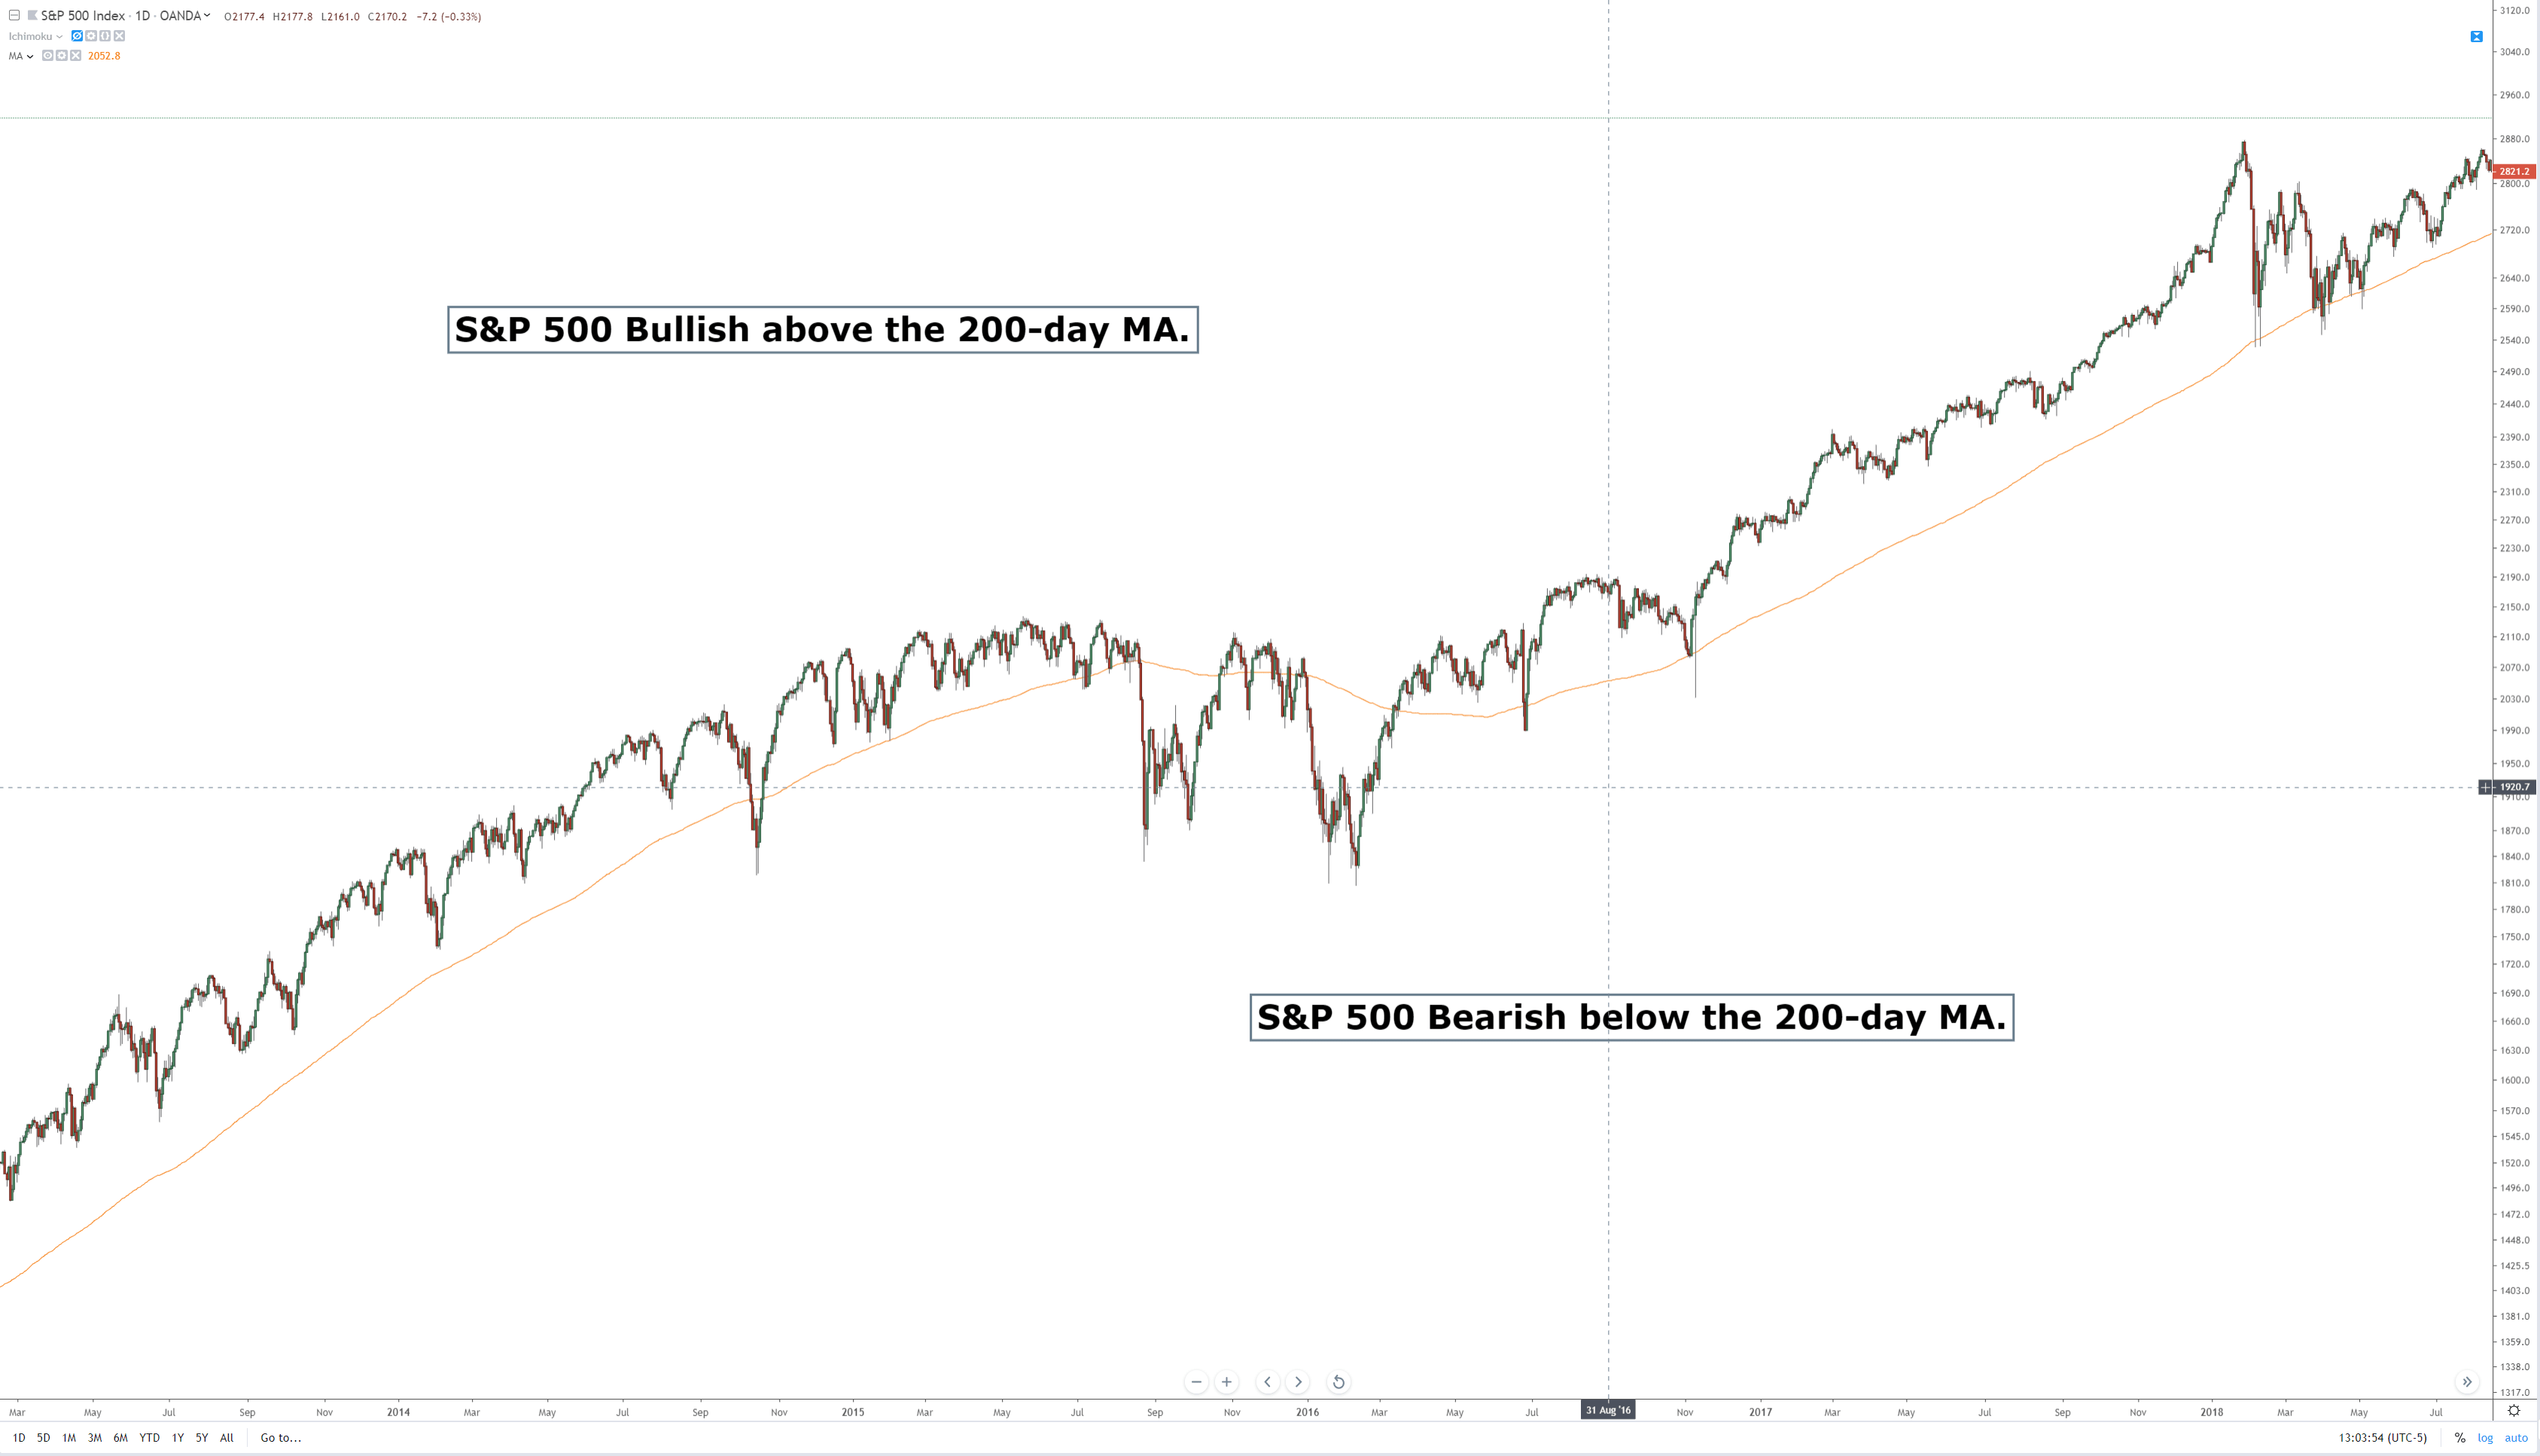
One method to decide the trend direction is to consider it a bull leg if the bar close is above the moving average; and a bear leg if the close is below the average.

Another method is to watch the slope of the moving average as if it were a trendline. If it bends up, then it’s a bull trend, and if it turns down, it’s a bear trend.

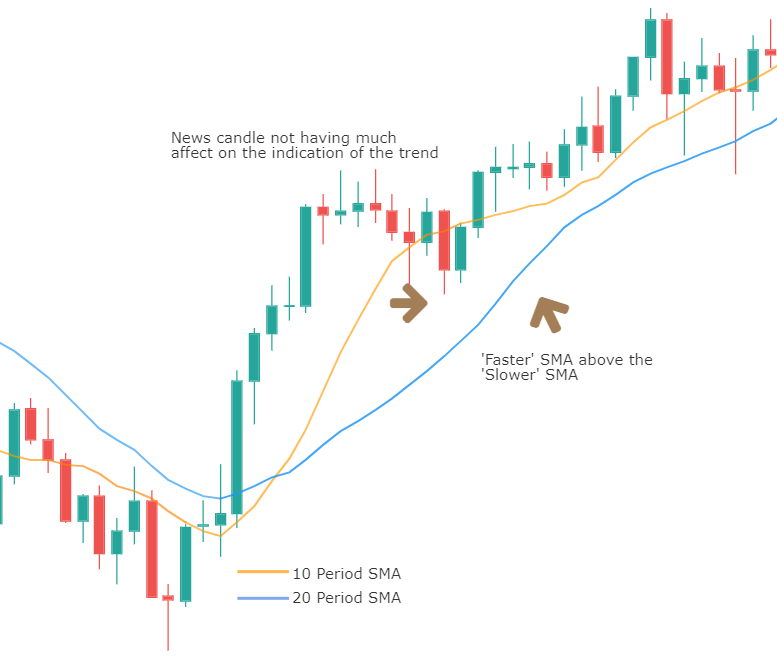
A third method is to use two moving averages:   Fast-Slow (Fast -> smaller period).

In this case, there are two variations:

  1. Moving average crossovers
  2. All the averages are pointing in the same direction.

As with the case of a single MA, a price retracement that touches the slower average is an opportunity to add to the position.

For example, using a 30-10 MA crossover: If the fast MA crosses over the slow MA, we consider it bullish; if it crosses under, bearish.

Using the method of both MA’s pointing in the same direction, we avoid false signals when the fast MA crosses the slow one, but the slow MA keeps pointing up.

When using MA crossovers, we are forbidden to take short trades if the fast MA is above the slow MA, but we’re allowed to add to the position at price pullbacks. Likewise, we’re not allowed to trade on the buy side if the fast MA is below the slow MA.

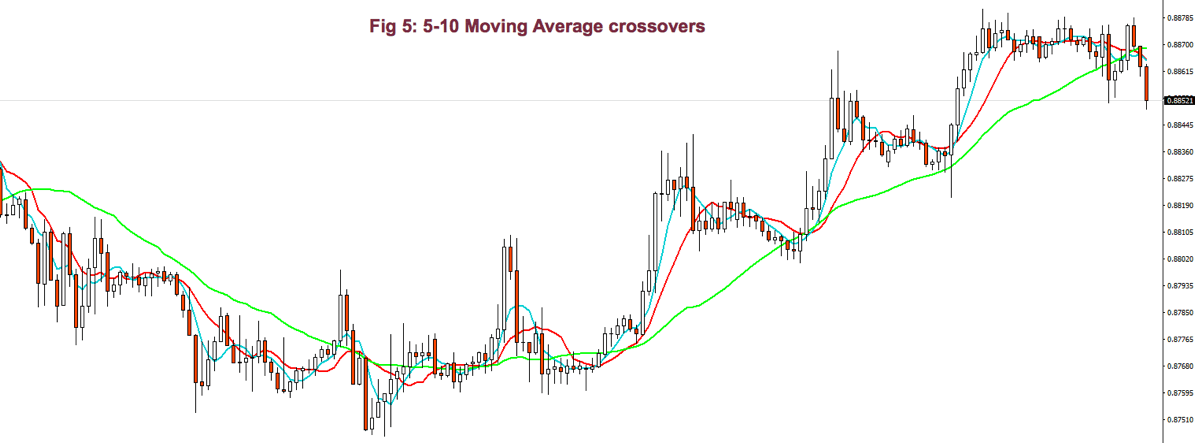
Using smaller periods, for instance, 5-10 MA, it’s possible to enter and exit the impulsive legs of a trend.  Then, the 10-30MA crossovers are used to allow just one type of trade, depending on the trend direction, and the 5-10 MA crossover is actually used as signal entry and exit (if we don’t use targets). In bull trends, for example, we may enter with the 5MA crossing over the 10MA, and we exit when it crosses under.

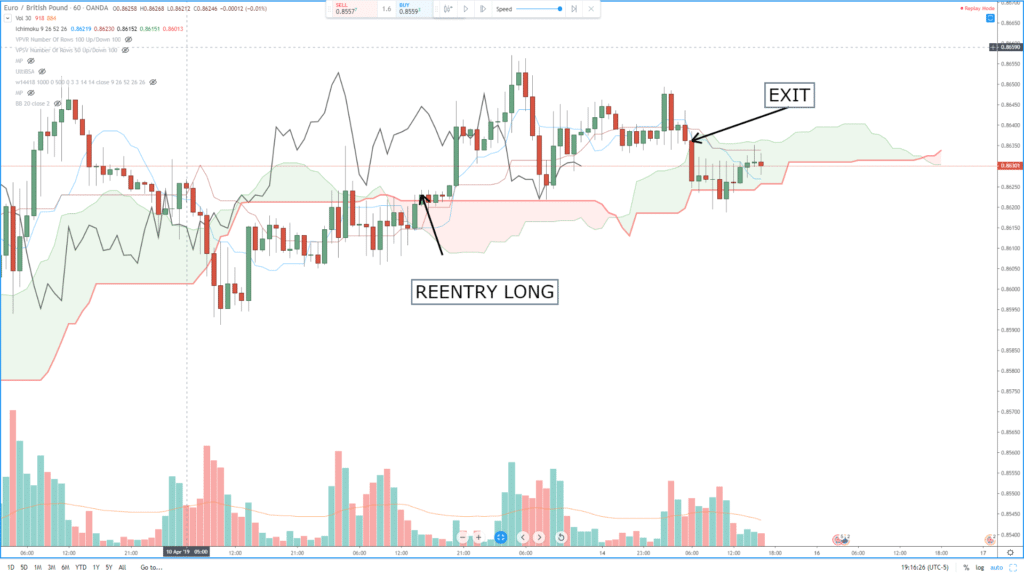
Bollinger Band Channel

We already touched channels that were made of two trendlines. There is another computationally friendly channel type that allows early trend detection and trading.

One of my favorite channel types is using Bollinger Bands as a framework to guide me.

A Bollinger Band is a volatility channel and was developed by John Bollinger, which popularized the 20-period, 2 standard deviations (SD) band.

This standard Bollinger band has a centerline that is a simple moving average of the 20-period MA. Then an upper band is drawn that is 2 standard deviations from the mean and a lower band that’s 2 standard deviations below it.

I tend to use two or three 30-period Bollinger bands. The first band is one SD wide, and the second one is two SD apart from the mean. A third band using 3 standard deviations might be, also, useful.

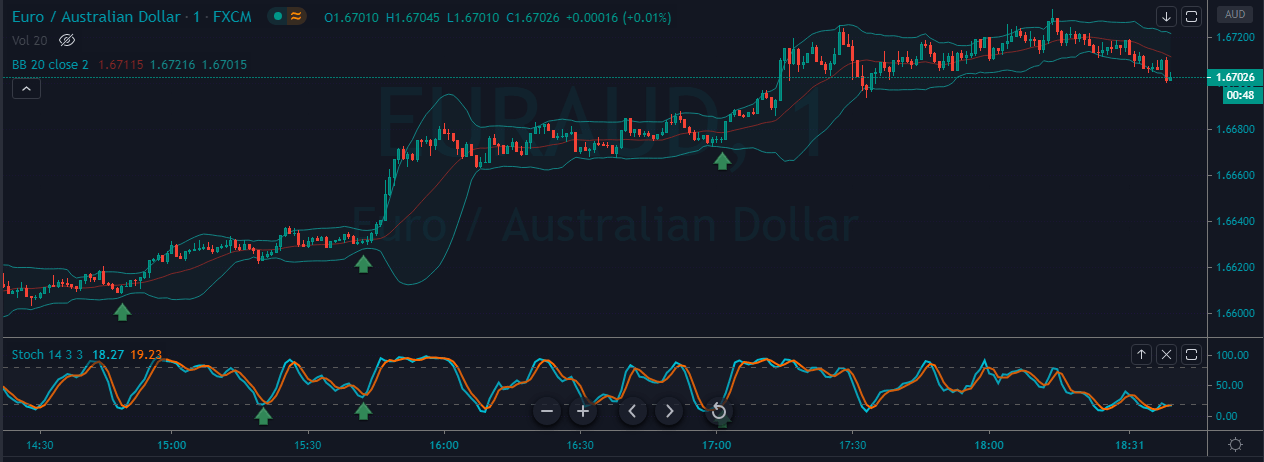
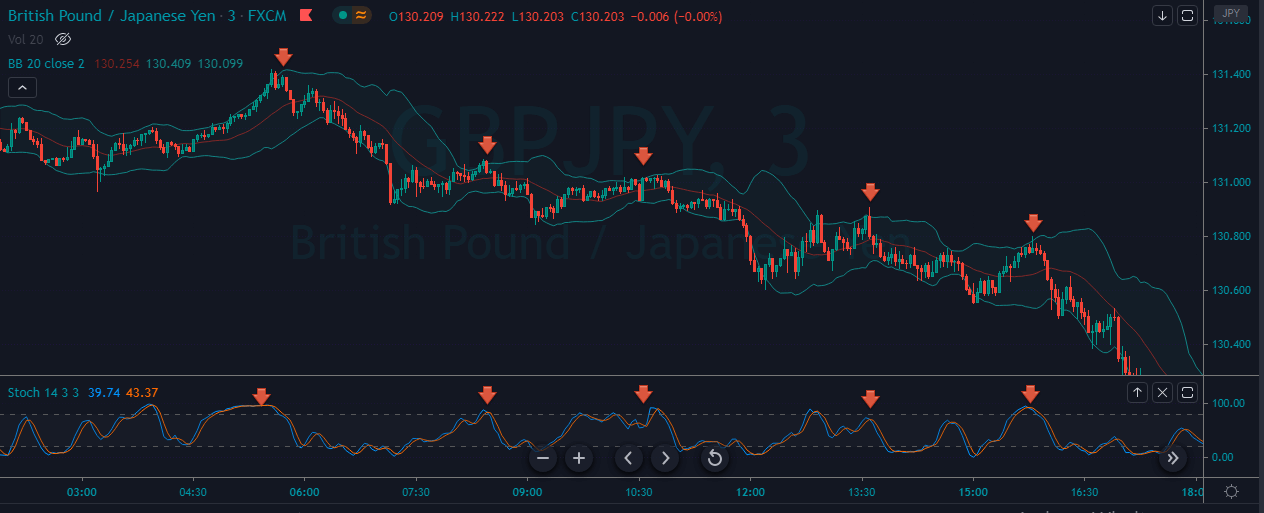
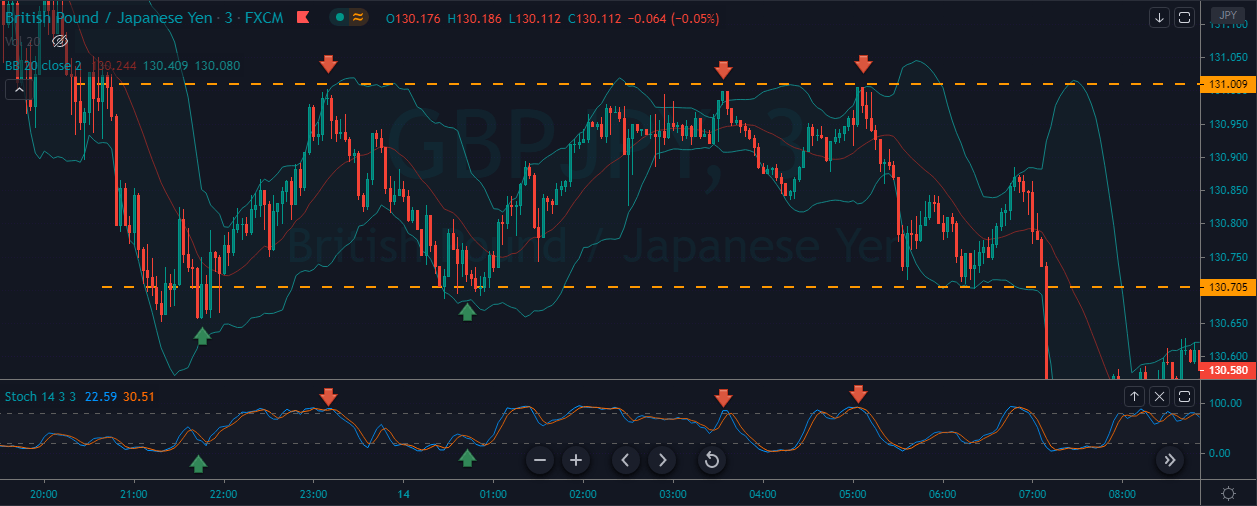
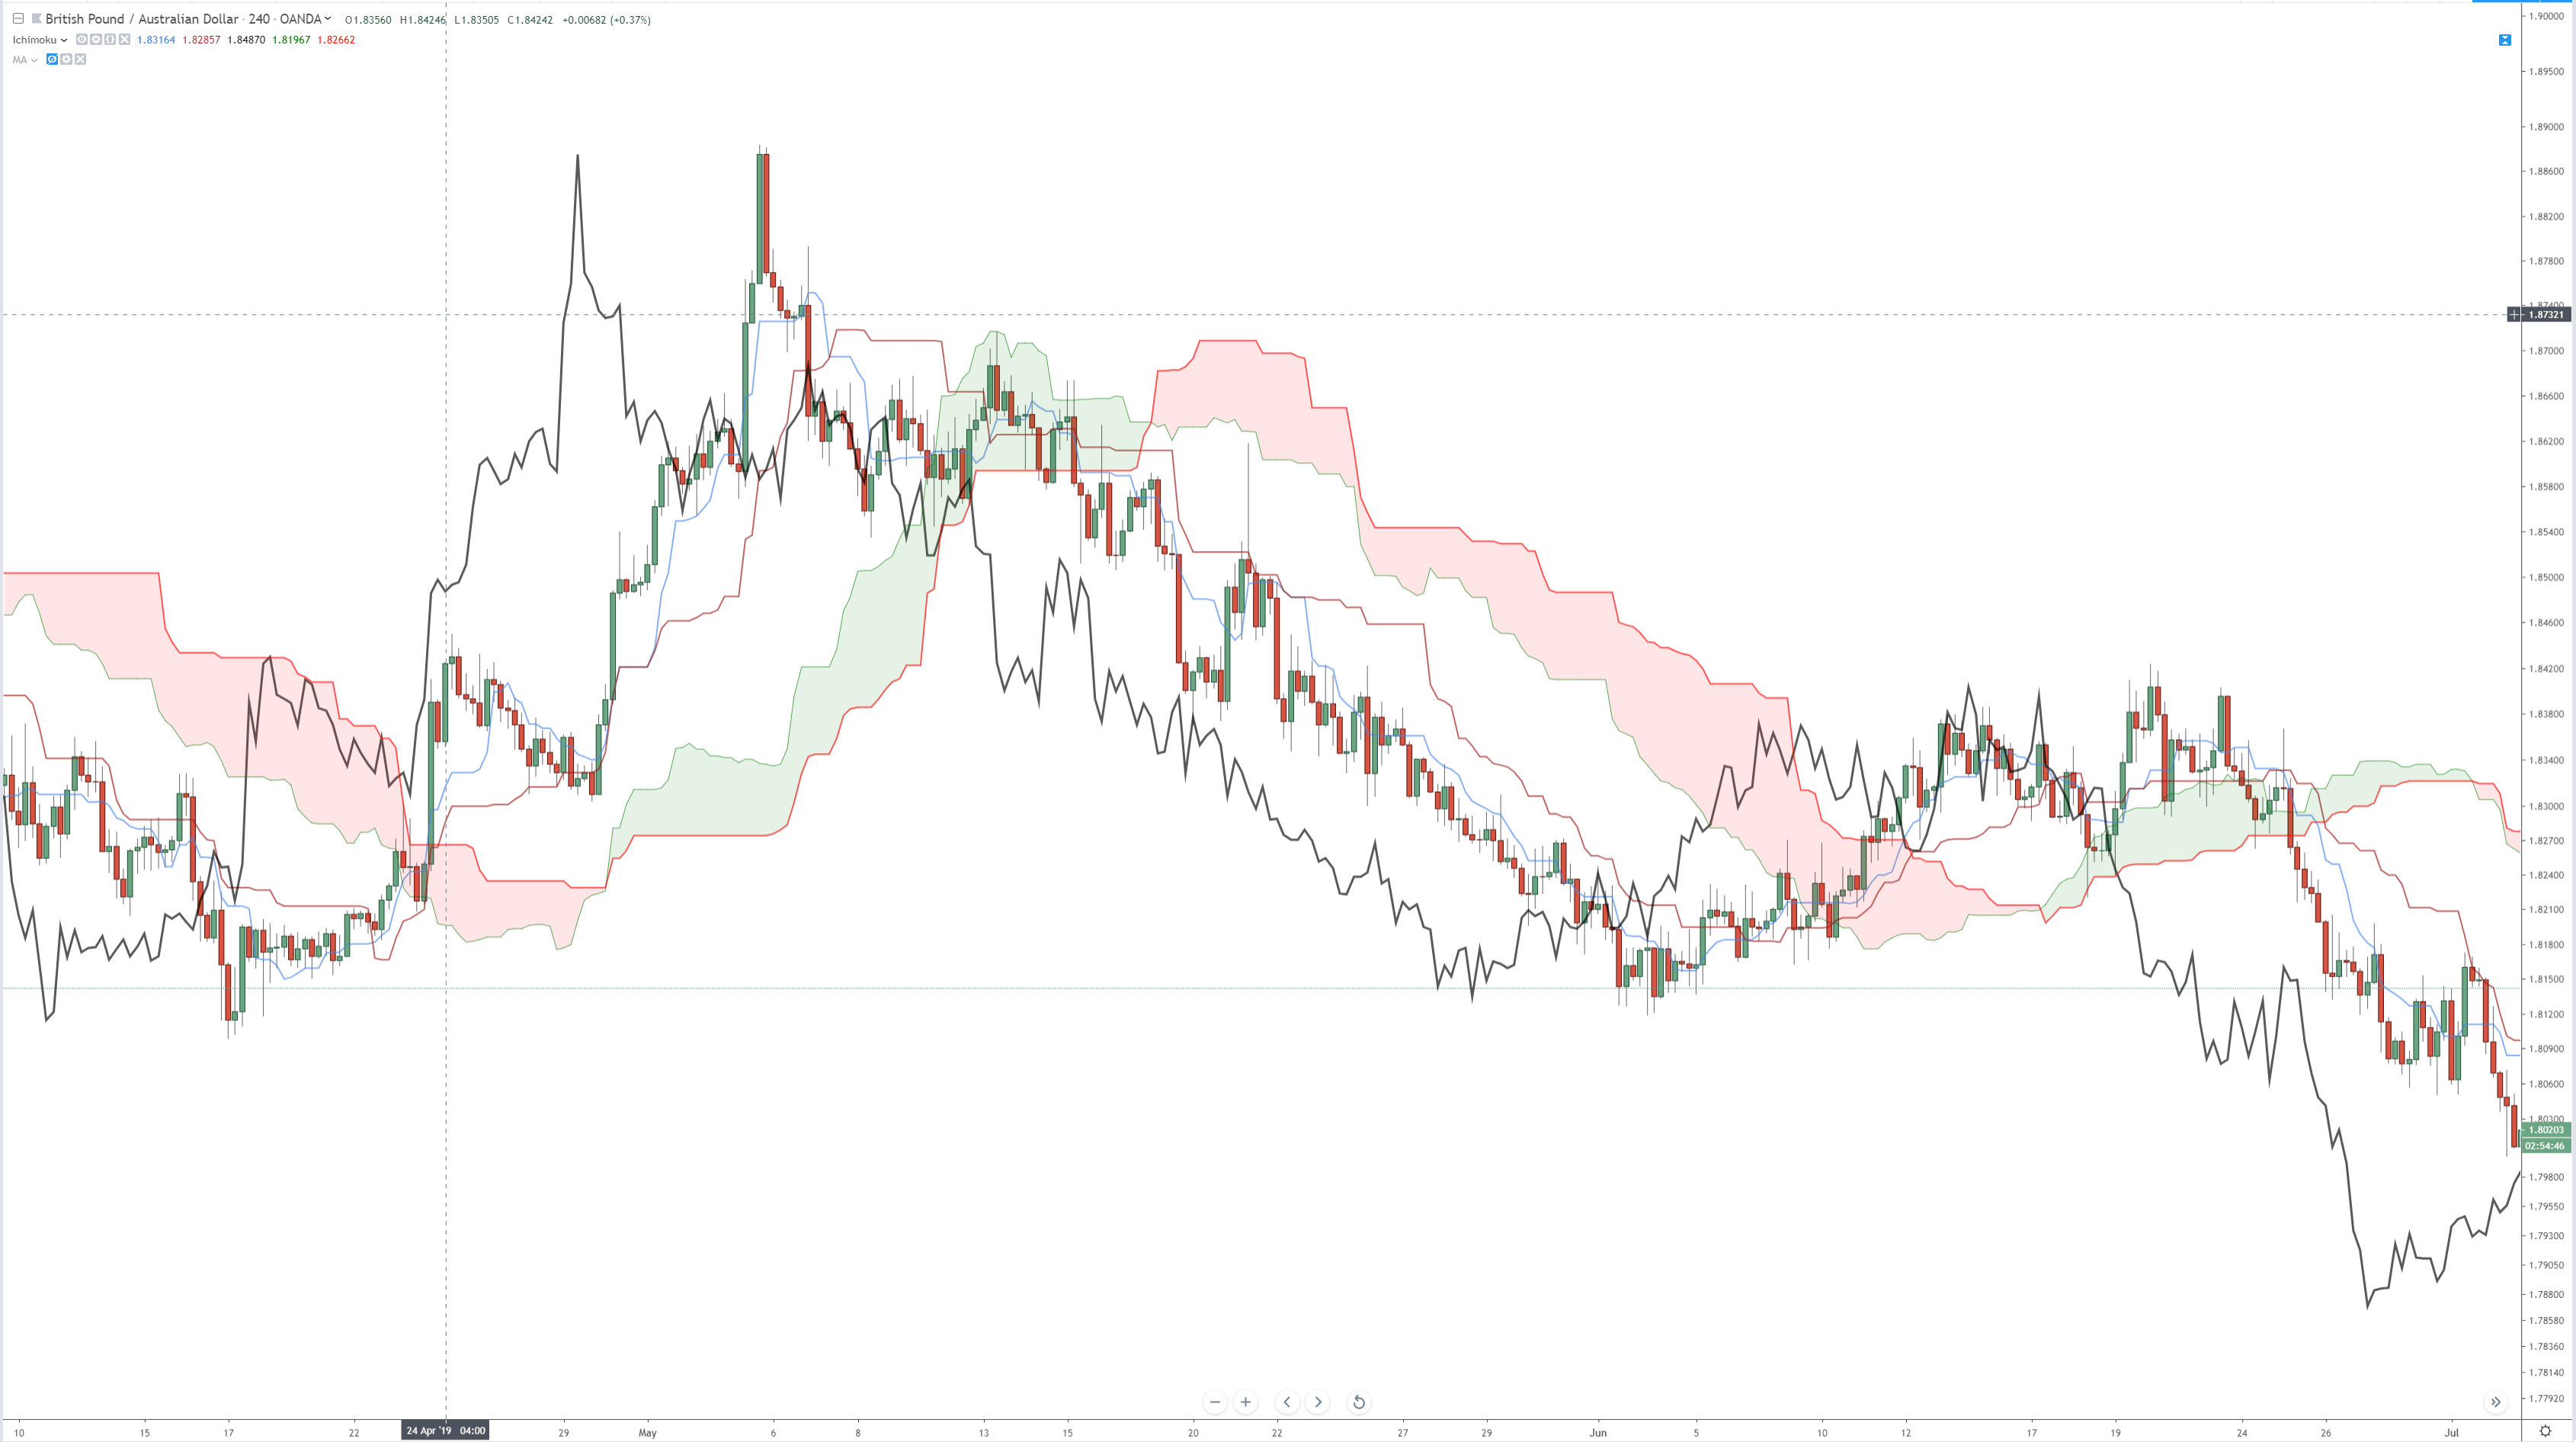
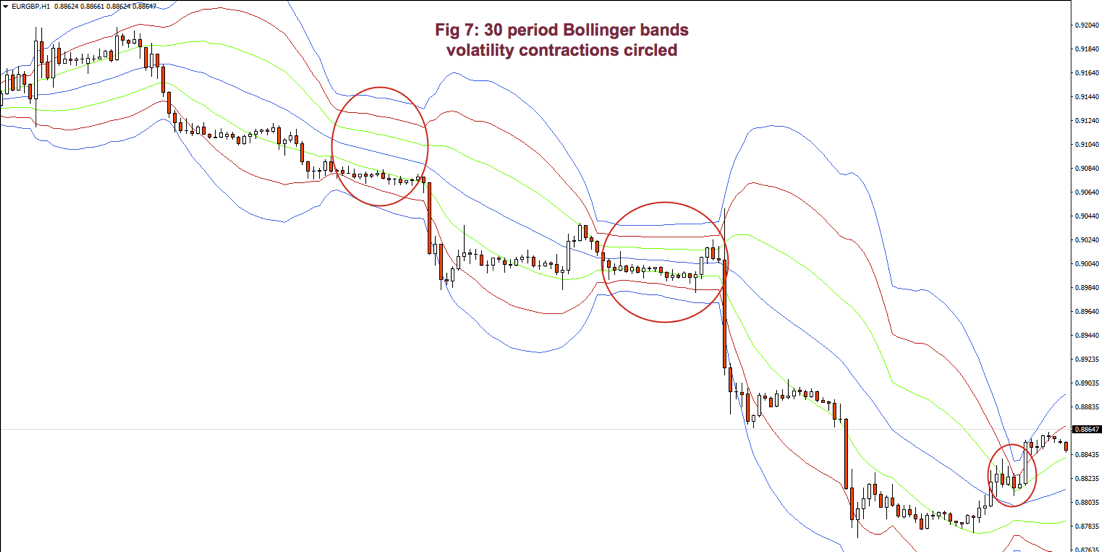
Fig 6 shows a very contracted chart with 3 Bollinger bands to show how it looks and distinguishing periods of low volatility.

During bull trends, the price moves above the mean of the Bollinger band.  During bear markets, the price is below the average line of the bands.

On impulsive legs of a trend, the price goes above 1-SD (or below on downtrends), and it continues moving until it crosses the 2-SD line, sometimes it even crosses the third 3-SD line. Price beyond 2 SDs is a clear sign of overbought or oversold. On corrective legs, the price goes back to the mean. During those phases volatility contracts, and is an excellent place to enter at breakouts or breakdowns of the trading range.

Below Fig. 7 shows an amplified segment of Fig 6, with volatility contractions circled. We may observe, also, how price moves to the mean, after crossing the 2 and 3 std lines.


Grading your performance

According to Dr. Alexander Elder, the market is testing us every day. Only most traders don’t bother looking at their grades.

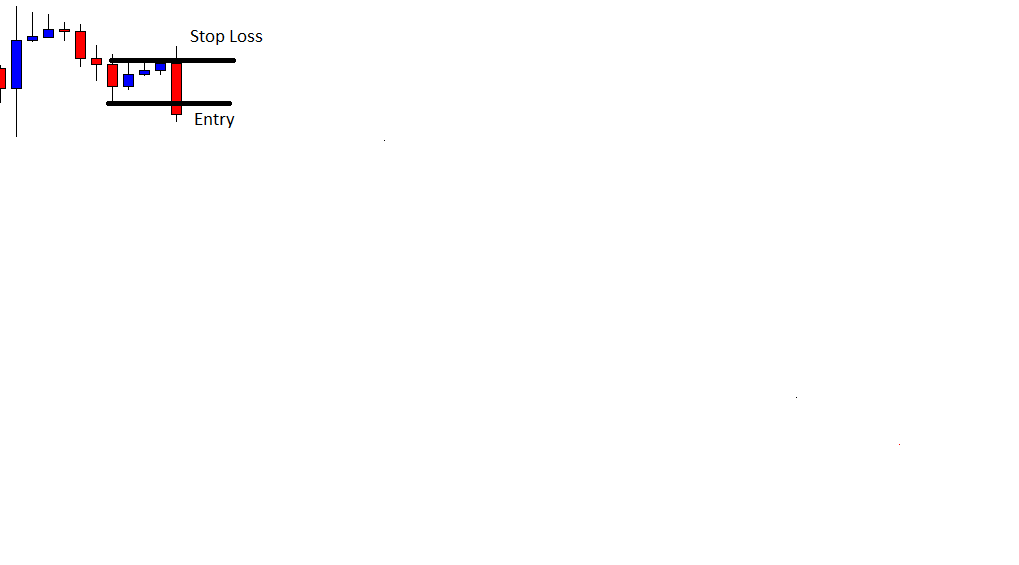
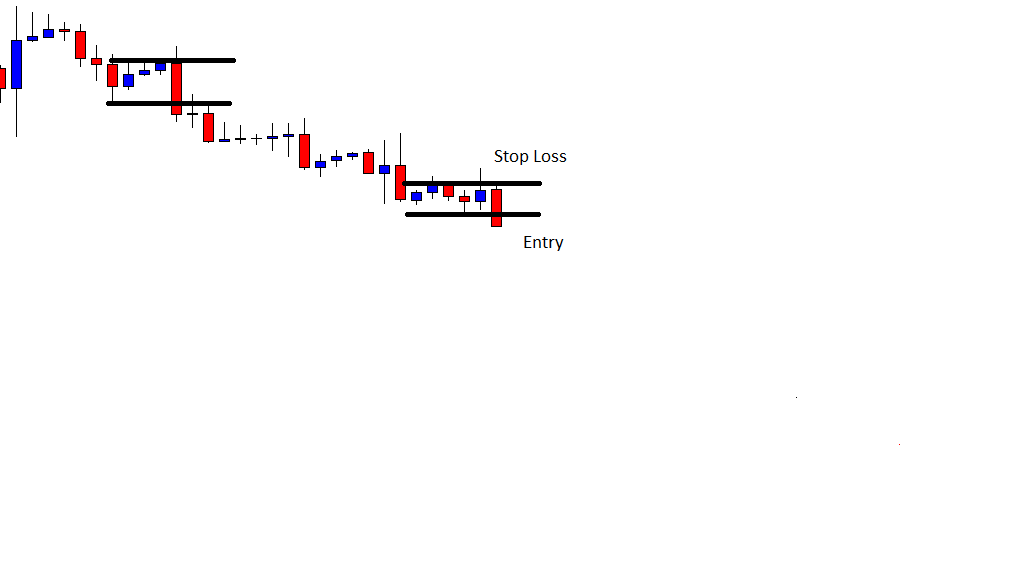
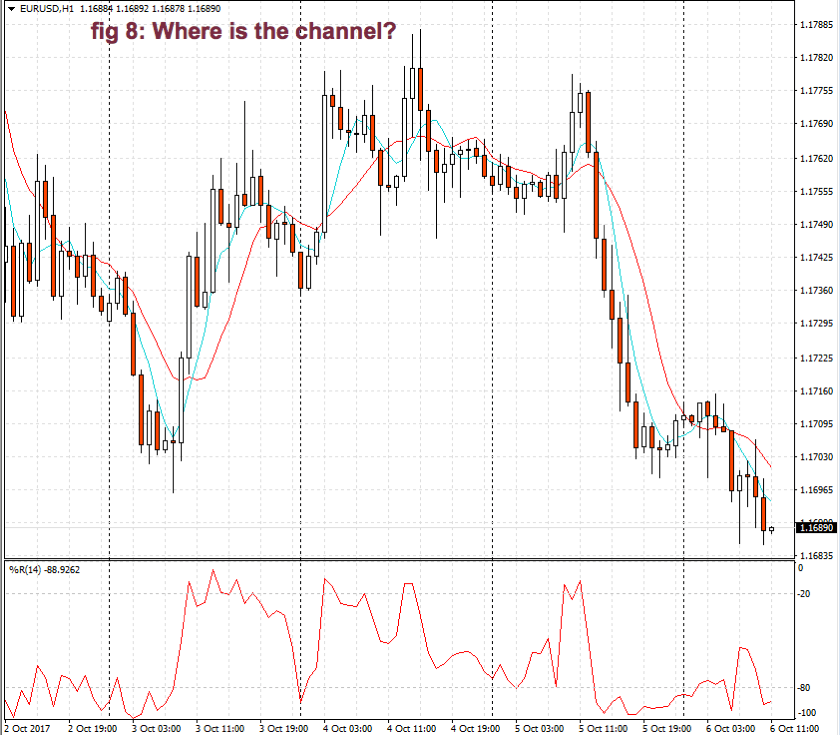
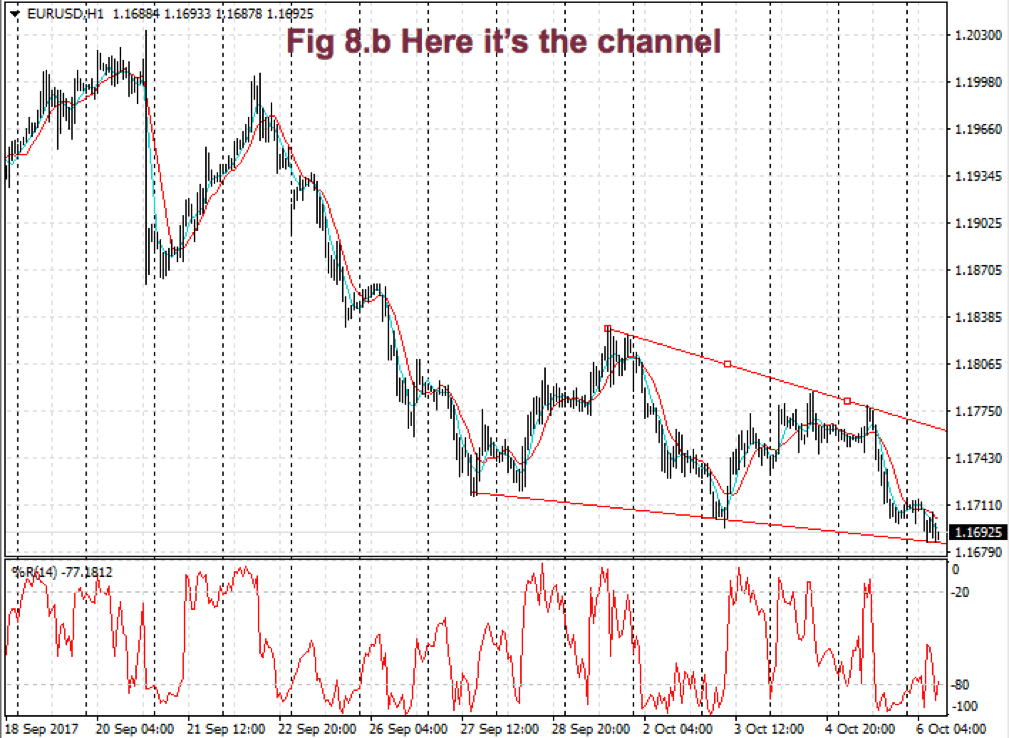
Channels help us grade the quality of our trades. To do it, you may use two trendlines or some other measure of the channel. If you don’t see one, expand the view of the chart.

When entering a trade, we should measure the height of the channel from the bottom to its top.  Let’s say it’s 100 pips.  Suppose you buy at ¾ of the upper bound and sell 10 pips later. If you take 10 pips out of 100 pips, your trade quality is 10/100 or 1/10. How does this qualify?

According to Elder’s classification, any trade that takes 30% or more of a channel is credited with an A. If you make between 20 and 30%, your grade will be B. Between 10 and 20% you’re given a C and a D if you make less than 10%.  So, in this case, your grade is C.

Good traders record their performance. Dr. Elder recommends adding a column for the height of the channel and another column for the percentage your trade took out of the channel.

Monitor your trades to see if your performance improves or deteriorated.  Check if it’s steady or erratic.  The information, together with the autopsy of your past trades, helps you spot where are your failures: Entries too late? Are you exiting too soon? Too much time on a losing or an underperforming trade?  A trade against the prevailing trend?


The next chapter will be dedicated to chart patterns.


Appendix: Statistics Overview

Statistics is a branch of mathematics that gives us information about a data set. Usually, the data set cannot be described by an analytical equation because they come from unpredictable or random events. As traders, we need basic knowledge, at least, of statistics for our job.

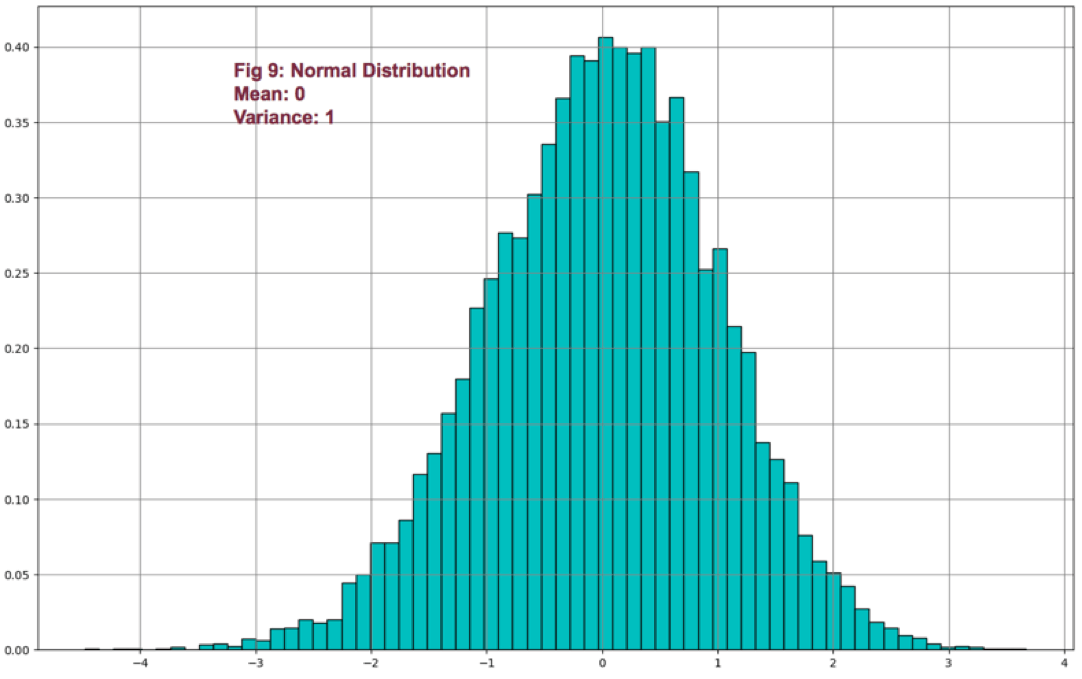
We can express statistical data numerically and graphically. Abraham de Moivre, back in the XVII century, observed that as the number of events (coin flips) increased, the shape of the binomial distribution approached a very smooth curve. De Moivre thought that if he could find the mathematical formula for this curve, he could solve problems such as the probability of 60 or more heads out of 100 coin flips. This he did, and the curve is called Normal distribution.

This distribution plays a significant role because of the fact that many natural events follow normal distribution shapes.  One of the first applications of this distribution was the error analysis of measurements made in astronomical observations, errors due to imperfect measuring instruments.

The same distribution was also discovered by Laplace in 1778 when he derived the central limit theorem. Laplace showed the central limit theorem holds even when the distribution is not normal and that the larger the sample, the closer its mean would be to the normal distribution.

It was Kark Friedrich Gauss, who derived the actual mathematical formula for the normal distribution. Therefore, now, Normal distribution is also named as Gaussian distribution.

Although prices don’t follow a normal distribution, it’s is used in finance to extract information from prices and trading statistics.

There are two main measures we use routinely: The center of our observations and the variability of the points in our data set from that mean.

There’s one main way to compute the center of a set: the mean. But it’s handy to know also the median if the distribution isn’t symmetrical.

Mean: It’s the average of a set of data. It’s computed adding all the elements of a set and divide by the number of elements:

Mean = Sum(p1-Pn)/n

Median: The median is the value located in the middle of a set after the set has been placed in ascending order. If the set has a symmetrical distribution, the median and the mean are the same or very close to it.

The variability of a data set may be calculated using different methods. Two main ways are used in financial markets:

Range: The easiest way to measure the variability. The range is the difference between the highest and lowest data of a set. On financial data, usually, a variant of the range is calculated: Average true range, which gives the average range over a time interval of the movement of prices.

Sample Variance(Var): Variance is a measure of the mean distance of the data points around its mean. It’s computed by first subtracting the average from all points: (xi-mean) and squaring this value. Then added together and dividing by n-1.

Var = 𝝈2 =∑ (x-mean)2 / (n-1),

whereis the symbol for the sum of all members of the set

By squaring (xi-mean), it takes out the negative sign from points smaller than the mean, so all errors add-up. The division by n-1 instead of n helps us not to be too much optimistic about the error. This measure increments the error measure on small samples, but as the samples increase, its result is closer and closer to a division by n.

If we take the square root of the variance, we obtain the standard deviation (𝝈 – sigma).

 Volatility: Volatility over a time period of a price series is computed by taking the annualized standard deviation of the logarithm of price returns multiplied by the square root of time expressed in days.

𝝈T = 𝝈annually √T


References:

New Systems and Methods 5th edition, Perry Kaufman

Trading with the Odds, Cynthia Kase

Come into my Trading Room, Alexander Elder

History of the Gaussian distribution http://onlinestatbook.com/2/normal_distribution/history_normal.html

https://en.wikipedia.org/wiki/Volatility_(finance)

Further readings:

Profitable Trading – Chapter 1: Market Anatomy

Profitable Trading Chapter III: Chart patterns

Profitable Trading – Computerised Studies I: DMI and ADX

Profitable Trading – Computerized Studies II: MACD

https://www.forex.academy/profitable-trading-computerized-studies-iii-psar/

Profitable Trading (VII) – Computerized Studies: Bands & Envelopes

Profitable Trading VIII – Computerized Studies V: Oscillators

Categories
Forex Educational Library

Profitable Trading – Chapter 1: Market Anatomy

Introduction

In their pursuit of a profitable system or strategy, traders look at past behaviors as a forward indicator of prices.

Indeed, if the price movement is an objective manifestation of the average trader sentiment, then wherever in the future the same sentiment arises, a pattern might take place with a shape similar to the one drawn in the past.  From this belief, it follows that the study of patterns may be of help to find entry and exit points in our pursuit of profits.

There is a catch, though. The human brain is a natural pattern recognizing system. We see patterns everywhere. In ordinary life, that’s the way we recognize things: A round tire, a rectangular table, or a staircase shape. When random events enter into the equation, we continue seeing patterns, although not always, they may exist. Nowadays, Technical Analysis is evolving toward a more evidence-based framework, pushed by authors such as David Aronson, Robert Carver, and others.

I’ll deal with this framework in a future article series, but, throughout the following issues, we’ll deal with the standard TA framework as a foundation for the later. We will develop a base knowledge and the tools to trade the three different market types.

Please keep in mind that, here, we’re dealing with uncertain events, so nothing is 100% sure. Sometimes not even 50% sure. But our objective when trading isn’t being right, but profitable, so as long as our overall performance is positive, the technical signal is good.

Market classification

There are three basic market types:

  • Bull markets: broad ascending trends with sporadic retracements or sideways moves or channels.
  • Bear markets: broad, descending trends with sideways movements or strong and fast bear-trap retracements.

Of course, when trading currency pairs, a bearish market in one pair is a bullish market in its inverse pair, so the tools for bear and bull markets tend to be somewhat similar, and the situations encountered quite symmetric.

Sometimes, lateral markets aren’t perfectly horizontal. The main feature of a lateral market is its increased volatility and noise. The other trait is the seemingly cyclic nature of their movements.

Anatomy of a trend

In Fig 1, we may observe a bullish trend on the EUR/AUD, back in 2015. We may see that prices move in waves. However, the crest of a new wave goes higher than its preceding one. Similarly, its valley is more elevated than preceding valleys, as well.

So, a practical definition of an uptrend is a price pattern with higher highs and higher lows. Consequently, a bearish trend, or downtrend, is, then, a price pattern with lower highs and lower lows.

Trends happen on any time-frame. Even a single bar might be classified as a bull, bear, or lateral. A candlestick with a long white body and short shadows is, in fact, a bullish trend in its tiny time-frame while a long black candle with small shadows accounts as a bearish trend.

Lateral movements on a single bar happen when the candle presents a small body, or none at all, together with long upper and/or lower shadows.

Phases of a bullish trend:

The wavelike pattern, present in most trends, is the result of phases of accumulation, distribution, and sale that draw two different kinds of patterns: One impulsive and one corrective. Every one of these phases accounts as a trend (or lateral channel) in a shorter time frame, which might be composed, at the same time, by shorter trends with its own phases of accumulation, distribution, and selling.

Accumulation phase:

In the later stages of a wave valley, there is accumulation by smart traders who think there is an excellent opportunity with low risk, forming a support level. Sometimes, this support is briefly broken to the downside; stops are taken, and, then, the price back up, again, above support.

After this last trick to fool the weak hands, price starts to climb, slowly at first, faster as momentum grows. In the final moments of this phase, price moves quickly, with substantial price increases on higher volume.

Distribution phase:

In the final stage of an impulsive phase, selling begins by smart profit takers, while the price is still rising, then it reaches overbought levels. A kind of barrier seems to have been established: It’s called a resistance level.

At those levels, more traders are willing to sell than buyers can manage, so price stagnates. Latest bulls don’t have the strength to raise prices beyond that point, but this new leg high is higher than the one in the previous impulsive phase.

Selling phase:

Price moves in a declining channel. Traders that went long at its highs close at a loss. Thus, the price moves down. Then, price recovers as if a new leg up might happen, just to fade again a bit lower than before. Several push-pull phases take place, its pattern like a fading oscillation.

Price reached a new support, and a new accumulation phase begins. Usually, this support is at or near the high of the previous impulse high. This stage draws a corrective pattern.

Phases of a bearish trend

In stock and futures markets, there is a marked asymmetry between bull and bear markets. The former being orderly and, usually, less volatile, except at its beginning, while its ending depicts exuberance and extremely positive expectations. Conversely, bear markets depict much higher volatility, together with fast, bear-trap rallies.

Sell-offs drives prices down much faster than when they are rising. Bear markets tend to be short and fast, losing between 20 to 70% of its value. On stocks, it may lose up to 95% of its value, as it happened to some tech stocks back in 2000 or bank stocks in 2008.

Currency pairs, by its own nature -currency prices moving against each other- make bull and bear phases symmetrical. The discussion above may have been the same if we swap the pair. So A bearish trend in a currency pair has identical stages because it’s just a bullish trend looked from the short side.

What is essential to be aware of is that the impulsive pattern, be it up or down, is the one where we could make more profits with reasonable reward to risk ratios. And the corrective leg (2), the product of a selling phase, is harder to trade and presents more mediocre rewards for its risks.

Fig 2 shows this behavior. We may discover that the Reward to risk channel on the impulsive phase (1) is much broader than on the reactive leg (2) when traded to the short side.

On the impulsive leg, the potential reward is more than 2x its risk, while to the short side, on a corrective phase, it’s less than one, even in the ideal case of taking profits at the lowest low of the channel.

This is a good example of why we should never fight the trend. Instead, we might use a corrective leg to add to a position or entering near support, that is, near the bottom of the channel.

Upside down, this example applies to a bear trend. Here, the impulsive leg, of course, is downward.

There are trends where the channel is more extensive, and both phases, impulsive and corrective, are equally profitable. But those cases are comparable to a sideways market, so the same kind of strategies applies there.

Sideways channels

A sideways channel happens when the price oscillates between two levels that seldom move or move up or down very slowly.  If the channel is wide enough, it may offer trading opportunities, although, usually, volatility is higher, so it’s harder to trade.

Fig 3 shows a sideways channel that took place in the EUR/GBP from Nov. 2016 until Jun. 2017.  Here, we observe there’s a floor level and a ceiling level, where bounces occur.  On this sideways channel, we could split every leg and consider each leg as a bull or bear trend, and go to a shorter time frame to trade it.

But not always, this may be possible. Fig 4 shows the price behavior on the USD/CHF pair for the last five months, from the end of May 2017, till the beginning of October. We may observe that the high volatility that takes place in the last two legs makes it difficult to differentiate impulsive from corrective.  There we must switch to a shorter time frame in search of better behaved impulsive patterns.

A final word about time frames. We should use a higher-order time frame as our guide to decide which side to trade on the shorter frame, then mark support and resistance levels and potential entry points and stops to assess the reward and its risk.

Levels, breakouts, support, and resistance

I’ll tell you here my personal view about levels, support, resistance, and breakouts. People trade their beliefs about the markets. Price is continuously moving in a struggle of two sides, while a third side is watching.

The fight is between those who believe it’ll go up and those thinking it’s already too high and must go down. If the believers on one side are less than on the other hand, price moves against them until a new consensus is made where both parties have similar power.

At price levels where the power of bulls and bears is similar, the price cannot move up or down any longer, until one of the parties weaken or the other gets more strength. In the first case of a price going up and then stagnating, the level is called resistance. The case of a price falling and then stopping its downfall is called support.

On the occasions when the price is pushed beyond resistance, it’s called a breakout. If the price crosses a support level to the downside, it’s called a breakdown. Sometimes the breakout or breakdown is of short duration, price resuming to its previous levels after a few bars. In such cases, it’s called a failed breakout or a failed breakdown. Thus, the passing of time confirms the breakout or breakdown. As time goes, the strength of a support or resistance level increases.

Fig 5 shows a couple of support and resistance channels with two breakouts. Please note that on the second channel, supports are located at the peaks of the sideways channel that preceded the first breakout. This is quite usual, and a persistent pattern in trading charts. Current support levels were, first, resistance levels crossed by a price breakout, becoming supports. Similarly, current resistance levels were support places that were pierced down.

Support and resistance patterns are extraordinarily useful because of their rather good predictive value. Buying at support and selling at resistance is one of the better strategies around, and not only by its success rate but also because they are locations with excellent reward to risk ratio.

Channel contractions

Channel contractions are patterns sometimes called flags and sometimes pennants, wedges, triangles, etc. Although many books about trading patterns make a differentiation between them, they are the same corrective phase, after an impulsive leg.

The critical point to remember about this type of formations is that they are excellent places to trade following the breaking direction. We don’t care which one is it. Usually, it’s a trend continuation, but that doesn’t matter much because the second most important feature of a range contraction is that at those spots, the reward to risk is increased almost double compared to its beginning point.

Fig 6 shows an example of a channel contraction, where we will be able to observe at 1 the risk at its beginning and at 2 the risk at its end. We, also, are able to see that this type of formations is a trend continuation most of the time.

In the next issue, we’ll talk about trendlines, moving averages, and channels.

That’s all for today.

©Forex.Academy


References:

I took some ideas from Essential Technical Analysis, Tools, and Techniques to Spot Market Trends by Leigh Stevens. The rest is mine.

All charts are taken from the MT4 trading platform.