Categories
Forex Basic Strategies

Pivot Trading Strategy – Easiest Way To Trade Pivot Points

Pivot points are the significant levels used by the market technician to determine the future movement and the major support/resistance levels on the price chart. Pivot point takes the prior period high, low, and close to estimate the future support and resistance levels. Pivot points are the leading indicator, and once they are set on a price chart, it will remain the same throughout the day.

Timeframes

The pivot point of the 1, 5, 10, and 15-minute chart use the prior day high, low, and close. Whereas the pivot points for the 30, 60, and 240-minute chart use the last week high, low, and close to calculate the pivot points. Once the new week starts, the pivot point appears on the price chart until the end of the week.
The pivot point for the daily and chart use the prior month data, and the pivot point for the weekly and the monthly chart use the last year’s data. The new pivot point for the year ahead will be calculated on the 1st of January. These would be based on the high, low, and close of the last year’s pivot points.

There is a total of seven basics pivot levels on the price chart.

  1. Basic pivot level – It is the middle of the center pivot line.
  2. Resistance 1 (R1) It is the first pivot point above the centerline.
  3. Resistance 2 (R2) It is the second pivot level above resistance 1.
  4. Resistance 3 (R3) It is the third pivot level above resistance 2.
  5. Support 1 (S1) It is the first pivot level below the middle pivot line.
  6. Support 2 (S2) It is the second pivot level below support 1.
  7. Support 3 (S3) It is the third pivot level below support 2.

Trading Strategies Using Pivot Points

There are various pivot point trading strategies in the market; this one is especially we created for our fellow traders, our strategy is backtested on demo and even on trading simulation, so you no need to put the work required to find out the probability of this strategy—all we suggest you follow this strategy very well to make consistent money from the market.

Pivot points most often work very well in trending market conditions; some traders even use pivot points on lower timeframes to scalp the markets. The strategy is to find out the uptrend in any instrument and wait for the pivot point to go above the Pivot point centerline, and then wait for the pullback back to the pivot line to take buy entry. You can close your position at resistance one if the market momentum is choppy, and even in a strong trending market, you can also book the profit at resistance two or three.

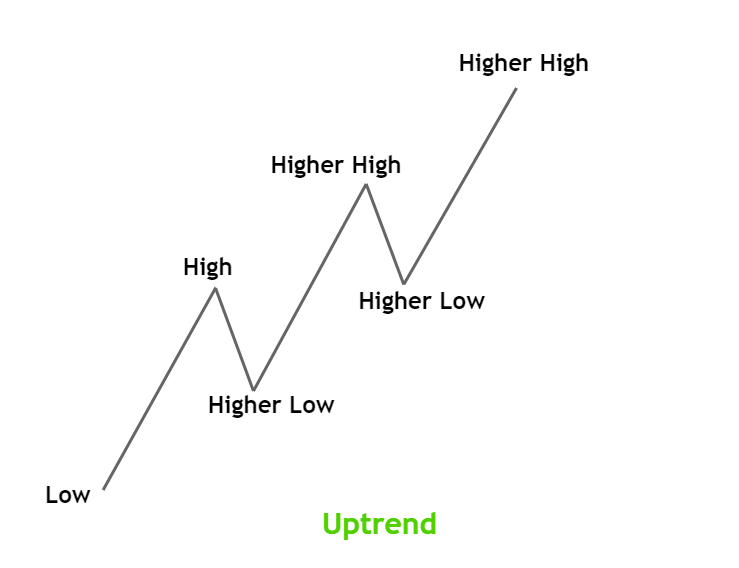
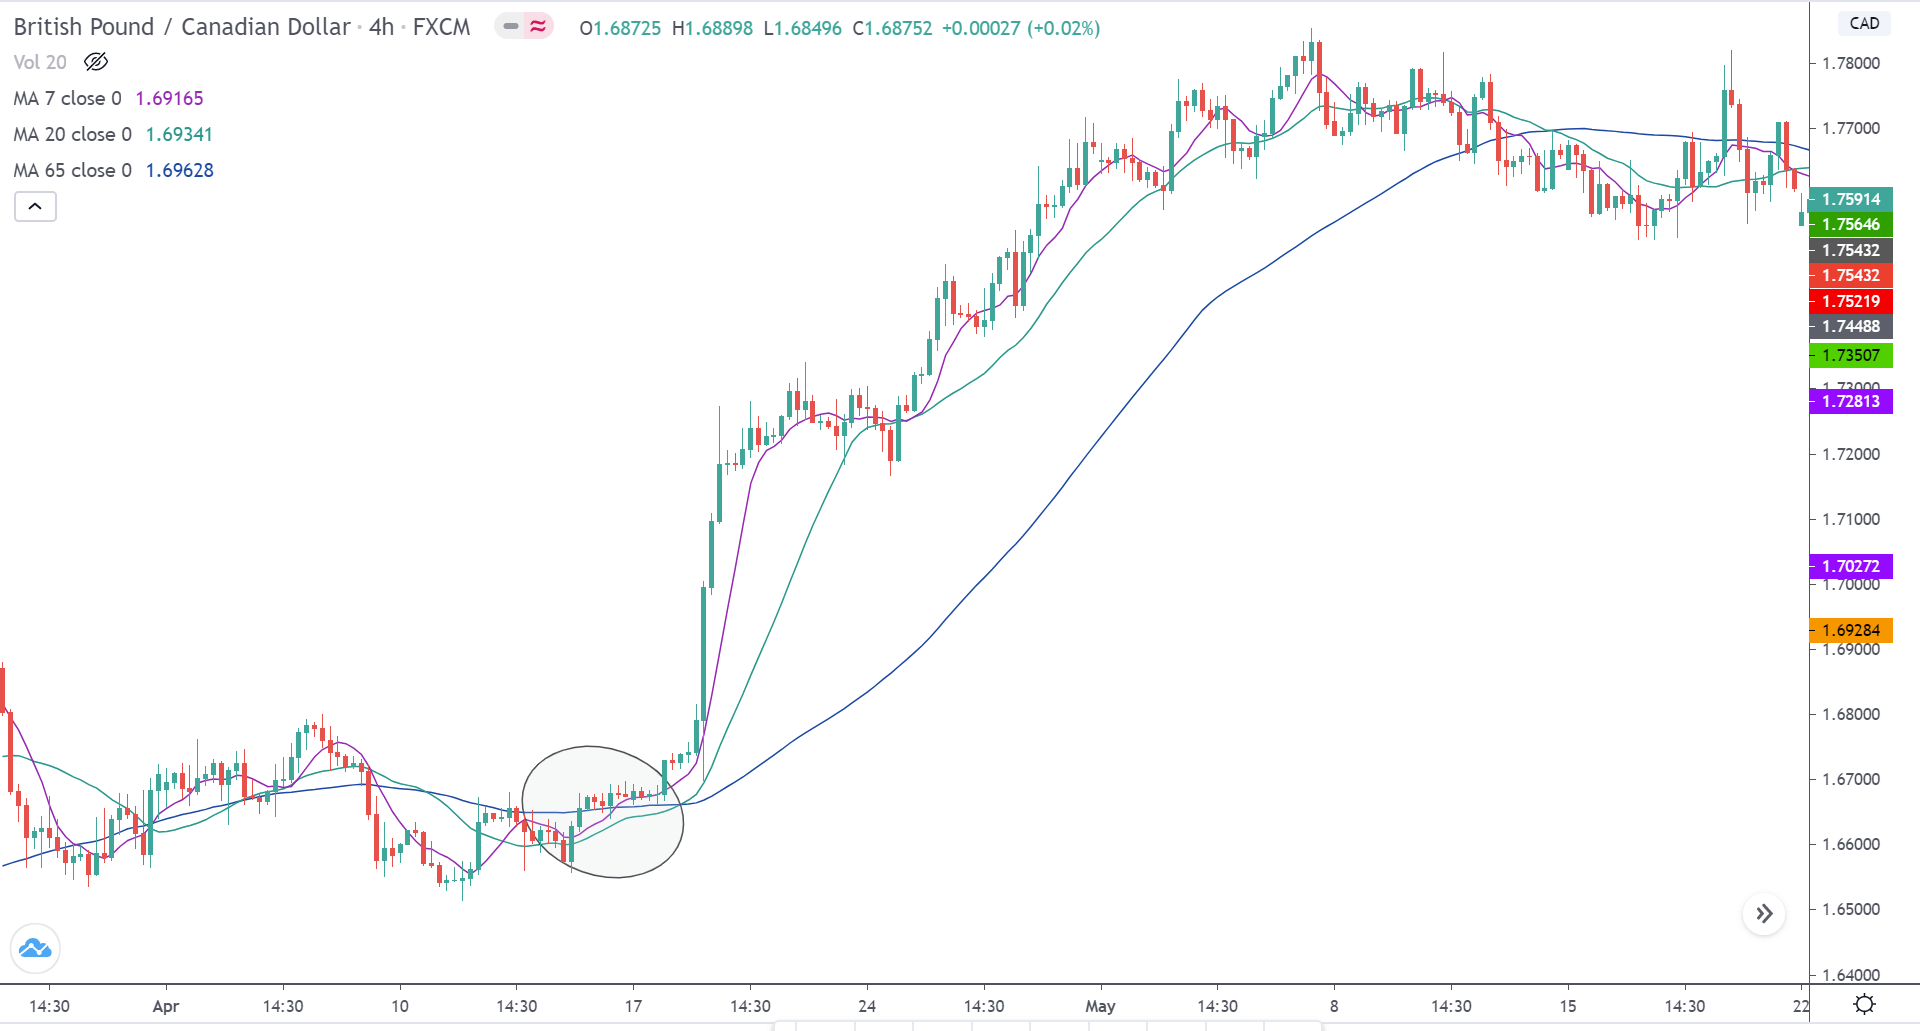
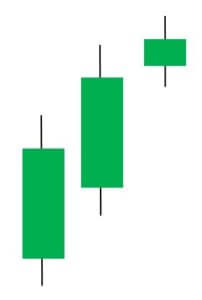
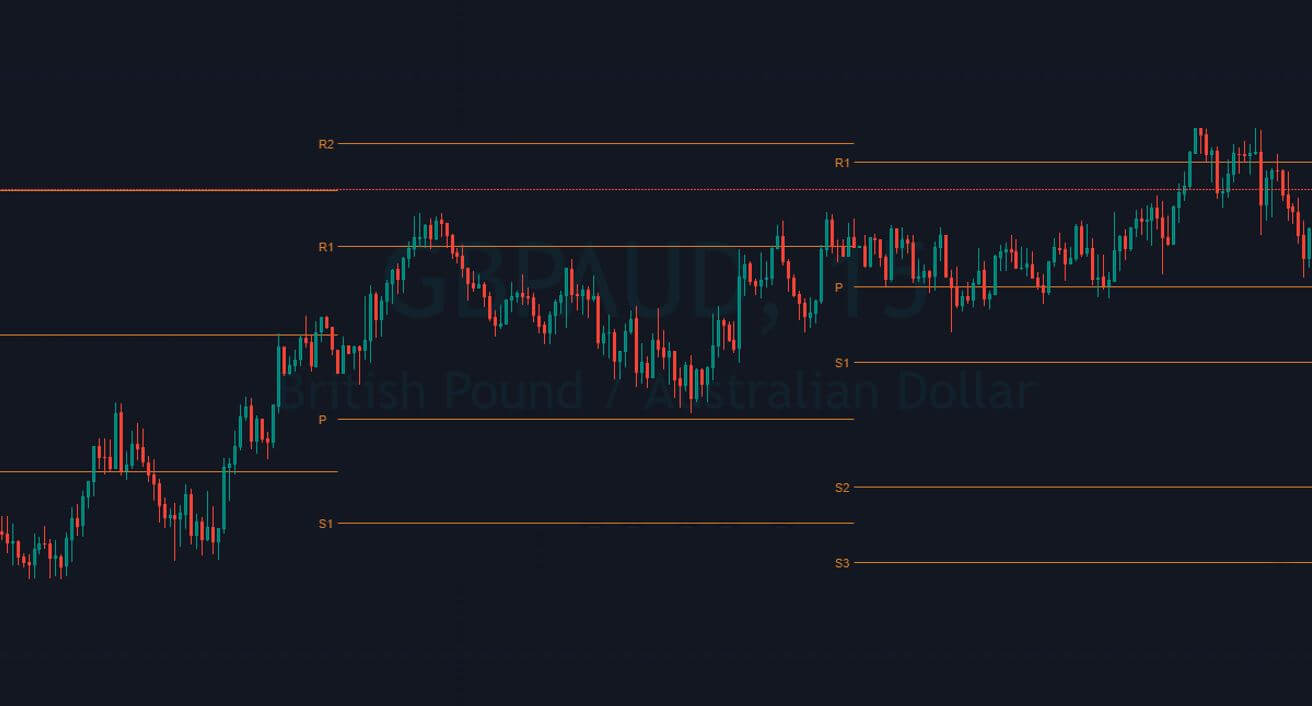
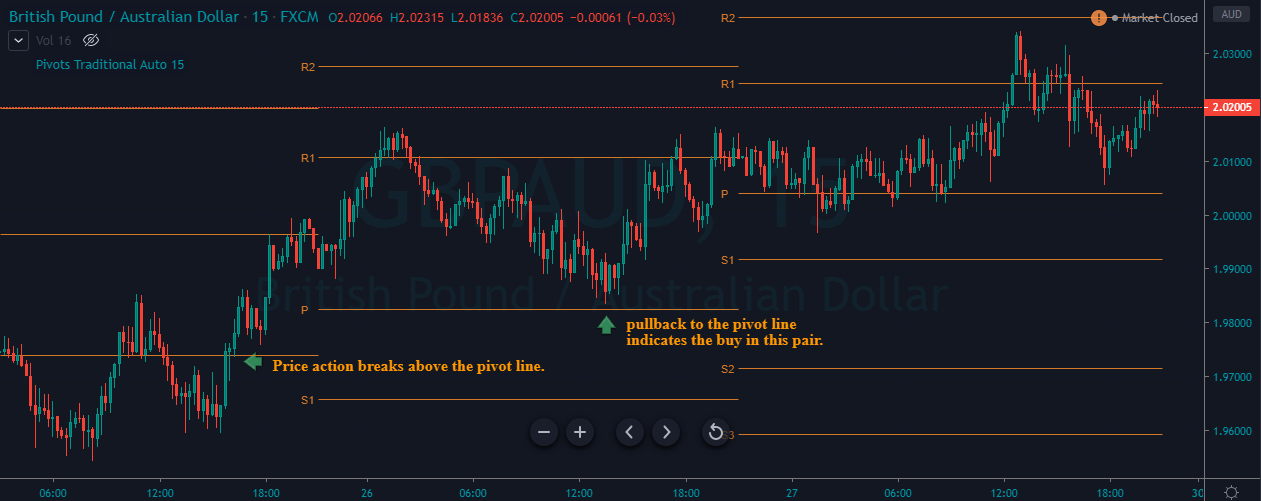
The image below represents the uptrend in the GBPAUD forex pair.

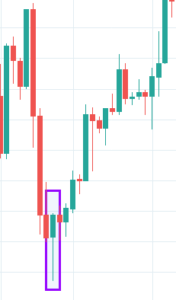
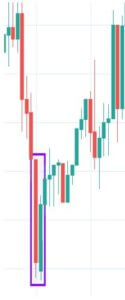
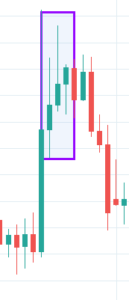
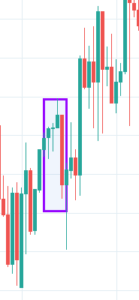
The image below represents our buying entry in this pair.  Notice that the day before our entry price action breaks the pivot line and the very next price action pullback to the pivot line. Keep in mind that the pullback must hold at the pivot line then only it confirms the buy trade, never place the limit order at the pivot line. Let the price action test the support line take entry.

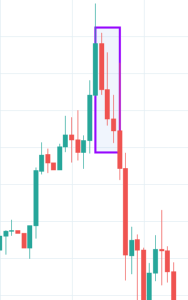
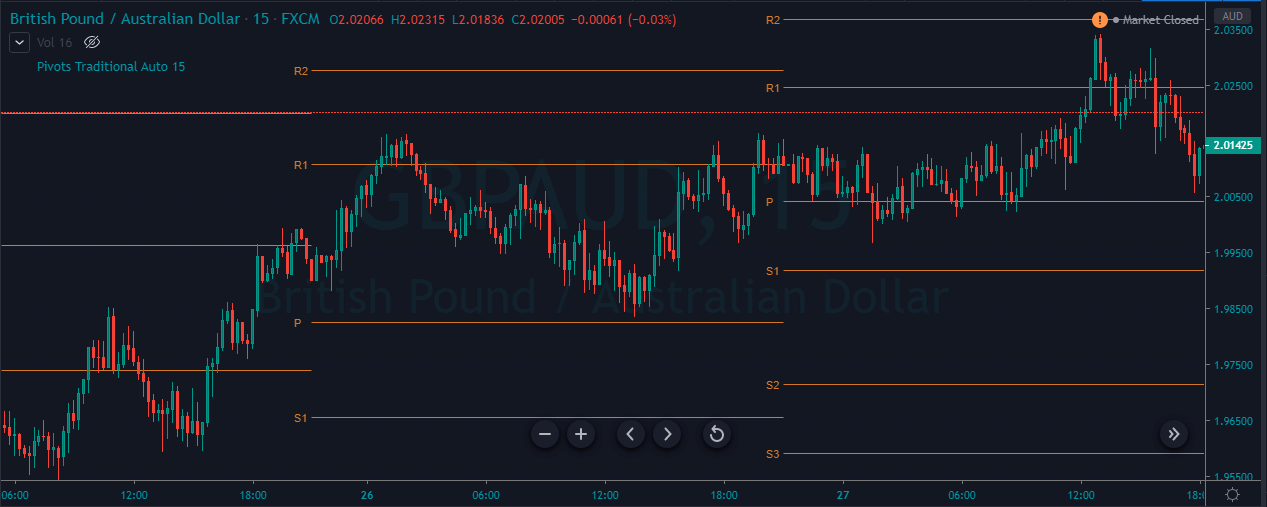
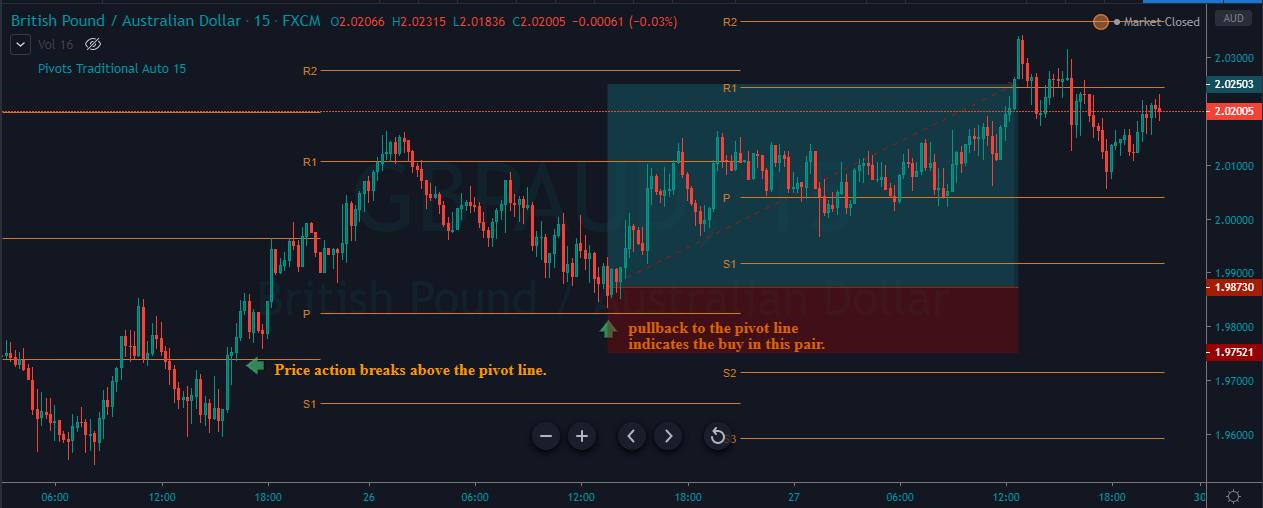
The image below represents our entry, exit, and take profit in the GBPAUD forex pair. When you follow so many steps to take an entry, it means that you are going for the precision in the market, and for the precision entries, always put the stop loss just below the entry price. In the image below, notice that our stop loss was just below the pivot line, and for the take profit, we go to the R1 of the next day, which was R2 for the previous day. Take profit is an art in the market, and when you use the pivot points, it’s even easier to book profit. If the price action immediately approaches the R1, then you can expect the price action to hit the R2 or even R3. If the price action shows you the struggle to hit the R1, then simply do not expect the deeper targets.

Pivot Points + Double Moving Average

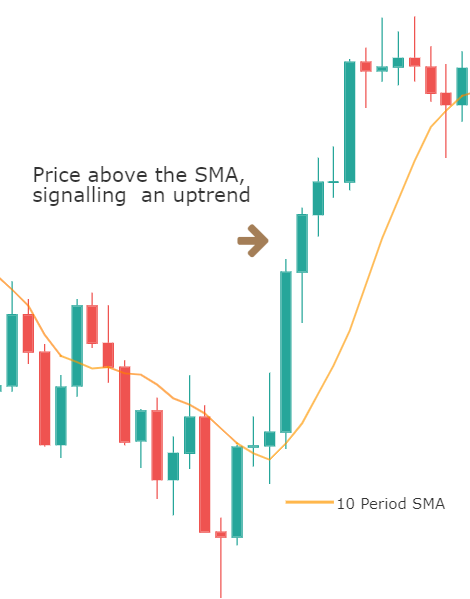
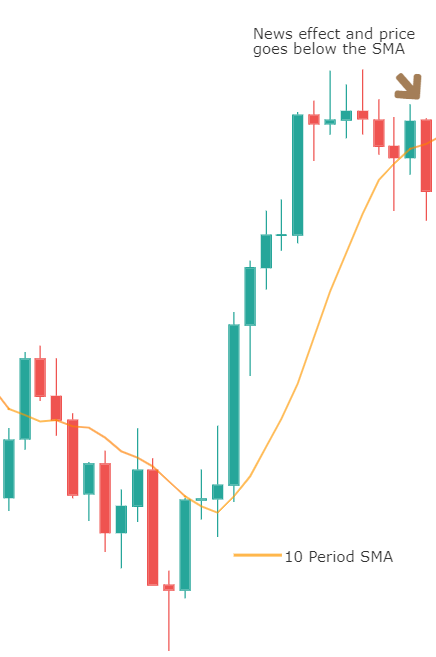
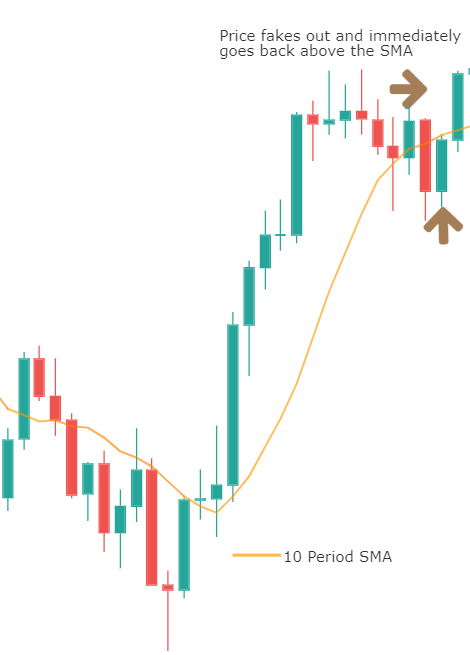
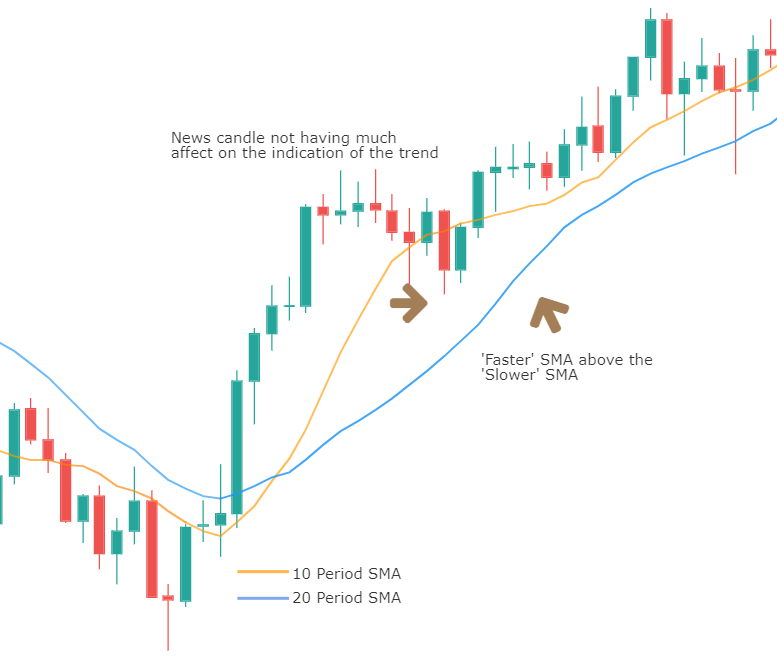
Moving average is a widely used indicator in the market which smooths out the price action by filtering out the noise from the random short-term price fluctuations. There are an infinite amount of moving averages in the market, which helps the traders to identify the market trend, entry, and exit also the potential reversals. When the moving average goes above the price action, it means that the trend is down, and when it goes below the price action, it indicates the uptrend in the security. In this strategy, we used the 30 and 15-period average to trade the market.

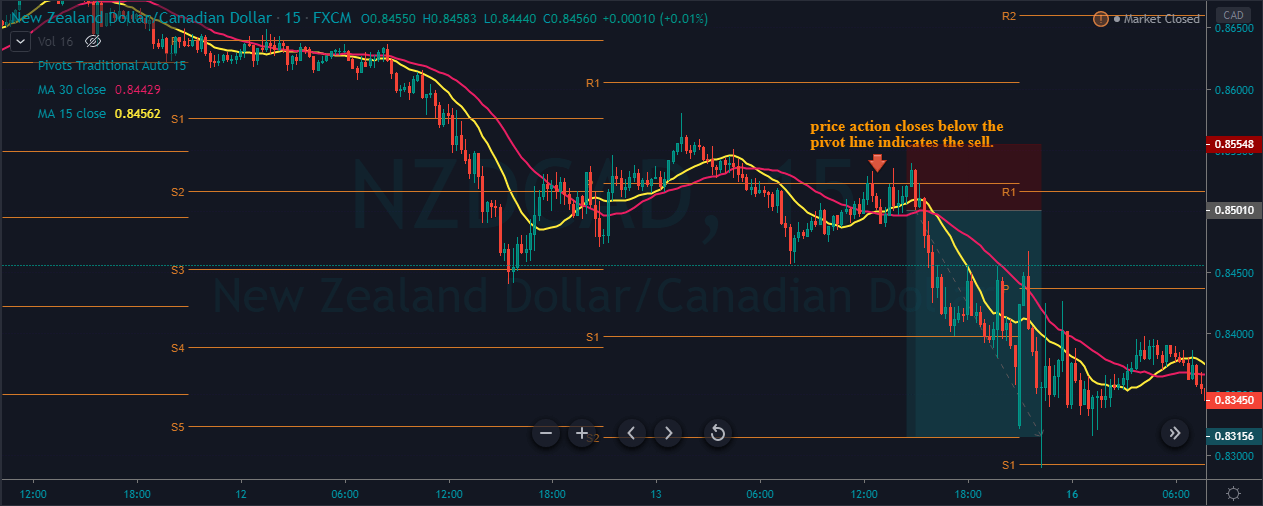
The trading strategy is, first of all, to find out the downtrend in any pair and wait for the prices to close below the pivot line also check the crossover above the price action on a double moving average to take an entry.

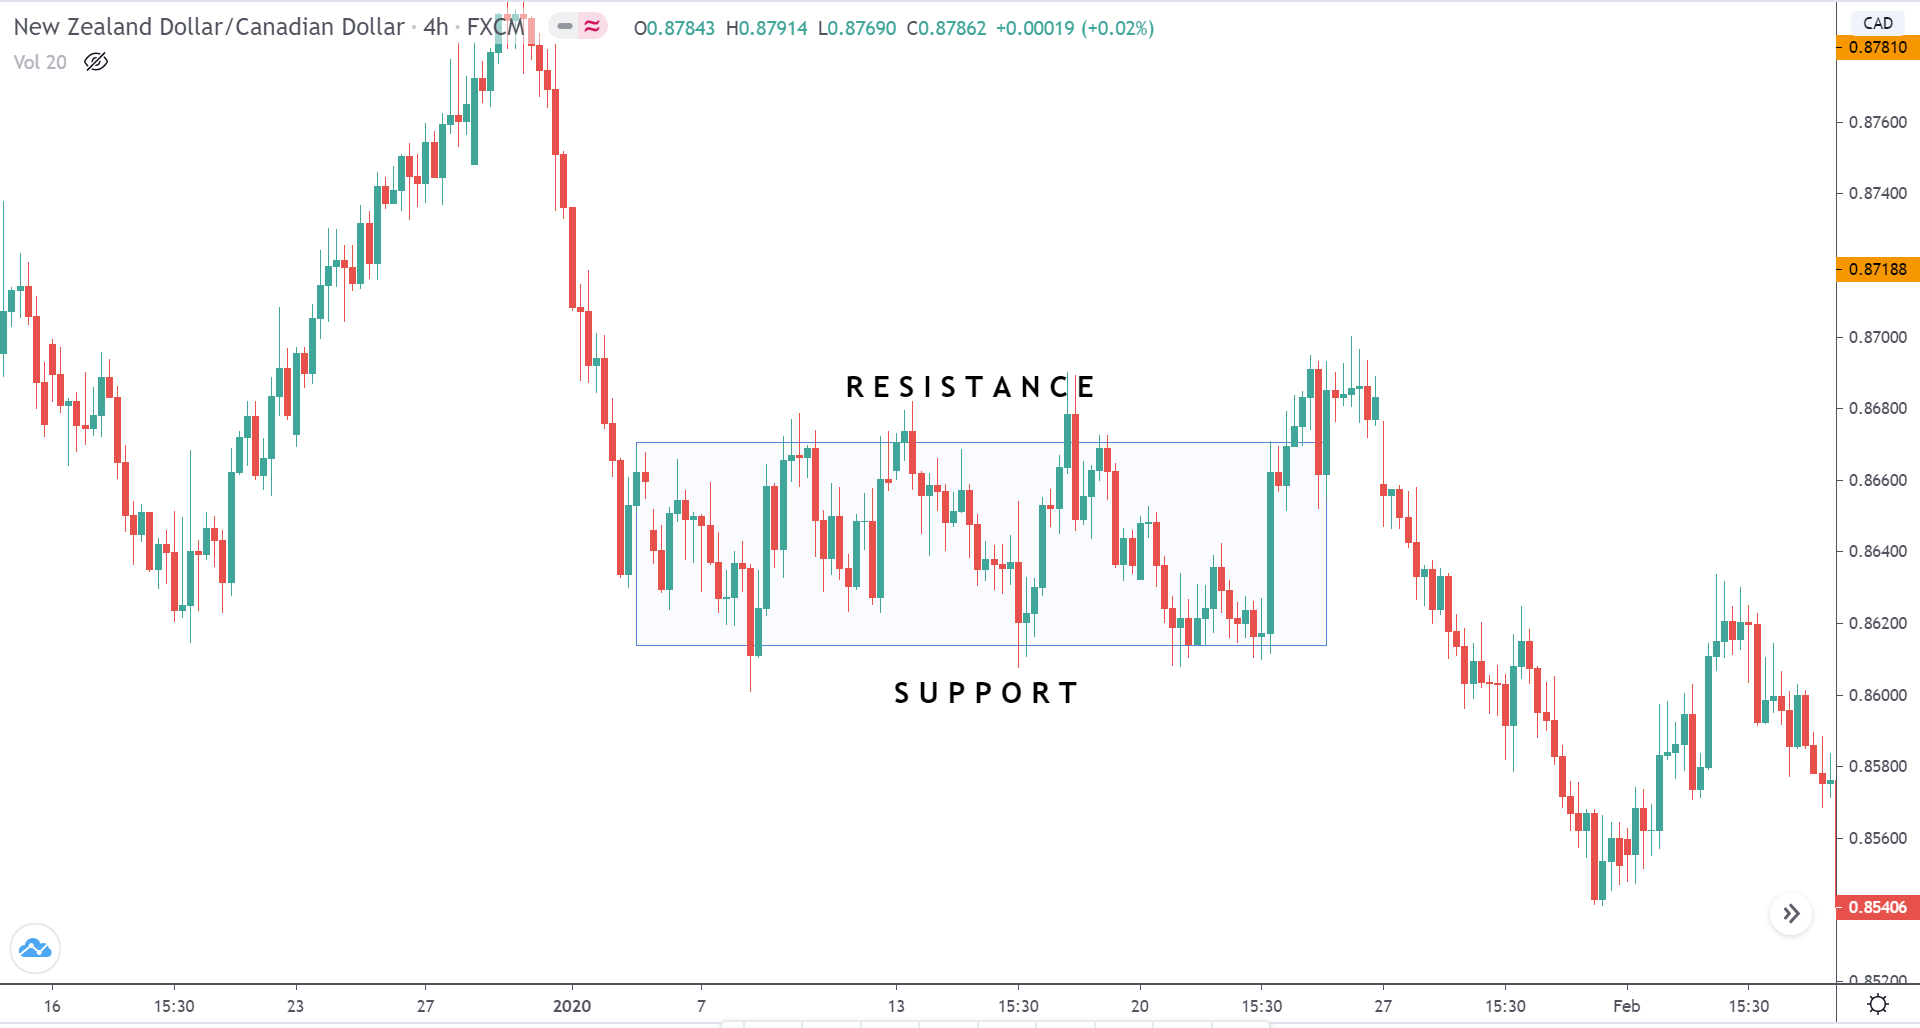
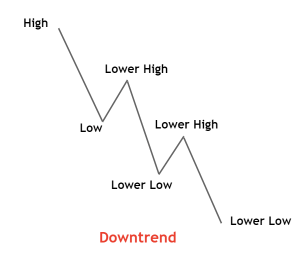
The image below represents the downtrend in an NZDCAD forex pair.

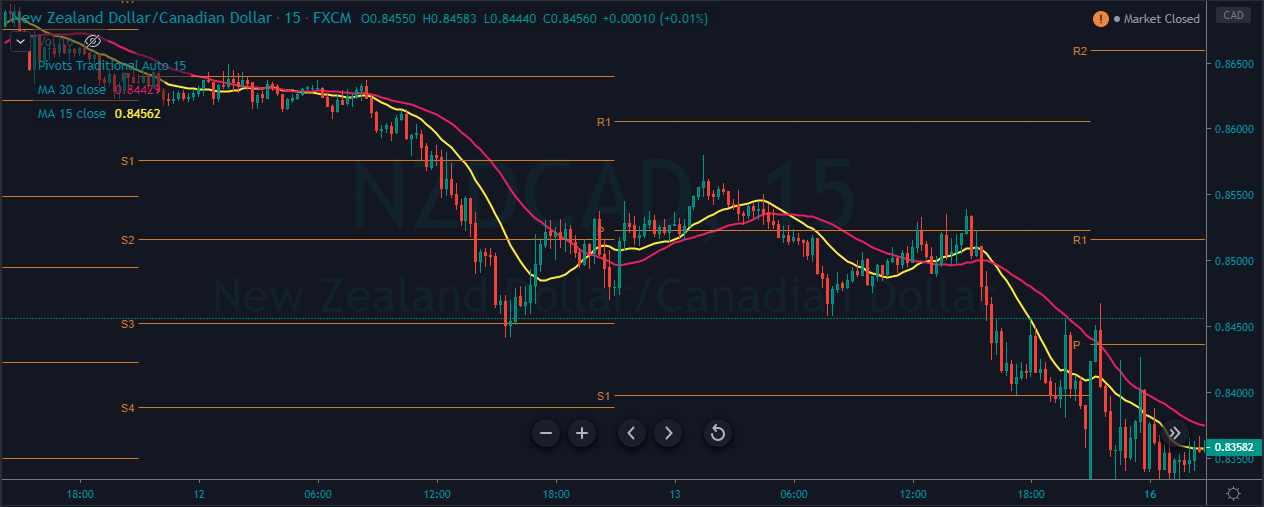
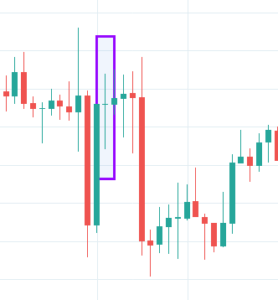
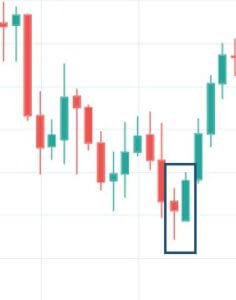
As you can see in the below image of the NZDCAD forex pair, it indicates the selling entry in this pair. In a downtrend, when the price action holds below the pivot line, it shows that the prices respect the resistance area; also, the crossover on the MA indicates the market is ready to print a brand new lower low.

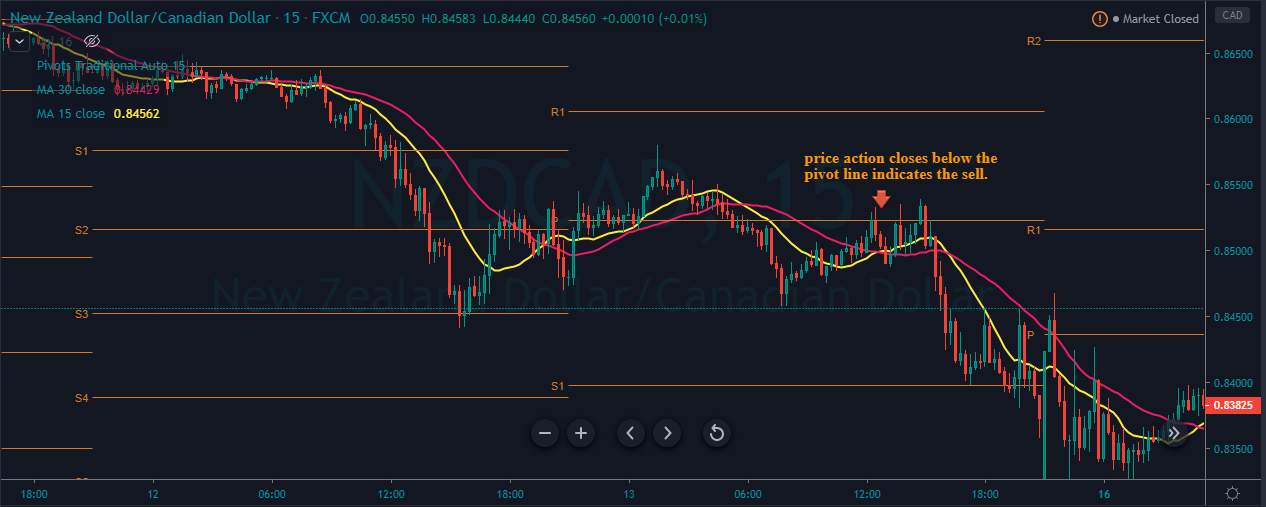
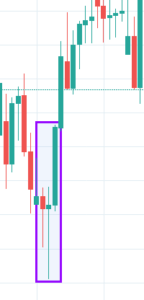
The below image represents our entry, exit, and take profit in this pair. As you can see, the entry was when prices hold below the pivot line, and the stops were just above the pivot line because the holds below show that the buyers hold no power to break above the pivot line. After our entry, price action strongly blasts to the north, which shows that we can expect our trade to travel even longer. Price action holds for some time at the S1, and then it immediately blasts to the S2 and prints the brand new lower low.

Conclusion

Pivot points are the leading indicator in the industry, which provides a glance at potential support and resistance level in the market. These levels are useful for taking an entry, or it can be useful for putting stop loss or for booking profit also. AS the leading indicator, you can use them all alone to trade the market, or you can pair them with some other indicator to trade the market. The critical benefit of pivot points is they work on all the financial markets also on all the trading timeframes. Try not to use this indicator in the ranging conditions and also avoid the use in the highly volatile markets.

Categories
Forex Course

140. Market Environment – Summary

Introduction

In a few of the past course lessons, we have discussed some of the most crucial topics related to the Forex market environment. Starting from the ‘state of the market,’ we have understood what trending and ranging markets are. We also have differentiated the concepts of retracements and reversals, which are vital for identifying accurate entries and exits.

One of the most valuable things we have comprehended is to identify ways for spotting potential market reversals. Finally, we understood how professional traders read different market environments and states. The fundamental purpose of this summary article is this – There is a possibility of you understanding these concepts better once you finish all the course lessons in this section.

Hence, this article will focus on summarizing everything we have learned till now regarding the Market Environment.

The Market States

We have discussed the different ways in which the market moves. Essentially, the price action of a particular asset class moves in three different ways.

Trend | Range | Channel

With clear examples, we have discussed how this movement happens and what we should understand when the price moves in a particular direction. More info related to this can be found here.

Trading the Forex market when it is trending!

In this chapter, we have taken you through the concept of trending market. Uptrend and downtrend concepts have been clearly explained. We also have used Indicators like ADX and Moving Averages to trade the trending market accurately. Please go through this to recall those strategies.

What should we do when the market is ranging? 

We have comprehended the various ways of identifying the ranging market. We also used the Support/Resistance strategy & ADX indicator to trade ranges effectively. Once you try trading a ranging market by yourself, the way you read this article will change, and it will all start making sense. Hence, going through it once again now is important.

Retracements & Reversals

In the next couple of articles, we have drawn down clear differences between Retracements and Reversals. Here, we understood what we must do in the situation of a reversal or a retracement. Then, we have moved on to learn how to trade a reversal in the most effective way possible. In this lesson, we have taken the help of Fibonacci Levels to identify potential market reversals and trade them accordingly.

Finally, we ended this course by understanding how most of the professional Forex traders read and trade different market states. We consider this one of the most useful and valuable articles in this course as we have shared some of the most simple yet effective trading techniques. We also used accurate risk management techniques to protect your capital while trading the market using these techniques. You can go through them again here.

We hope these techniques helped you in becoming a better trader. In our upcoming course lessons, we will be understanding Breakouts, Fakeouts, and everything related to these topics. Cheers!

Categories
Forex Course

136. Learning To Trade The Ranging Market?

Introduction

A Range is a state of the market where the prices move back and forth between the upper bound and the lower bound. A ranging market is also referred to as a choppy, sideways, or a flat market. Unlike a trend, the prices do not move in one specific direction for a long time. A range on a time frame, when looked on a smaller time frame, the price trends in one direction for a while, reverses its direction, and trends in the opposite direction.

Understanding Support and Resistance

Knowing support and resistance is an essential concept to understand a range. These two terms form the basis of a range.

Support

In simple words, support is the level in the market where the prices tend to go up. It is the region where the buyers are interested to aggressively buy the security, causing the prices to shoot up. In other words, it is an area where there is a high demand for the currency pair. A level can be regarded as support when the price reacts multiple times (with power) from that area.

Resistance

Resistance is a level in the market where the prices tend to drop. It is the price where sellers are willing to sell or short sell the asset. They prevent the market from going higher from a specific level. Resistance is no different from that of supply.

Resistance can be understood in terms of buyers. It is an area in the market where the buyers are not interested in buying at that price as they find it expensive. Since there is no demand from the buyers, the prices drop. And when it drops to the support area, the buyers show up again. Thus, due to a higher demand than supply at the support region, the prices rise.

The combination of both support and resistance makes a range. For instance, let’s say the market drops to the $5 mark every time it touches the $10 price. Visually, the market is moving sideways, and such a market is referred to as a range. Here, the $5 price is the support level, and the $10 price is the resistance. A similar example of the same is illustrated below.

ADX indicator for ranging markets

The Average Directional Index indicator can be applied to determine if the market is trending or ranging. A value above 25 indicates that the market is in a strong trending state, while a value of less than 25 signifies that the market is in a consolidation (range) state.

Below is the live chart of AUD/CAD on the 4H time frame. Looking at the chart from a bird’s eye perspective, the market started as an uptrend, held for a while, continued with the same trend, and is currently ranging again. In this sequence, we can observe that the ADX was below the 25-mark line when the market was consolidating, and greater than 25 when it was trending upwards.

We hope you found this lesson on ranging markets interesting and informative. In the next lessons, we shall get into more detail and understand concepts like retracements and reversal. Happy learning!

[wp_quiz id=”78971″]
Categories
Forex Course

135. All About The Trending Market

Introduction

In the previous chapter, we understood the different states that exist in the market, which were trends, ranges, and channels. In this and the upcoming lessons, we shall go over each one of the types in detail.

What is a Trending Market?

A trending market is the type of market where the prices move in one specific direction. Of course, the prices change the direction temporarily, but the overall direction will still be in one direction.

Since there are two directions in the market, there are two types of trends: one facing upward and the other facing downward. The former is referred to as an uptrend, and the latter is called a downtrend. Having that said, there are some rules and criteria to confirm a market is trending.

How to Identify a Trend?

There are quite a number of ways to identify and confirm a trend. One can use price action patterns or technical indicators to identify if a market is trending.

Price Action pattern

The concept of highs and lows on the price charts is used to determine if the market is trending upwards or downwards.

Uptrend

In an uptrend, the market makes higher highs and higher lows. Multiple sequences of this pattern confirm that the market is trending up.

Downtrend

In a downtrend, the price makes multiple sets of lower lows and lower highs.

ADX Indicator

Another way to determine if a market is trending is by applying the Average Directional Index (ADX) indicator. It was created by J. Welles Wilder, where the indicator has values between ranging between 0 and 100. The magnitude of the value determines the strength of the trend. The larger the number is, the stronger the trend.

Typically, a value greater than 25 indicates that the market is in a strong trend, either uptrend or downtrend. It is a non-directional indicator, where the value is always positive irrespective of the direction.

Note that ADX is a lagging indicator and does not really determine the future of the market. Thus, it cannot be employed for timing your entries and exits.

Moving Average

Simple moving averages can also be used to determine if the market is in a trending state. Add the 7 period, 20 period, and the 65-period MAs on the price chart. When all three MAs compresses and fans out, and if 7 period MA is below the 20-period MA and 20 period MA is below the 65-period MA, then it confirms that the market is in a downtrend.

Conversely, if the 7 period MA is above the 20 period MA and the 20 period MA is above the 65-period MA, then the market is officially in an uptrend.

These were some of the most popular techniques to identify and verify whether the market is trending. However, they are not strategies to trade a trend. Nonetheless, they can be used to give heads up to any trend trading strategies.

[wp_quiz id=”78831″]
Categories
Forex Basic Strategies

Trading The ‘Wedge Pattern’ Like A Professional Technical Trader

Introduction

A Wedge is a technical chart pattern marked by converging trend lines on the price chart. The trend lines on the price chart are drawn to connect the highs and lows of price action over a specific period of time. The wedge pattern holds three significant characteristics:

  1. The converging trend lines.
  2. A major decline in volume as the price action progresses through the pattern.
  3. A major breakout on either of the sides.

The Two Types of Wedge Patterns

  • The Rising Wedge (signals a bearish reversal)
  • The Falling wedge (signals a bullish reversal)

The Rising Wedge

The Rising Wedge is a bearish trading pattern that begins with a wide bottom. The pattern contracts as the prices rise. This pattern typically appears in an uptrend, and on higher timeframes, it takes nearly 3 to 6 months of time to form. Upper and lower trend lines must have at least 3 to 4 higher highs and higher lows to consider that as a Rising Wedge pattern. The loss of volume on each successive high indicates that the price is losing its momentum, and soon we can expect the downside reversal.

The Falling Wedge

The Falling Wedge is a bullish pattern that begins wide at the top and contracts at the bottom. To confirm this pattern, see if the direction of the trend is downward. Most often, the Falling Wedge pattern forms at the end of the downtrend, as it prints the last lower low on the chart. Mostly this pattern takes almost three to four lower lows and lower highs to print on the price chart. As the price action drops, the loss of volume and momentum increases the probability of bullish reversal.

Wedge Pattern Trading Strategy

The Falling Wedge Pattern

As discussed, a Falling Wedge indicates that the sellers are losing momentum in the market, and the buyers are gaining momentum. This means that we can soon expect a buy-side reversal in the trend. As we can see in the image below, we have identified a Falling Wedge pattern in the AUD/NZD Forex pair. We can clearly see that the price action is confined within the two lines, which gets closer together to create a Falling Wedge pattern. The loss of selling momentum indicates that the buyers are gaining control. When the price action breaks the upper trend line, it shows that the sellers are now out from the game, and this instrument is ready for brand new higher highs and higher lows.

The image below represents our entry, exit, and stop-loss in the AUD/NZD Forex pair. The entry was purely based on the breakout, and the stop-loss was just below the second line. In this example, we go for deeper stop-loss because the market was quite volatile. Most of the time, the breakout line acts as a strong support to the price action. So we can go for a smaller stop-loss just below the close of the recent candle as well. The placement of take-profit order entirely depends on you. Some of the common ways to exit our position are when the price hits the major resistance line, or when the buyers start to lose momentum. In this example, we have placed the take-profit order at the higher timeframe’s resistance area.

The Rising Wedge Pattern

Markets prints the Rising Wedge pattern in an uptrend. When the two lines of the pattern get closer, it indicates that the uptrend is losing momentum, and the probability of the downside reversal is increasing. So when the price action breaks the lower trend line, it is an indication to go short. The below image represents the falling wedge pattern in the EUR/JPY Forex pair, and the entry was at the breakout of the lower trend line.

The below chart represents our entry, exit, and take profit in this pair. As mentioned, the entry was after the breakout, and the stop-loss was at the most recent higher high. To place the take-profit, we choose the major resistance line. But notice that on this daily chart, price action took so much time to hit our take profit. This is normal, and while trading this pattern, we will face these types of situations. Most of the time, this pattern offers very strong signals. So it is important to control our emotions and not panic. Holds your positions for the target you are looking for. If the price action came back to the breakeven, only then we suggest you close your position. Otherwise, place the stop-loss at breakeven and wait for the market to hit the take-profit.

Pros & Cons Involved

Just like any other technical trading pattern, the Wedge pattern also has its own pros and cons. The problem is that there is no specific benchmark for this pattern of where to enter and where to exit our positions. Some traders pair this pattern with the other technical indicators to take an entry while some traders wait for the trend line breakout to take entry.

Both ways work very well, and both have the chance to lead us to more significant profits. The biggest advantage we have is the leverage of more than two lines coming together. It is a warning for us to stop taking sell trades and expect a buy-side reversal soon. So with this, we know the shift in the direction of price action ahead of time. This will ultimately help us in entering the trend at the earliest.

Conclusion

For us to witness & confirm this pattern on the price chart, three things are required. Two trend lines must come close to each other as the price action moves and within those two lines, and that’s primary. The second rule is that one-party must be losing its momentum while the other party must show the sign of coming back in the show. The third thing is that the breakout of either one line according to the circumstances is necessary.

To take a trade, we can enter the breakout, or we can wait for the price to retest the trend line. The stop-loss should be set above/below the second line, and the take-profit order must be placed at the higher timeframe’s resistance area. Identifying this pattern is easy compared to the other trading patterns out there. We must train our eyes to find this pattern visually on the price chart and look for the best entry, exit, and stop-loss areas. All the best!

Categories
Forex Course

108. What Are Corrective Waves & How To Comprehend Them?

Introduction

In the last lesson, we discussed the impulsive waves and 5-wave pattern corresponding to it. A trend is made up of the combination of the 5-wave pattern and the 3-wave pattern. The 5-wave impulsive pattern moves along the original trend, while the 3-wave corrective pattern moves against the trend. In this lesson, we shall discuss the corrective wave and then interpret the 5-3 waves.

Corrective waves

In case of an uptrend, the impulsive waves are towards the upside, and the corrective waves are towards the downside. Continuing with the example mentioned in the previous lesson, the corrective waves are represented in the below figure.

In the above figure, waves a, b, and c represent the corrective waves. The overall trend of the market is up, but corrective waves are against it. In other terms, the 3-wave corrective wave can be considered as pullback for the uptrend.

Note: The 3-wave corrective wave is also referred to as the ABC corrective wave pattern.

Reverse Corrective Wave Pattern

The Elliot wave theory is applicable to both uptrend and downtrend. So, for a downtrend, the impulsive wave faces downwards following the overall trend, while the corrective wave faces upwards. Below is a figure representing the 5-3 wave pattern for a downtrend.

Types of Corrective Wave Patterns

The above illustrated corrective wave is not the only type of corrective wave that occurs. According to Elliot, there are twenty-one 3-wave corrective wave patterns, where some are simple and some complex. However, a trader need not memorize all of them at once. The following are three simple corrective waves that are most occurring in the market.

The Zig-Zag Formation

The zig-zag formations are very steep compared to the regular one and are against the predominant trend. In the three waves, typically, wave B is the shortest compared to wave A and wave C. Note that, the Zig-Zag pattern can happen twice or thrice. Also, the zig-zag patterns, like all other waves, can be broken into 5-wave patterns.

The Flat Formation

As the name suggests, in flat corrective wave patterns, the 3-wave pattern is in the sideways direction. That is, the wave C does not go below wave B, and wave B makes a high as much as wave A. Sometimes, the wave B goes higher than wave A which is acceptable as well.

The Triangle Formation

The Triangle formation is a little different from the other corrective patterns. The difference is that these patterns are made up of 5-waves that move against the overall trend. These corrective waves can be symmetrical, ascending, descending, or expanding.

These were some of the most used corrective patterns used by traders. These must be known to technical traders by default. In the next lesson, we shall discuss another important concept related to the Elliot Wave theory.

[wp_quiz id=”71613″]
Categories
Forex Course

74. Using Moving Averages To Identify The Trend

Introduction

In the previous lessons, we have understood the two types of Moving Averages and the difference between them. We have also seen which Moving Average should be used in different market conditions and the one that must be preferred most of the time. From this crouse lesson, let’s explore the real-time applications of Moving Averages and how we can find accurate trades using this indicator.

One of the simplest, yet important use of Moving Average is to determine the direction of the trend. This can be done by plotting the indicator on the chart and then deciding the position of candlesticks with respect to the line of Moving Average.

The ideal way of identifying a trend using MA is this – If the price action tends to stay above the moving average line, it usually signals an uptrend. Likewise, if the price action remains below the moving average line, it indicates a downtrend.

This approach of establishing the trend is too simplistic and also has a significant drawback. Let us understand that with the help of an example.

Below is the EUR/USD price chart, and we have added a 10-period MA line to it. According to the rules of MA, since the price is above the MA, we should be going ‘long’ in this currency pair.

Due to a news event, price drops suddenly and closes below the MA (in the below chart). So, this changes our plan, which means now we should be thinking of going ‘short’ in the currency pair. But before we do that, let us see what happens to the price in the next few candles.

The below image shows that the price fakes out and does not continue its downward trend. Hence, if we would have gone short, that would have resulted in the price hitting our stop-loss resulting in a loss. Let’s understand the problem with this setup.

The strategy mentioned above is right, but the problem is that we are using a single period MA line stand-alone and not combining it with any other indicator. The best way to use MA for determining a trend is by plotting an extra Moving Average line on the charts instead of just one. It will give us a clearer idea if the pair is trending up or down depending on the sequence of the MAs.

The best way is to check if the ‘faster’ moving average is above the ‘slower’ moving average for an uptrend, and vice versa for a downtrend. In the below chart, we can see that the ‘faster’ SMA is above the ‘slower’ SMA, and this shows the strength of the uptrend. Also, the fake-outs that happen because of news releases will also have less impact on the indication given by the Moving Averages. Combining this knowledge with trendlines can help us decide if we have to go ‘long’ or ‘short’ in the currency pair.

Conclusion

Moving Averages can be useful for establishing the direction of a trend, but it should never be used stand-alone. If not other indicators, additional moving averages itself can be combined with an existing moving average to decide the direction of the trend. In the next article, we will be discussing how we can enter a trade using moving averages and profit from this indicator.

[wp_quiz id=”65733″]
Categories
Forex Basic Strategies

Trading The Bullish & Bearish ‘Flag Pattern’ Like A Pro

Introduction

A Flag Pattern is one of the very well-known trend continuation patterns. Visually, this pattern looks like a flagpole and a flag, hence the name ‘Flag Pattern.’ A flagpole is printed by the sharp price upward move, followed by the symmetrical pullback, which forms the flag on the price chart of any underlying currency pair. When the flag breaks the trend line, it triggers the next trend move of an underlying asset. In simple words, flag forms when price action turns sideways after the sharp upward movement. This pattern can be seen on any timeframe; however, it is mostly found on lower timeframes such as 15, 5 or 3-minute chart.

Flag patterns can be both Bearish & Bullish

Bullish Flag Pattern

The bullish flag pattern starts with a strong upward move. This move implies that the sellers are entirely off guarded as the buyers took over the entire show. Eventually, the price action peaks, and it prints a pullback. The higher high and lower low of the pullback will be parallel to each other. This action results in the formation of a tilted rectangle. This whole process appears like a bullish flag pattern on the price chart.

By placing the trend line at the upper and lower end of the pullback, we can observe the diagonal parallel nature of that pullback. The breakout of the upper trend line indicates that the trend is ready to resume, and that is the best time to activate an extended position.

Bearish Flag Pattern

The bearish flag pattern is just the opposite of the bullish flag pattern that we discussed above. When the price action hits bottom, it prints the pullback where the lower low and higher high are parallel to each other.

The breakout of the lower trend line indicates that the trend is ready to resume, and it’s the best time to go short in any underlying asset.

Flag Pattern – Trading Strategies

Bull Flag Pattern Strategy

A Bull flag is a trend continuation chart pattern that indicates the likeliness of the market to move higher. (Uptrend Continuation)

Pattern Confirmation Criteria:

  • Find out a strong uptrend in any currency pair. In other words, the range of candles should be more bullish.
  • After the strong move, wait for the pullback to occur. A pullback is generally in the form of lower low and lower high. Here’s where we can expect to see a bull flag pattern on the price chart.
  • Draw the upper and lower trend lines on the price chart. When the price action breaks the upper trend line, it a sign to go long.

Here’s how the bull flag pattern looks like on price chart.

Entry – In the below NZD/USD Forex chart, we can see that the pair was in an overall uptrend. During the pullback phase, price action has printed the bullish flag pattern. The breakout of this pattern indicates a clear buy signal in this currency pair.

Stop-Loss & Take-Profit – When the price action breaks the upper trend line, it’s a sign to go long in this pair. The bull flag is quite a reliable pattern, so we can place our stop-loss just below the second trend line (lower part of the tilted rectangle). Placing the take-profit order is purely based on your trading style. If you are an aggressive trader, go for extended targets; but if you are a conservative trader, use smaller targets. In this particular trade, we closed our full position at one of the significant resistance areas.

Bear Flag Pattern Strategy

A Bearish Flag Pattern is also a continuation chart pattern, but it indicates the downward movement of the market. (Downtrend Continuation)

Pattern Confirmation Criteria:

  1. Find out a steady downtrend in any currency pair. In other words, the range of candles should be more bearish.
  2. After a strong move, wait for the pullback to occur. A pullback is typically in the form of a lower higher low and higher high. Here’s where we can expect the formation of a bearish flag pattern on the price chart.
  3. Draw an upper and lower trend line on the price chart. When price action breaks the lower trend line, it’s a sign to go short.

Here’s how the bearish flag pattern looks like on price chart.

Entry – In the below EUR/CHF 60 Forex chart, the overall market was in an uptrend. Then suddenly, sellers overwhelmed the buyers by printing a couple of strong red candles. If a bearish flag pattern appears on the price chart, we can confirm that the downtrend is going to continue. In the below picture, we can clearly see the formation of a bearish flag pattern. We can activate our sell positions as soon as the lower trend line breaks.

Stop-Loss & Take-Profit – In this trade, we must go for minimal stop-loss because the market is in a consolidation phase and not in a strong downtrend. We had closed our whole position when the price action started struggling to print a new lower low and lower high.

Bottom Line

The Flag pattern is always created by a swift up/down move, followed by the consolidation, which runs between the parallel lines. Always use the breakouts of the Flag pattern to take the positions.

Always remember that the trend is your friend. Take only buy trades in the appearance of a Bullish Flag and sell trades in the presence of a Bearish Flag.

Traditional ways suggest that the stop-loss must be set below the pole of the flag, but we don’t always have to follow this idea. While trading flag breakouts, the stop-loss just below the recent low is good enough.

In the Forex market, the flag pattern performs very well in active trading hours as most of the swift moves (like flagpole formation) occur in busy hours only. If you are a strict confirmation trader, let the price action to retest the trend line to activate your trades. This procedure will help you in picking the higher probability trades, although you’ll miss the higher-momentum moves that don’t pause to continue moving.

Categories
Forex Course

58. Exploring More Candlestick Patterns – Cheat Sheet!

Introduction

In the previous lessons, we have discussed many candlestick patterns out of which some were single, some were multi-candlestick patterns (Dual & Triple). But there are many more patterns that one needs to be aware of. Since it is not possible to cover each and every one of them, we have picked some of the most profitable and important patterns everyone should be aware of. So, this article basically acts as a cheat sheet for any reference. By referring to this guide, one can get the basic price-action structure of all these important patterns that are mentioned below.

Hammer Candlestick Pattern

It is a single candlestick pattern signaling a possible reversal to the upside. The Hammer is mostly seen after a prolonged downtrend. On the day this pattern is formed, the market will be inclined towards the sell-side. As the candle comes to a close, the market recovers and closes near the unchanged mark or maybe a bit higher.


That is a clear indication of the market reversal. We must take trades only after the appearance of a confirmation candle and not before. So we see a bullish candle on the charts immediately after the Hammer pattern, consider buying the currency pair.

Doji Candlestick Pattern

This pattern is formed from a single candle and is considered a neutral pattern. A Doji represents the equilibrium between demand and supply. The appearance of this pattern indicates a tug of war in which neither the bulls nor the bears are winning.


In the case of an uptrend, the bulls will be winning the battle, and the price goes higher, but after the appearance of Doji, the strength of the bulls is in doubt. The opposite is true in case of a downtrend. If we come across this pattern, we must wait for extra confirmation to take any action.

Piercing Candlestick Pattern

The Piercing Pattern is a two candle reversal pattern that implies a possible reversal from downtrend to an uptrend. This pattern is typically seen at the end of a downtrend. The second candle in the pattern must be bullish and should open below the low of the previous day and closing more than halfway into the previous day’s bearish candle.


We generally will have two options after noticing this pattern. Either we can buy the forex pair to benefit from the uptrend that is about to begin, or we can look at buying ‘options’ to reduce risk.

Engulfing Candlestick Pattern

It is two candle reversal pattern that is formed at the end of a downtrend or an uptrend. Bullish Engulfing Pattern is formed when a small ‘Red’ candlestick is followed by a large ‘Green’ candlestick that completely engulfs the previous day’s candle. For a Bearish Engulfing Pattern, the situation is vice-versa.


The shadows of the small candle should be preferably short, and the body of the large candle should overpower the entire previous day’s candle. When we come across a Bearish candlestick pattern, we must activate our sell trades and vice-versa.

Meeting Line Candlestick Pattern

This pattern is a two candle reversal pattern that occurs in a downtrend. The first candle must be a bearish candle followed by a second long bullish candle that gaps down and closes higher. It has the close at the same level as the close of the first candle.


This pattern only signals partial bullishness and buying strength, but not completely. Traders must look for other signs of reversal than just relying on the pattern stand-alone because just the Meeting Line pattern is not a clear confirmation for a complete reversal of the trend.

Harami Candlestick Pattern

It is a dual candlestick reversal pattern indicating the reversal of a bullish or bearish trend. In Bullish Harami pattern, the first candle is usually a Red candle with a large real body, and the second one is a small Green Candle. It’s opposite in the case of a bearish Harami pattern.        

Traders must look at the appearance of a bullish Harami pattern as a good sign of taking long positions in the market. Likewise, we must be shorting once we confirm the appearance of the bearish Harami Pattern.

Three Black Crows Candlestick Pattern

This pattern consists of three Red candles and predicts the reversal of an uptrend. It does not occur very frequently, but when it occurs, we can be sure that the market is going to reverse.


The first candle in this pattern is a long bearish candle that appears in a prevailing uptrend. The second and third are also approximately the same size and color, indicating that bears are firmly in control. This pattern is most useful for long-term traders, who take short positions and hold them for several weeks.

Abandoned Baby Candlestick Pattern

It is a three candle reversal pattern that occurs during a downtrend. The first candle in this pattern is a bearish one. The second candle is a Doji, which gaps down from the previous candle. The third candle is a long bullish candle and opens above the second candle.


We must take long positions only if the price breaks above the third bar in this pattern. Also, make sure to use a stop-limit order for additional risk management.

Deliberation Candlestick Pattern

The Deliberation is a three-line bearish reversal candlestick pattern that occurs during an uptrend. This pattern is comprised of three bullish candles. The first and second candles have significantly large bodies than the third one.


This pattern signals a bearish reversal of the current uptrend. The confirmation is usually a Red candle that overcomes the midpoint of the second candle’s body. We can take aggressive short positions in the currency pair right after we notice the confirmatory candle. This pattern is rarely seen on the price charts, but it does appear, it is highly rewarding.

Three Line Strike Candlestick Pattern

We have discussed single, dual, and triple candlestick patterns till now. Three Line Strike is the first four candlestick pattern, which signals the continuation of the current trend. This pattern can be found in both bullish and bearish markets, depending on the trend.

In an uptrend, the first, second, and third are bullish, and each candle needs to close above the previous candle. The fourth candle is bearish and closes below the open of the first candle. We can take long positions only after the trend is confirmed by technical indicators like RSI & MACD

Learning to recognize and interpret candlestick patterns is important for anyone who aspires to be a professional technical trader. Perfecting this skill will take time and practice. But once you master these patterns, you can trade with enough confidence as you will know how to read the market better.

That’s about candlestick patterns and how to trade them. In the upcoming lesson, we will see how to trade candlesticks using support and resistance levels. We hope you practice these patterns better and become a better trade. Kindly let us know if you have any questions in the comments below. Cheers.

[wp_quiz id=”61830″]