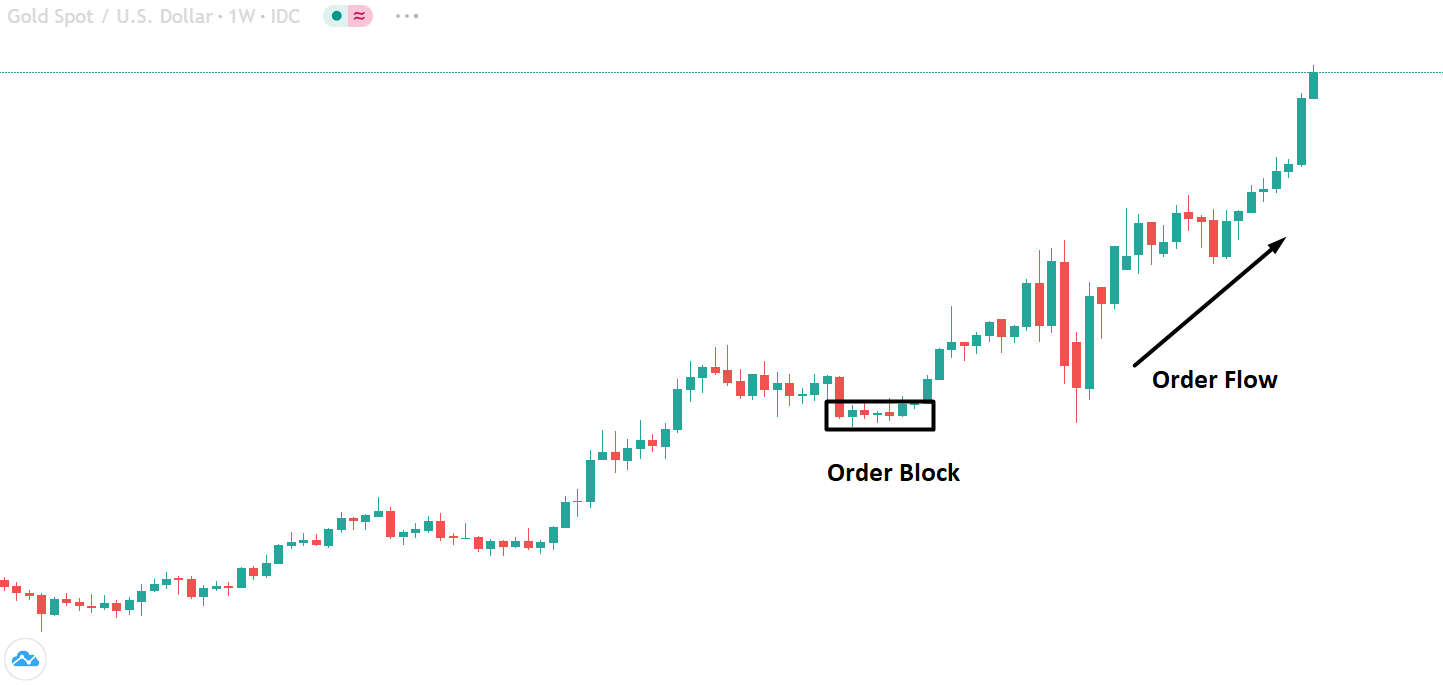
Categories
Forex Basic Strategies

15 Minute Forex Scalping Strategy Using The Donchian Channel Indicator

Introduction

Scalping is a trading strategy designed to profit from small market changes. The Scalpers took a couple of trades in any trading session, and the goal of every scalper is to seize gains when they appear on a price chart because the aim is to have a few small wins rather than one large one. Scalping is one of the most challenging style of trading to master because it requires unbelievable discipline and focus.

A scalper must follow the rules of their trading strategy like a religion because one large loss can easily wipe out dozens of successful trades. One of the most critical aspects of scalping is liquidity because we would not scalp any instrument that is not liquid enough and ensuring liquidity also ensures that we are getting the best price while entering and exiting in a trade. In this article, we will show you how to scalp the 15-minute trading timeframe by using the Donchian Channels Indicator.

Working Of A Donchian Channel

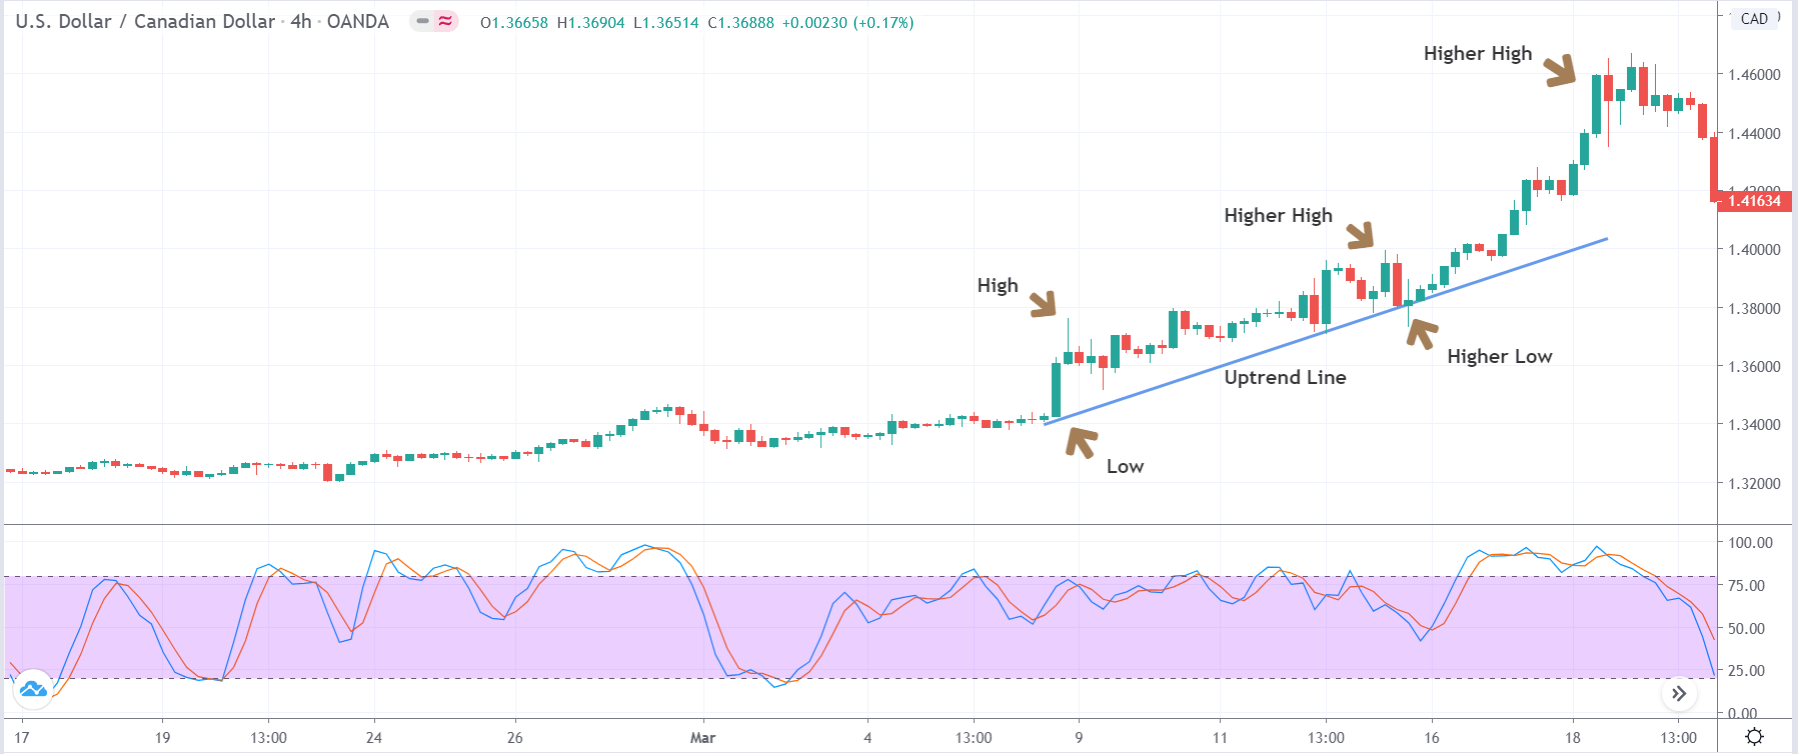
Donchian channel consists of three lines, which are generated by the moving average calculations that comprise an indicator formed by the upper and the lower band, also the median band. The celebrity trader Richard Donchian developed the indicator in the mid-twentieth century so that he can identify the trend of the market. The area between the upper and lower band represents the Donchian channel. The indicator identifies the bullish and bearish extremes areas, which are followed by the reversals or breakouts in price action.

15-Min Trading Strategy

The scalping strategies are only created to trade the lower timeframes, such as 1, 3, 5, 15-minute timeframes; do not apply any of these strategies on any higher timeframes; otherwise, you will face some trouble in your trading.

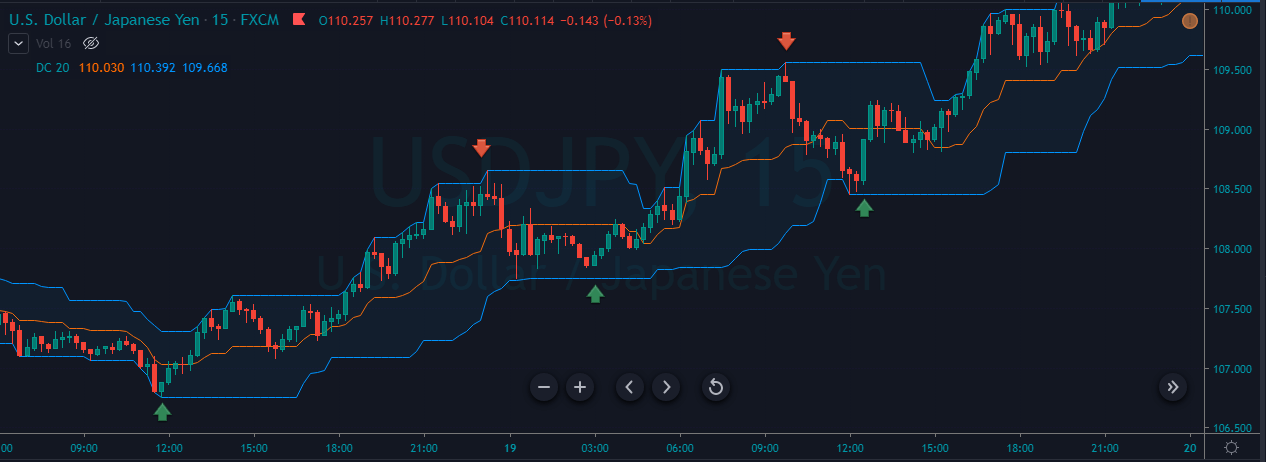
As you can see in the below image of the USDJPY forex pair, overall, the instrument is in a strong uptrend, and when the price action hits the lower band of Donchian channel it indicates the buy trade, and when it hits the upper Donchian channel, it means to go for a short trade.

In the below image the price action gives us three buying and three selling trade, most of the time the buying trades perform bit longer than the selling trades, it is because the flow of the market was up, but for the scalpers, the flow doesn’t matter, all the scalpers want is to in and out from the market. Close your position when the price action hits the opposite channel, and when you take the entry, if the price action goes a bit against you { for, e.g., 4 to 5 }, then close your position immediately and wait for the new signal.

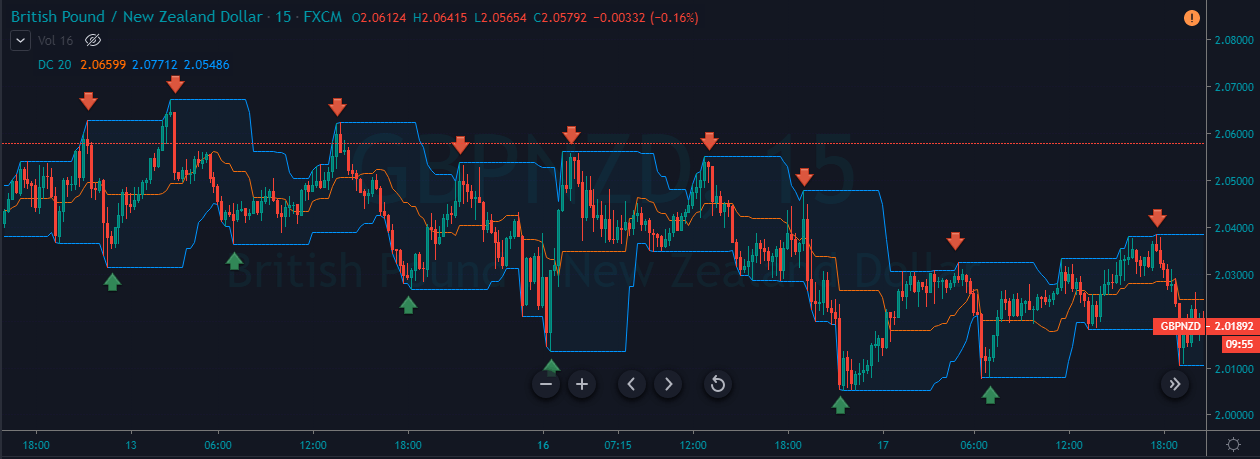
The below image represents a couple of buying and selling trades in a downtrend. The goal of every scalper is to, first of all, check the trend of the market, and expect more trades by following the trend and simply expect less counter-trend trades. You can see that the below image of the GBPNZD forex pair shows us the nine selling and six buying trades. Most of the selling and buying trades worked very well, and each trade generates a significant amount of money for us. The whole goal is to activate the position when the price action hits the Donchian channel and close your position when the price action goes a bit against us.
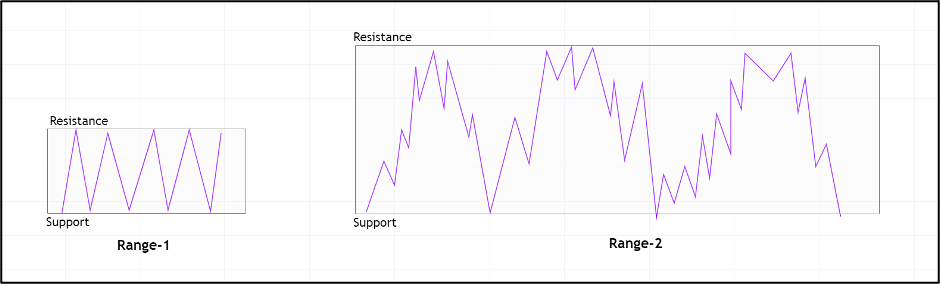
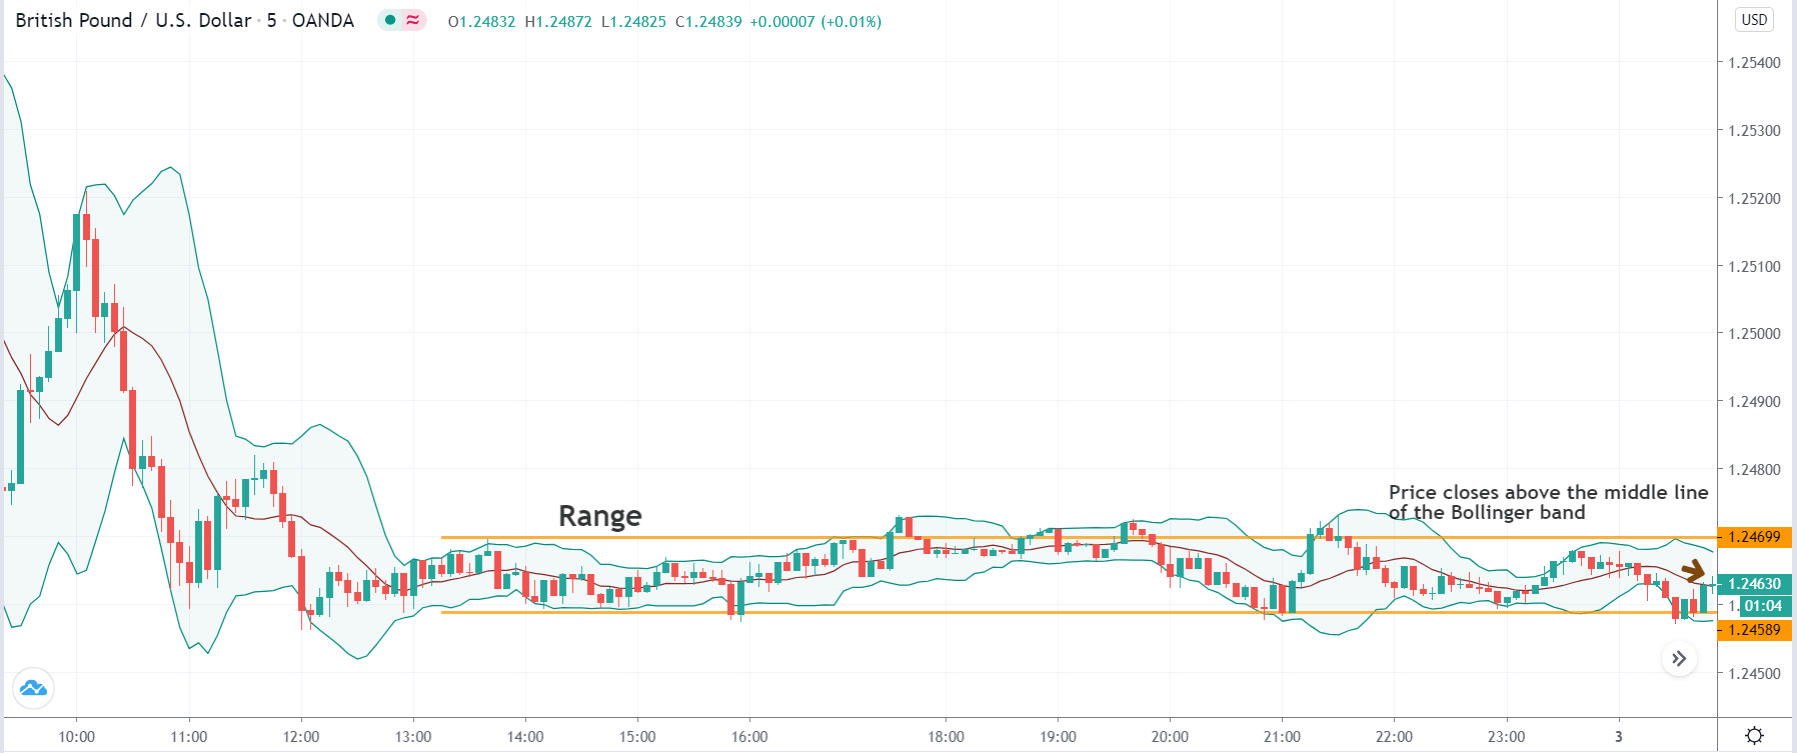
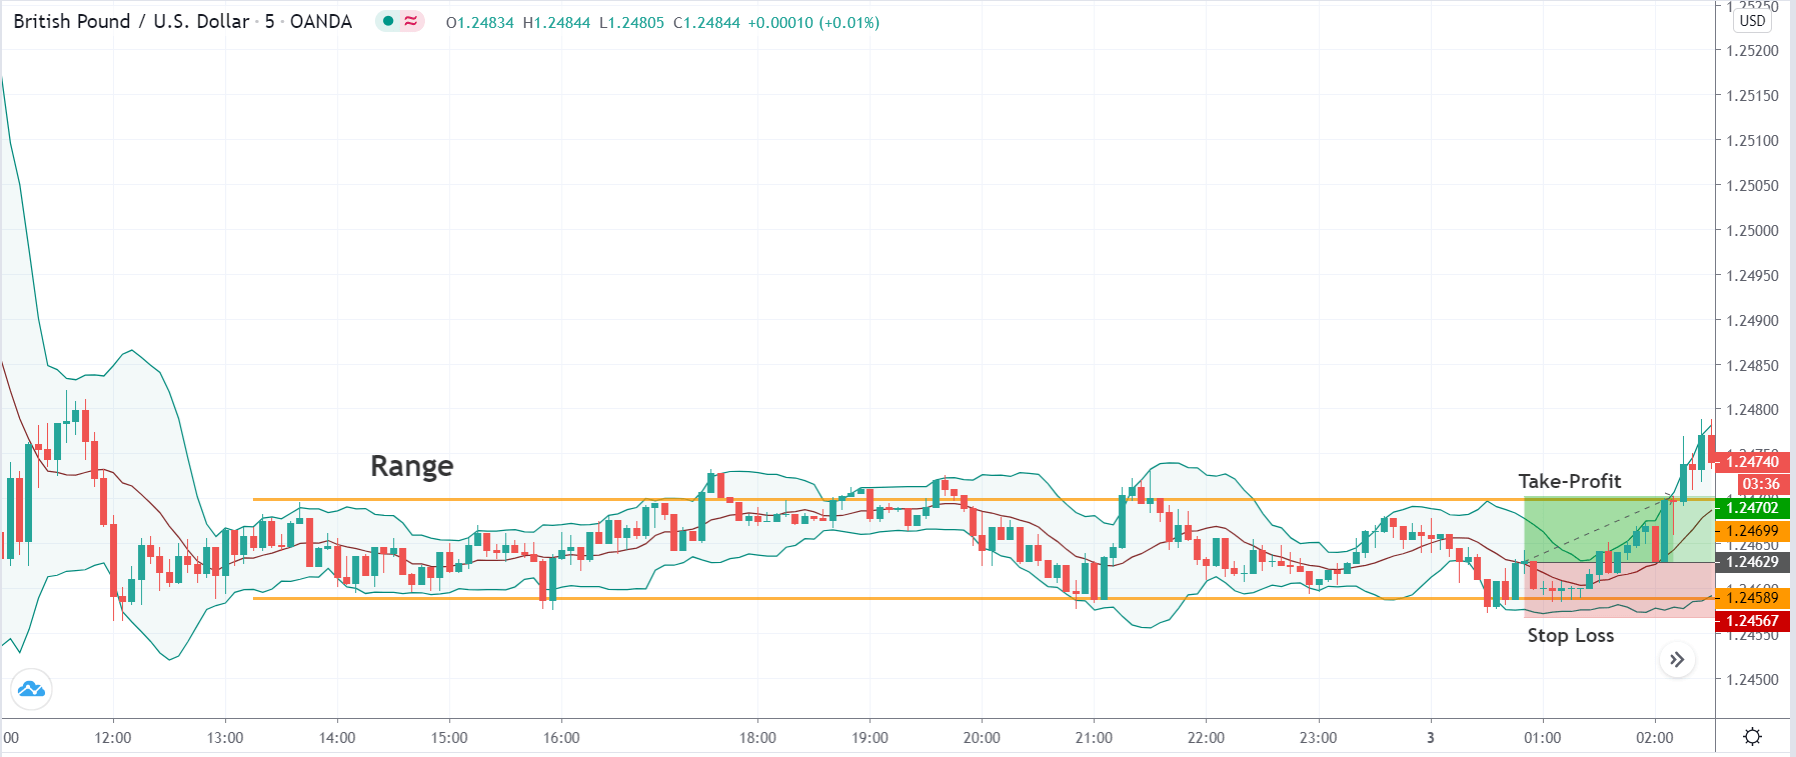
Range Trading

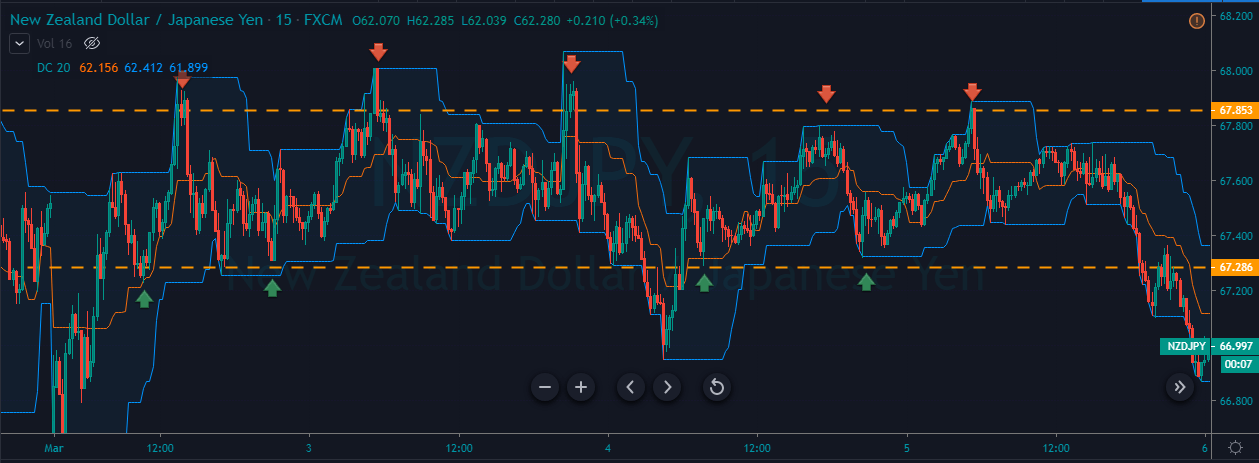
If you trade the trending market, then expect the more trend-following trades, and if you scalp the ranges and channels, then you can expect both the buying and selling trades because in ranges and channels both of the parties hold the equal powers this is the reason ranges and channels are favorite for the scalpers. The image below shows the 15-minute chart of the NZDJPY, forex pair, which shows the ranging market, and in range price action gives the five selling and four buying trades. In the ranging market, we suggest you go for the 1:1 RR trades because the price action more often spikes in ranges.

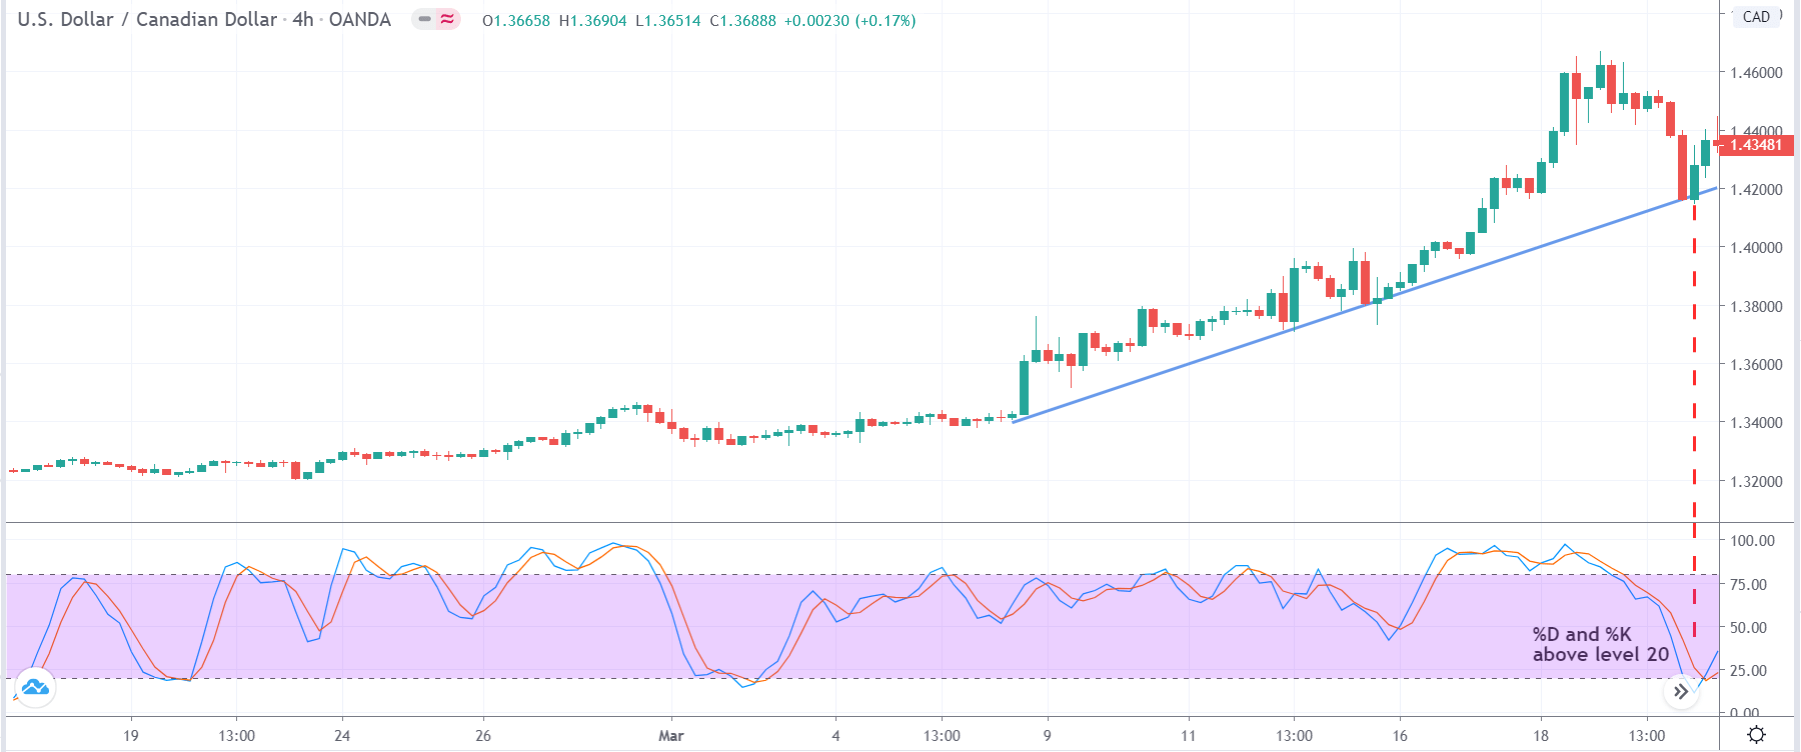
Scalping Trading By Following The Market Trend

Buy Trade

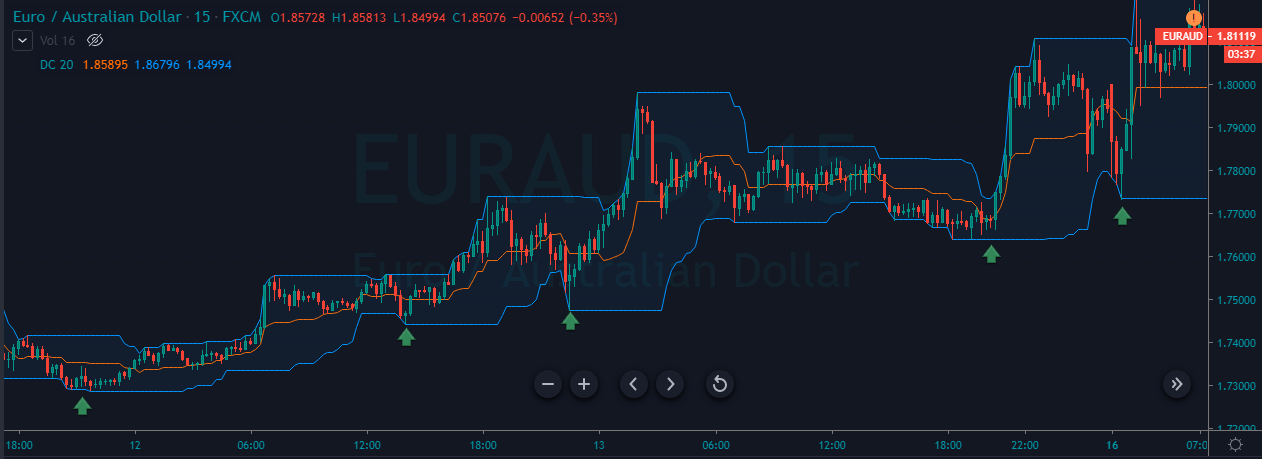
The scalping is all about having a strong and aggressive mind to face the rollercoaster ride in the market, and some of the conservative and confirmation traders want to scalp the market, but they little hesitate to react on every signal, so if you are a conservative or confirmation scalper then here is good news. We specially created a strategy that suits your trading personality. In this strategy, you will find fewer trades, but the trades will be accurate. Apply this strategy only on the fifteen-minute timeframe and avoid trading the ranges and channel markets because both situations have higher chances of fake outs. First of all, on a lower timeframe, find out the clear uptrend in any instrument, and when the price action hits the lower Donchian channel go long and hold your position till the price action hits the opposite channel. Do not go for selling trades in the buying market simply wait for the next buying trade. In the below image, by following the trend of the market, we only got the five buying trades in the EURAUD forex pair. Each of our trade travels a significant amount of time; then the price action generates the next trade. By following this strategy, you will face less mess and good trades in the market.

Sell Trade

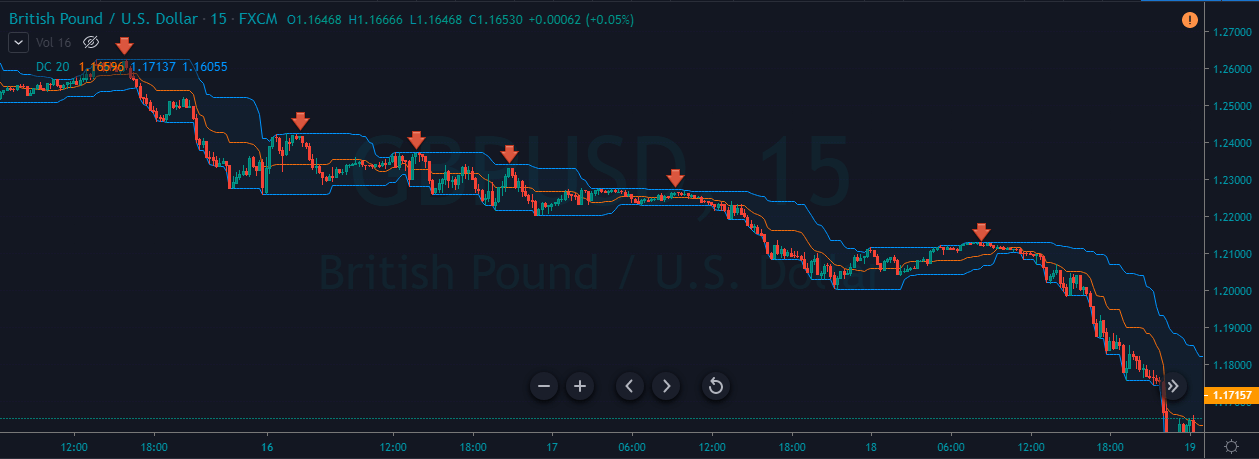
The image below represents the six selling trades in the GBPUSD forex pair, you can see that the downtrend was quite smooth, and after activating our every trade, the price action immediately goes into our favor. In the strong trending market, you can go for the smaller stop loss and book profit when the price action gives the buying signal.

Conclusion

Scalping is not easy, but it is a quick way to make some money from the market. As a scalper does not expect a continuous win, most of the scalpers face the ups and downs in their trading journey. Every trading day awaits a couple of buy and sell trades, do not judge yourself or your strategy according to every single trade, instead of at the end of the day find out how many wins and losses you have. If the end of you have more wins than the losses, then it means you have a successful trading day. Scalping works very well on the lower timeframe and the strategies we show in this article created, especially for the 15-minute trading timeframe.

Categories
Forex Basic Strategies Forex Daily Topic

Trade Ranges Like A Pro with this Effective Forex Trading Strategy

Introduction

The market does not move in random directions. It either trends or consolidates. As many would not know, the market is like a closed circle, and the same states keep repeating over and over again. Thus, in trading, one must learn how to become pro at reading these market states.

On that same note, we shall be going over an effective strategy when the market is in a consolidation/ranging state. However, before jumping right into the strategy, it is important to understand the basics and related concepts.

What is a consolidation phase in a market?

There are several ways to comprehend the consolidation phase of the market. There is logical reasoning behind the occurrence of this state, and is not simply a random pattern that shows up quite often.

The consolidation state is that phase of the market when the market moves in a sideways direction. This state is also referred to as a range. The reason for its occurrence is related to the strength between bulls and bears.

Comprehending a Range

There are two parties in the market – the bulls and the bears. Their strength is what describes the state of the market. In a trending market, either of the parties is powerful. For instance, if the market is going up, it simply means that the bulls control the market. In a consolidation state, both bulls and bears show equal strength. The bulls show strength by pushing the market higher, while the bears show power by taking the price right back down. As a result, the prices in both directions – which we refer to as a range.

How to draw a range?

To trade this range strategy, it is vital to understand how a range is drawn. A range is made up of two levels:

  • Support
  • Resistance

Thus, drawing the correct support and resistance levels will result in a perfect range.

Another point considered is the size of the range. The larger the range, the better. The other small consolidations in the market are ignored. Following is an example of how we pick an ideal range.

In the above example, both are ranges as the market is moving in a sideways direction. However, we do not consider range-1 as a range for our strategy. This is because a single line going up and down fails to depict the market’s price action.

Supply and Demand Range Strategy

What is the usual approach to trading a range? It is to buy at the support and sell at the resistance. But we’re going to step the game a little bit. The supply and demand range strategy uses the same principles of a typical range, in addition to other factors.

Step by step procedure to trade the Supply and Demand Range Strategy:

  1. Find a legitimate range in the market. Mark the Support and Resistance levels appropriately.
  2. Determine the direction of the market prior to the range.
  3. Find a potential supply/demand level.
  4. Get in when the market breaks through the range and reaches the supply/demand zone.

Buy Example

Consider the below chart of GBPCHF on the 4H timeframe. We see that the market has been ranging between 1.1902 and 1.1800. Observe that the support and resistance levels have been marked by cutting off the false market breakouts.

To trade this market, our job is not simply to hit the buy at the support and sell at the resistance. As mentioned, we take into account the preceding direction and the supply and demand levels around it.

The direction of the market prior to the range was an upside, indicating that the bulls were in control previously. A point to note is that, despite the market being in a range, it does not change the fact that the bulls are still powerful. Thus, we rather look for buying opportunities than shorting signals.

To do so, we wait for the price to drop below the bottom of the range and hold at any one of the demand zones. Once the market begins to reverse its direction from south to north around the demand zone, we can go long. The same scenario has been illustrated in the chart below.

Placements

Stop Loss – Well below the demand zone would be decent.

Take Profit – Top of the range would be an ideal spot to take profits.

Sell Example

Consider the chart of CAD/JPY on the 15min timeframe shown below. The recent market price action depicts that the market is moving sideways. The market’s overall trend is down, indicating that the bears are in control of the market.

Since the scenario is opposite to the previous example, we wait for the market to break through the resistance and reach any potential supply level. In the below example, we can see that the price broke through the resistance twice reacted off from the supply, as shown. Thus, we can look for entries when the market begins to switch direction to the downside.

Placements

Stop Loss – Above the supply zone

Take Profit – Bottom of the range

Conclusion

The only way to trade a range is not by buying and selling from the top and bottom of the range. It can be professionally traded with the application of other factors. And this range strategy particularly dealt with the strength of the bulls and bears and the concept of supply/demand.

We hope you were able to comprehend our Supply and Demand Range strategy. Do test them out for yourself and let us know your results in the comments below. Happy trading!

Categories
Forex Basic Strategies

Learning To Trade The ‘Order Block’ Forex Strategy

Introduction

Order block is a market behavior that indicates order collection from financial institutions and banks. Prominent financial institutes and central banks drive the forex market. Therefore, traders must know what they are doing in the market. When the market builds the order block, it moves like a range where most of the investing decisions happen.

The market makes a sharp move towards both upside and downsize once the order building is completed. The key term of the order block trading strategy is that it includes what the institutional traders are doing. As they are the key price driver, any strategy that includes institutional trading might

What is the Order Block?

Financial institutes do not make a sudden investment in any trading instrument. They spend a lot of money on analysis to get the best trading result. Furthermore, they play with the money that is often impossible to arrange by retail traders.

Smart money makes several steps in their trading based on the availability of the price. For example, if a bank wants to buy $100M EURUSD, it will take trade-in three or four steps. In the first step, they will take $20M, in the second step, $50M, and in the third step $30M. The price usually makes a movement when the full quota of $100M completes.

Order block seems like a range, but every range is not an order block. Moreover, we don’t know when and where the smart money moves. Therefore, we will rely on the best location and price action to identify a suitable order block.

Besides the order block, we have to know what the order flow is. Once the price starts a movement from an order block, it provides an order flow towards any direction. Order flow from a higher timeframe indicates a market direction, and we have to find the order block towards the direction of it.

Order Block Trading Strategy

From the above section, we have seen what the institutional order block and order flow is. In this trading strategy, we will use 1 hour- 4 hours or the daily timeframe to enter the trade and weekly timeframe to identify the order flow. Furthermore, we will use the Fibonacci to identify the potential location from where the market is expected to move.

Timeframe

  • One hour to 4 hours to identify the entry-level.
  • Weekly timeframe to measure the order flow.

Currency Pair

The best part of this trading strategy is that it can provide profitable trades in all currency pairs. However, we have done extensive research and found that it works well in all major currency pairs, including EURUSD, GBPUSD, and USDJPY.

Identify the Order Flow

In the weekly timeframe, we will look for the price that tested an order block and moving higher or lower. Once it completes the test and starts the movement will find the direction.

In the image above, we can see that the price moved higher and came back sharply towards the order block with an impulsive bearish pressure but did not break the lowest. After the rejection candle, we will wait for the price to move higher with a candle close. Once the candle closes, we found our weekly order flow.

Later on, we will move to the H4 or daily timeframe and identify the order block to trade towards the direction of the order flow.

Location of the Order Block

Move to the H4 timeframe and draw the Fibonacci retracement from upside to downside. While you draw the Fibonacci level, make sure to draw from the last available price, not more than 200 candles. Furthermore, for a buy trade, draw the Fibonacci from the highest price to the lowest price.

After drawing the Fibonacci level, you should consider order blocks residing below the 50% Fibonacci retracement levels. Any price below the 50% Fibonacci retracement level is the discount price and any price above the 50% retracement level is the premium price.

In the bullish order block trading strategy, you should consider the discount price and, in a bearish order block trading strategy, consider the premium price only.

Entry

Wait for the price to break above or below the order block, win an impulsive bullish or bearish pressure. Later on, the price will make new highs or lows, but you should wait when it comes back to the order block. In most cases, the price will come back to the order block and test the 50% level before making the final movement.

Therefore, if you don’t want to monitor the price, you can take a pending order at a 50% level of the order block. However, the best practice is to enter the trade once it starts moving from the order block with a candle close above or below it.

Stop Loss and Take Profit Level

The stop loss level should be below or above the order block with some buffer. In most of the cases, use 10 or 15 pips buffer to avoid unexpected market behavior.

On the other hand, the ordinary take profit level would be towards the order flow with 1:1 risk: reward ratio. However, the final take profit level is Fibonacci 0%, which is usually the top of the available price in a bullish condition and the bottom of the price in a bearish condition.

Summary

Let’s summaries the order block trading strategy:

  • Identify the weekly order flow and consider the direction.
  • Identify the premium and discount zone level with the Fibonacci retracement levels.
  • Move to H1 to H4 timeframe and find the order block within Fibonacci 50% to 100% levels.
  • The price should move towards the order flow directly from the order block, but it should come down to test the order block again.
  • Enter the trade as soon as the price rejects the order block with a reversal candlestick.

The order block trading strategy is profitable in most of the currency pairs. However, it is essential to keep in mind that the forex market is very uncertain. We, as a trader, anticipate the price, and that’s why we use stop loss. No trading strategy can assure a 100% profit. Although the Order block is a very profitable trading strategy, you should use appropriate trade management and money management rules to avoid unexpected market conditions.

Categories
Forex Basic Strategies

Heard Of The ‘Piranha’ Forex Trading Strategy?

Introduction

The forex market is mostly seen to move in a trend or a range. In the previous article, we discussed the rapid-fire strategy, which works best in a trend. The piranha strategy that we are going to discuss is used in a ranging market.

Everyone would have heard of piranhas. They typically take small bites frequently off their prey until it is totally devoured. A single bite may not cause much harm, but it is the frequency of bites that causes the attack to be deadly. In the same way, the piranha strategy was developed to allow scalpers to bite the market and chew off small profits each time.

This strategy is specifically designed for the GBP/USD currency pair, where it is applied to the 5-minutes time frame chart. On average, one can find over 15 trades in a day using the piranha strategy.

Time Frame

The piranha strategy is useful for trading on the 5-minutes time frame. This means each candlestick on the chart represents 5 minutes of price movement.

Indicators

For this strategy, we use the Bollinger band technical indicator with the following settings.

  1. Period 12, Shift 0
  2. Deviation 2

When prices approach the upper band, the market is considered to be overbought, and when prices approach the lower band, markets tend to consolidate. By setting a higher deviation value, the price volatility will be magnified, and we geta a Bollinger band with wider upper and lower bands.

Currency Pairs

The strategy is designed for the GBP/USD currency pair, which is also referred to as The Cable. However, some other currency pairs in which the strategy can be used include EUR/USD, USD/JPY, and GBP/JPY. Since the strategy takes place in short timeframes it is advisable on highly liquid pairs.

Strategy Concept

We will use the Bollinger band indicator to identify the trading range of GBP/USD, after which we will mimic the nature of the piranhas by defining objective entries for long and short positions. Long trades are initiated when market prices touch the bottom of the band, and short trades are taken when prices touch the upper band.

Piranhas are active in rivers and ponds but not in the rough seas with strong currents and waves. In a somewhat similar way, we avoid trading this strategy at times of major news announcements during the U.S. or London sessions, as such environments reflect rough seas with strong currents and waves. We will analyze the GBP/USD currency pair on the 5-minutes chart to look for long and short trades.

Trade Setup

Step 1

The first step of the strategy is to first look for a range on the chart of GBP/USD. The range can be identified using the Bollinger band strategy. However, we need to apply the concepts of price action for the identification of the range. The essential criterion for a range is that the price should respect the support and resistance levels at least twice. After we have identified the range, we will apply our strategy at the extreme ends of the range to take a suitable position in the pair.

The below image shows an example of the kind range that is required for the strategy.

Step 2

The next step is to wait for the market to hit the lower band of the indicator or upper band of the indicator. At the lower band, we will look for buy opportunities, and likewise, if the price at the upper band, we will look for sell trades.

In this example, we see that the price has approached the lower band, which means there is a high chance that buyers will take the price higher from this point.

Step 3

One should not enter the market soon after the price touches the lower or upper band, which carries a huge risk. We need confirmation from the market before we can take a suitable position. In this step, we look for that confirmation. Once the price closes above the middle line of the Bollinger band indicator, it is a confirmation that the support is respected this time and that the price is heading at least till the range’s resistance.

Step 4

In this step, we determine the take-profit and stop-loss levels for the strategy. We have two take-profit levels – the first take-profit is set at the upper side of the range, a typical place for booking profits. Another method is to hold on to the trades until the market shows signs of reversals, which is when the price falls below the middle line of the Bollinger band.

The stop-loss for this strategy is placed below the support of the range or below the lower band. The trade offers a risk to reward ratio of around 1 to 1.5, which is not bad.

Strategy roundup

In the beginning, we mentioned that the piranhas hunt their prey until it is completely devoured. In a similar way, once the trade hits our stop loss, it means there is nothing left, and we need to look for a new setup.

The triggering of stop loss is an indication that the market is no longer trading in that band, and it has started a new trend. In such cases, wait until the market halts and starts moving in a range. The only difference will be that we will be looking for a trade in the opposite direction with the same rules.

This is an important point and a trick that one can use to navigate themselves in trending markets. As the strategy is developed to trade in a range, one will find few opportunities when the market goes into a strong trend.

Categories
Forex Basic Strategies

Have You Tried This ‘Power Ranger’ Forex Trading Strategy?

Introduction

The forex market either trends or moves in a range. The last strategy was dedicated to trading the range. The strategy we will be discussing today is also based on trading the range. Range strategies are either pure price action based or a combination of both. Oscillators are one of those indicators that are commonly used in range strategies. This is because oscillators indicate a possible range that the price swings back and forth from.

Some common oscillators are the stochastic and relative strength index (RSI). It has been observed that identifying and trading ranges poses more challenges to traders than identifying trends. After all, ranges become evident only after it is formed.

To make things worse, when a range is formed, and one starts applying the range strategy, price action causes the market to break out or break down of a range again. The power range strategy tries to fill this gap. Let us look at how this can be done through the use of a powerful oscillator.

Time Frame

The power ranger strategy works well with the hourly (H1) or 4-hourly (H4) chart. This means each candle on the chart represents 1 hour or 4 hours of price movement. However, using the strategy on the 15 minutes time frame requires a lot of experience and practice. Hence, all new traders should use the strategy on the recommended time frame only.

Indicators 

We use the Stochastic indicator for this strategy with the following specifications.

%K period = 10 | %D period = 3 | Smooth = 3 | Levels = 20 and 80

The stochastic indicator is an oscillator that measures overbought and oversold conditions in the market.

Currency Pairs

The strategy is suitable for all currency pairs listed on the broker’s platform. However, it is advised to deploy the strategy on major currency pairs as patterns clearly show in these currency pairs. One should avoid trading in exotic or illiquid pairs as apart from unclear patterns, there are other problems associated with trading such pairs.

Strategy Concept

The strategy is based on the concept that the market will form a range after a trend. We use the stochastic indicator to give us an indication of a possible range formation. The current market momentum will tell us if we will go ‘long’ or ‘short’ in the market. If the market moves in an uptrend, we look for buy opportunities in the range where the entry will be determined by the stochastic indicator’s oversold region.

If the market is moving in a downtrend, we look to go short in the range. In this case, the entry is determined by the overbought region of the stochastic. We use the most recent high and low to determine the possible resistance and support of the range. Two of the ‘take-profit’ levels are located within the range, and the third one is located beyond the range in anticipation of a breakout.

Trade Setup

To illustrate the strategy, we shall consider the USD/CAD currency pair and find an appropriate trade using the strategy. Here are the steps to follow to execute the power ranger strategy.

Step-1

The first step is to find a trending market. By trending market, we mean, to look for higher highs and higher lows in case of an uptrend and lower lows and lower highs in a downtrend. Plot a trend line that connects these lows and highs, so that the trend looks eminent. This is the simplest step of the strategy. The below image shows an uptrend visible on the 4-hour time frame chart of the currency pair. Let us understand the further steps of the strategy.

Step-2

The next step is to look for a price retracement to a support area or an area close to the trendline. By doing so, we ensure that we are not chasing the market, which is crucial. Once we find such a retracement, observe the stochastic indicator’s position, and determine %K and %D level of the indicator.

We should look for price retracements where the %K and %D lines cross above the 20 levels indicating the market’s oversold condition. In a downtrend, the lines should cross below the 80 levels, indicating the market’s overbought condition.  The below image shows the crossing of both the lines above the 20 level exactly near the support, indicated by the red dotted line.

Step-3

As the price starts moving higher after reacting from the support line and a rise in the oscillator, we take our entry expecting a higher high in the market. One can notice here that, we enter the market only after we get a confirmation and just based on indicator signal and price level. We can see below that we are executing our ‘long’ trade after confirmation from the market in the form of two green candles, indicated by the brown arrow mark.

Step-4

In this step of the strategy, we determine our take-profit and stop loss. Basically, this strategy has three profit points and a single stop loss. We shall take 50% of our profits at the 50% mark of the range, 40% of the profit at 90% mark of the range and remaining profits at the new ‘high.’ The stop loss for this strategy is placed below the support, which would result in a 1:1 risk to reward ratio.

After looking at the below image, one might think that the trade does not hit our final ‘take-profit,’ but this is just one of many trades that does not result in a breakout. However, in most cases, the market makes a higher high and results in a fully profitable trade. The risk management part of the strategy ensures that even though the price does not hit reach our final target, we can still come out of the trade with no or minimum loss.

Strategy Roundup

This is an amazing strategy that allows us to take a range of trade in the early stages of its formation. Always determine the momentum of the market before looking for support and resistance levels. Giving importance to momentum will put ourselves in an advantageous position and prevents us from blindly trading just based on the signal given by stochastic indicator. Cheers!