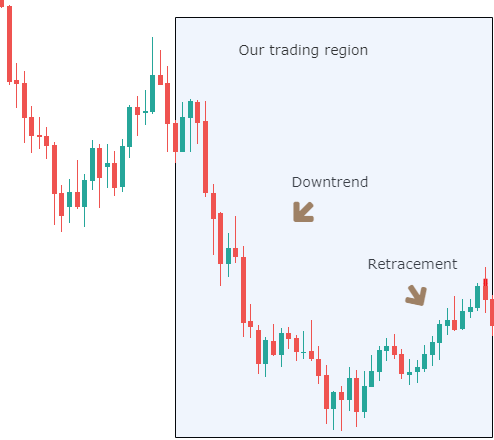
Categories
Forex Basic Strategies

Trading The Bullish & Bearish Bat Pattern Like A Pro

Introduction

We have learned the importance of Harmonic patterns in our previous articles. We also understood a couple of interesting harmonic patterns – The Butterfly & AB=CD. In this article, let’s understand what a ‘Bat’ pattern is, and how to make money trading this pattern. The Bat pattern is a part of the Harmonic group, and ‘Scott Carney’ discovered this pattern in the year 2001. Out of all the patterns present in the harmonic group, Bat pattern has the highest accuracy. This pattern can be extremely profitable when traded correctly.

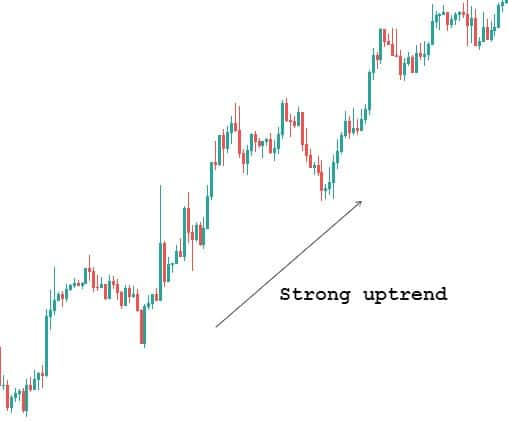
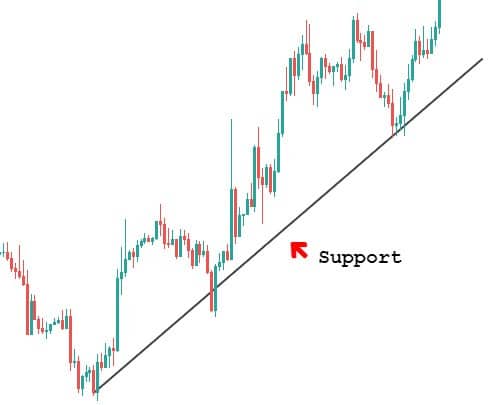
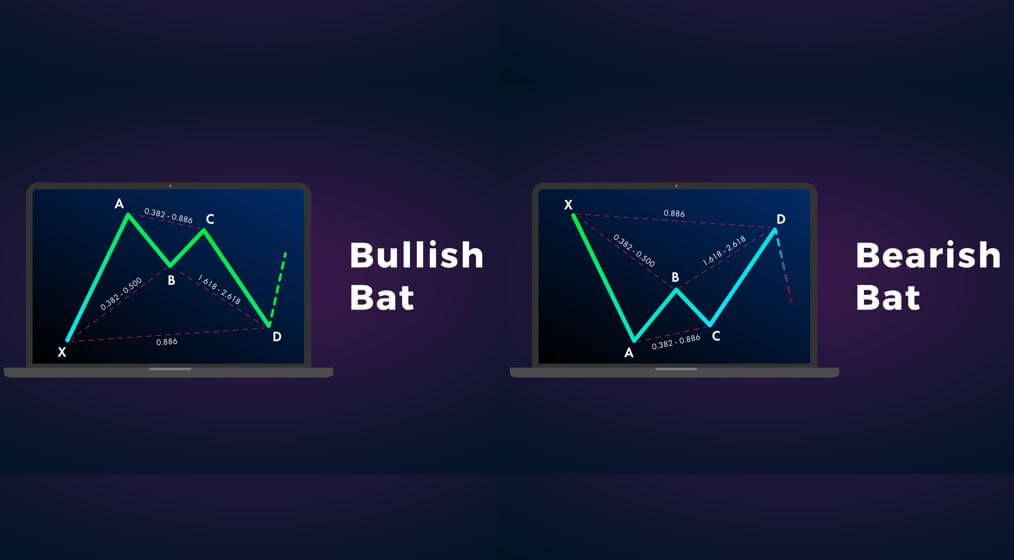
It works very well on all the timeframes but try not to trade it in smaller timeframes because the price in these timeframes tends to reverse quickly. The Bat pattern comes in both bullish and bearish variations and is made up of five swing points X, A, B, C, and D. In a downtrend, the appearance of a bullish Bat pattern indicates a bullish reversal. In an uptrend, the appearance of a bearish Bat pattern indicates a bearish reversal.

One of the critical characteristics of the Bat pattern is the power, speed, and strength of the reversal that occurs after the appearance of this pattern on the price chart. Fibonacci ratios are the core strength of any harmonic pattern, and thanks to the advanced technology for providing the Fibs ratios to the Bat pattern to increase its accuracy.

Bat Pattern Rules

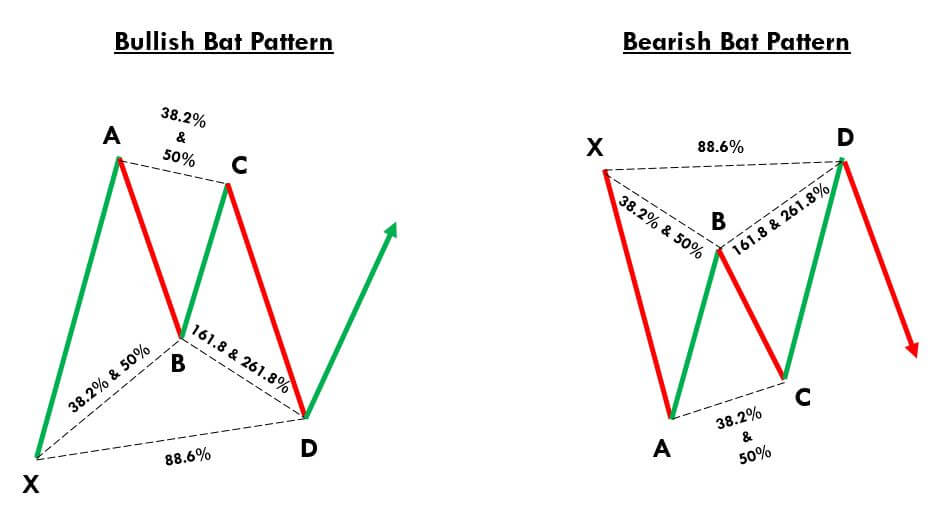
Just like most of the harmonic patterns, the Bat pattern is a four-leg reversal pattern that follows specific Fib ratios. A proper Bat pattern needs to fulfill the below criteria.

‘X-A’ – In its bullish form, the first XA move of the Bat pattern could be any random upward move on the price chart.

‘A-B’ – For a Bat pattern to get validated, the AB leg’s minimum retracement should be 38.2% of XA leg or maximum of 50% Fib levels. Scott Carney suggests that the retracement at 50% Fibs levels increase the accuracy of the signal generated.

‘B-C’ – The BC move can retrace up to a minimum of 38.2% Fib level of AB and a maximum of 88.6%.

‘C-D’ – CD is the last move that confirms the Bat pattern. This move should be at 88.6% Fibs retracement of XA leg, or it should be between 161.8% or 261.8% Fibs extension of the AB leg.

For a bearish Bat pattern, point X should be at a significant high. Conversely, for a bullish Bat pattern, point X should be at a significant low.

Below is the pictographic representation of the Bat Harmonic Chart Pattern.

Bat Pattern Trading Strategy

Trading The Bullish Bat Pattern

In the below USD/CHF four hours chart, we can see the formation of a bullish Bat pattern. These days, on most of the trading platforms, we can find all the harmonic tools which are combined with Fib levels. These tools get extremely handy when we need to quickly confirm the pattern. We use TradingView charts, and the harmonic pattern tool can be found in the left-side toolbar.

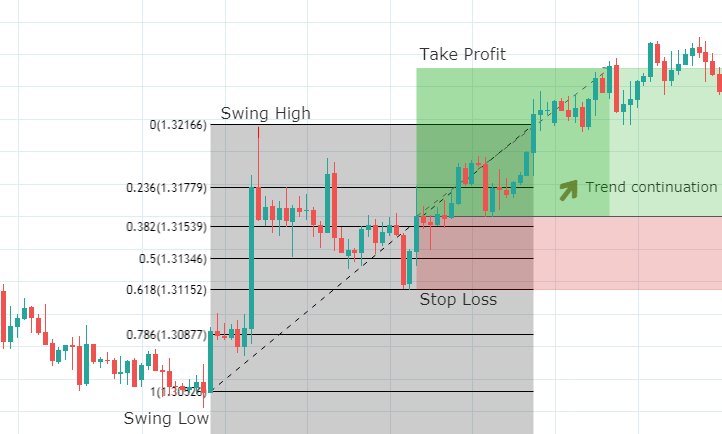
Coming to the strategy, our starting point X was at 0.9840 from where the move has started. The price action started to counter the trend from 0.9984. Let’s consider this as our point A, and the XA is nothing but a random bullish move in the market. Now we located our first swing high, so the next step is to count the market wave movement. The AB move retraces at 38.2% of the XA move, and the BC move goes up again and retraces at 88.6% of AB. Furthermore, the market prints the last move of the pattern, which is at 88.6% level of the XA move. So now we have got all the four touch patterns for a bullish Bat pattern on the price chart.

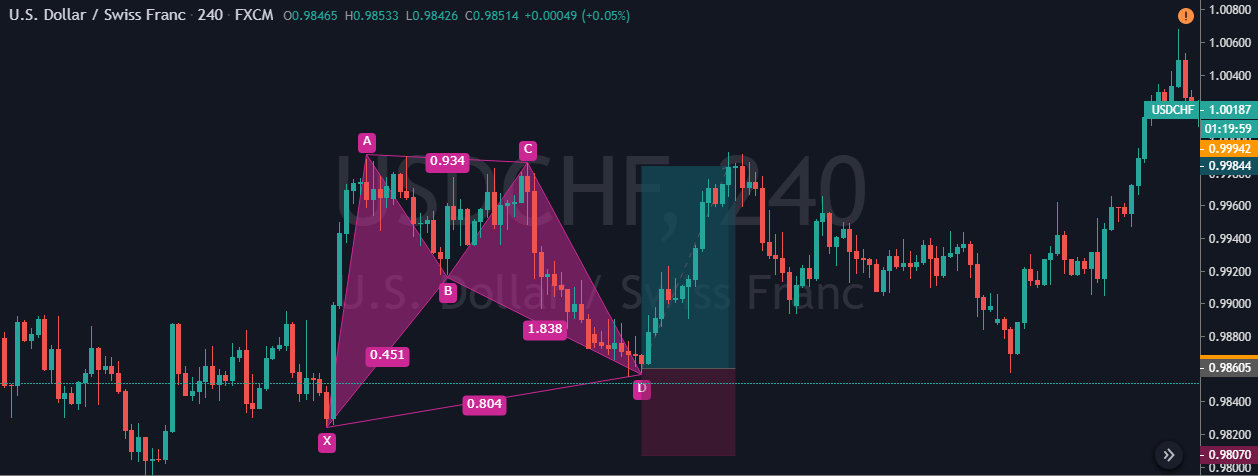
While back-testing, we found the market blasting to the north whenever the CD move finishes at 88.6% level. This is the reason why we took the buy entry as soon as the price-action completes the CD move. Overall it was an excellent risk-reward ratio trade. Also, when the CD move touches the 88.6% Fib level, it always provides a decent risk-reward ratio. The stop-loss is placed below the ‘X,’ and take-profit can either be placed at A or C points.

Trading The Bearish Bat Pattern

Both the bearish and bullish Bat patterns have the same rules. The only difference is that it appears inversely. So in this strategy, let’s trade the bearish Bat pattern with at most accuracy.

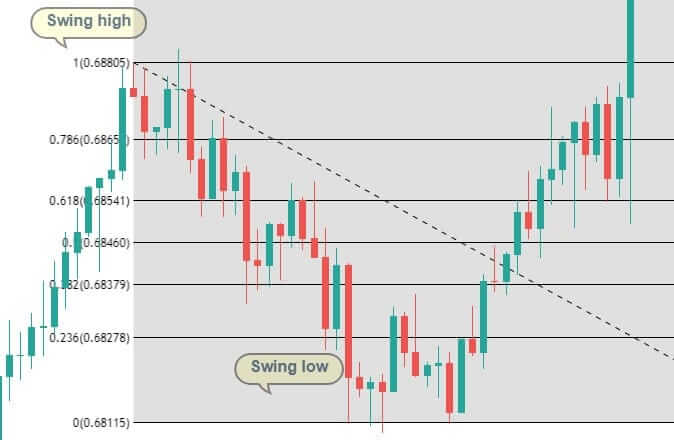
In the below NZD/USD daily chart, we have identified a bearish Bat pattern. The very first move has started from point X and ends at point A. This can be considered as a random bearish move. The price action has then reversed back and retraced at 38.2% level of the XA move forming the AB move. The market then goes into the counter direction and forms a BC leg, which is also retraced at 38.2% Fib level of the AB leg. The last leg was the CD move, and it finished close to the 88.6% Fibs level.

These swing highs and lows confirm the formation of a bearish Bat pattern on the price chart. So when the price action prints a bearish confirmation candle, we went short in this pair. Scott Carney described the points B, C and A as the first, second, and third target respectively. We can book profit at any of these points, or we can hold for deeper targets depending on the market situation.

In this particular trade, we didn’t book profits at B or C after seeing the momentum of the price. We were sure that the price could easily reach the last target. The price action did hold at point C for a longer time, which indicates that this trade might not work. Any armature trader would have panicked and closed their trades at breakeven.

But, as mentioned, whenever an ‘almost perfect’ Bat pattern is formed, the trade will definitely work. We must be patient and confident enough to stick to the strategy. Stop-loss placement is crucial, and one thumb rule while trading harmonic patterns is to place the stop-loss just below point X.

Conclusion

In short, harmonic patterns imply that the trends can be subdivided into smaller or larger waves using which the future price direction can be predicted. These harmonic patterns only work if the fibs ratios are aligned with the pattern. Some traders do not believe the authenticity of harmonic patterns, but we assure you that you can trade these patterns confidently. This ends the discussion on the Bat pattern. Remember that this pattern provides accurate entries as well as good RRR trades compared to other harmonic patterns. In the upcoming articles, let’s discuss Gartley and Crab patterns, which are equally important to learn.

We hope you find this article informative. In case of any questions, please let us know in the comments below. Cheers!

Categories
Forex Course

65. Combining Fibonacci Levels With Candlestick Patterns

Introduction

In the previous lessons, we understood how Fibonacci levels could be combined with trendlines to generate confirmation signals. After discussing many applications of the Fibonacci indicator, we are now ready to explore some complex strategies using these levels. In this lesson, we will be discussing how the Fibonacci levels can be used with Japanese candlestick patterns.

The candlestick patterns are an intrinsic part of trading, and we cannot ignore them. We have learned many candlestick patterns in the previous lessons, and you can find them starting from here. We have also learned that these patterns can not be used stand-alone, and we should be using any reliable indicators to confirm the signals generated by these patterns. So we will be using Fibonacci retracements to confirm the opportunities generated by the chart patterns.

For the explanation purpose, let’s discuss one of the most reliable candlestick patterns – Dark Cloud Cover. To know more about this pattern, you can refer to the second part of this article. We will be trading the market today by combining both Fibonacci levels and the Dark Cloud Cover pattern.

Strategy – Dark Cloud Cover Pattern + Fibonacci Levels 

For explaining the strategy, we considered a downtrend, on which we will be plotting our Fibonacci indicator and later evaluate its retracement. The below chart shows the same with a trading region in which we will be identifying our swing high and swing low. We will also see if the retracement shown in the chart is going to react at the important Fib levels.

In the below chart, we can see the market has moved down quite swiftly from the swing high to swing low. This shows the strength of the underlying downtrend. Trading a retracement of a strong and big move on any side is always preferable. The next step is to plot the Fibonacci levels on the chart.

After the Fibonacci indicator is rightly plotted as shown in the below chart, let’s see what happens at the important Fibonacci levels, such as 50% or 61.8% level. In the chart below, we see that the last Red candle of the retracement exactly touches the 50% level and closes midway of the previous Green candle.

These two candles together remind us of one of the very well known candlestick patterns – The Dark Cloud Cover. More importantly, this pattern is formed exactly at the 50% Fib level. So if we get a confirmation to the downside, it could result in a perfect setup to go short on this pair.

In the above picture, we can clearly see the formation of a bearish confirmation candle. So we can confidently take short positions in the market by placing a stop-loss near the 61.8% level with a target below the recent low.

The above chart shows how the trade works in our favor by hitting our pre-determined ‘take profit.’ We can see that, right after the entry was made, the market moves so fast in the direction of the trend producing continuous red candles. This shows the accuracy of candlestick patterns when combined with indicators like Fibonacci. Since the market is still in a strong downtrend, aggressive traders can take profit at the second or third swing low of the trend, after crossing the initial ‘take-profit.

Conclusion

From the previous articles, we have seen how the Fibonacci tool can be used with support resistance levels, trendlines, and now even candlestick patterns. By this, we can be assured that the Fibonacci tool is potent and should never be underestimated. Instead, we recommend you to widen its usage in technical analysis to identify more accurate trading opportunities.

[wp_quiz id=”64541″]
Categories
Forex Course

64. Trading Support & Resistance Levels Using Fibonacci Levels

Introduction

In the previous lessons, we understood how to use the Fibonacci tool to trade the pullback of a trend. We have also learnt how these Fib levels are not foolproof. Now, in this lesson, let’s extend this discussion to see how the Fibonacci tool can be used in conjunction with Support and Resistance – arguably the most critical levels on a price chart.

Support is the area where the price rejects to go down and bounce back further. This area acts as a floor where the price gets stopped. Resistance is the opposite of Support. At this level, the price finds it very hard to go up as it acts as a ceiling. The general idea is to buy at the Support and sell at Resistance. But blindly buying and selling at these levels carry huge risk as there is no guarantee that these levels will work each time.

So let’s use Fibonacci levels to determine the working of these S&R levels. Basically, we are combining both Support Resistance and Fib levels to increase the accuracy of trading signals generated. Let’s get started.

In the below chart, we have identified a strong resistance area, and now we must wait to see if it creates an area of Support after breaching the Resistance. It is always advisable to buy at ‘resistance turned support.’ Also, if the price has broken a strong resistance with multiple touches, there is a higher chance of it turning into Support. At the marked region below, we can see the price breaking the strong resistance area.

In the marked regions below, we can see the price retracing after breaking the Resistance. So in order to combine this support resistance level with Fib levels, we must identify the swing low and a swing high. As we can see below, we have also plotted the Fibonacci levels on the chart using a Fib indicator.

Ideally, if we get a retracement at the 61.8% Fib level and a confirmation candle, we can confidently enter for a buy. If the market does not react at any of the Fib levels, this could be a sign that the Support is no longer strong, and it can be broken.

As per the theory of Support and Resistance, the market must react at the previous Resistance and bounce off. From the below chart, it is clear that the retracement has reached our S/R line, which is exactly coinciding with the 61.8 Fib level. Now it is a clear indication for us to go long once we see a confirmation candle.

In the below chart, we can see that the price has exactly bounced off from the 61.8% Fib level and printed a bullish candle giving us a confirmation sign. Right after the confirmation candle, we can place our buy trade with a stop-loss at 78.6% Fib level and take-profit anywhere near the high.

Further, in the below chart, we can see the market making higher highs breaking the previous resistance levels. From this trade, we learn that, when Fibonacci is used near S/R as a confirmation tool, it increases the odds of that level performing. The price will surely take Support at the Fib levels and continue its trend.

One can notice that the ‘buy’ happens precisely at the 61.8% Fib level near Resistance turned support line. The market continues to take Support at this level until, eventually, it breakouts on the upside. This shows the power of the Fibonacci indicator when combined with S&R levels.

There are many other credible indicators that are reliable and can be combined with S&R levels. But Fibonacci is one of the most used ones by the traders across the world.

[wp_quiz id=”64461″]
Categories
Forex Course

62. Using Fibonacci Retracements To Enter A Trade

Introduction

In the previous article, we understood the definition of Fibonacci and how the Fibonacci levels are derived. Now we shall see how to use these levels to enter a trade and formulate a trading strategy around it.

The strategy we are going to discuss can be used not just in the Forex market. It can also be used in different other markets such as Stocks, Commodities, Cryptocurrencies, and ETFs. This is essentially a trend trading strategy that takes advantage of a pullback in a trend. The Fibonacci levels later prove to be critical areas of support and resistance that most traders keep a close watch on. Let’s get started with the strategy.

Step 1: Identify an initial big move. We are going to trade its retracement.

A trend helps the traders to identify the direction of the market and to determine where the market will head further. A big price movement indicates that the market has reversed from its original direction and will possibly continue further in that direction.

In this example, we have identified a big move on the upside, and we shall see how to trade its retracement to join the trend. Let’s use Fibonacci levels to enter the trend at the right time.


Step 2: Use the Fibonacci tool and plot the levels on the chart

After placing Fibonacci levels on the chart, we need to wait for a retracement and see where it touches the Fib levels. The most desirable condition is when the price bounces off after touching the 50% or 61.8% fib ratio. These ratios are also known as Golden Fib ratios. In the below chart, we can see the formation of a bullish candle as soon as the Red candle reaching the 61.8% level.

In an uptrend, always make sure to plot the Fib levels from Swing Low to Swing High. Likewise, in a downtrend plot, the Fib levels on the chart from Swing High to Swing Low.

Step 3: Enter only after confirmation 

Typically, traders are taught to place their buy orders as soon as the price reaches the 61.8% level. Do not do that. Only place the trades after the appearance of at least a couple of bullish candles. In the below chart, the formation of a green candle at 61.8% gives us an additional confirmation that the trend is going to continue after the retracement. Traders can also confirm this buy signal by using reliable technical indicators. This is how the chart would look at the time of entering the trade.

Step 4: Take-Profit and Stop-Loss placement

It is important to place accurate Stop-Loss and Take-Profit orders to mitigate the risk and maximize profits. In this strategy, stop-loss is placed just below the 61.8% Fib level. If the price breaks this Fib level, the uptrend gets invalidated, and we can expect the beginning of a downtrend.

We can place the take-profit order at the nearest’ high’ of the uptrend and trail the stop-loss until it is triggered. The minimum risk to reward of this trade is 1:1, which is not bad. But since it is a continuation of the trend, we can wait until it makes a new high and take profits there. This will result in a 1:2 risk to reward trade.

Below is how the setup of the final trade looks like.

We can clearly see the price respecting the Fibonacci levels, and the trade here went exactly the way we predicted.

Conclusion

Fibonacci retracements are a part of the trend trading strategy that most traders observe during an uptrend. Traders try to make low-risk entries in the direction of the trend using these Fibonacci levels. It is believed that the price is highly likely to bounce from the Fibonacci levels back in the direction of the initial trend. These Fib levels can also be used on multiple time frames. When this tool is combined with other technical indicators, we can predict the outcome of the trade with a greater degree of accuracy.

[wp_quiz id=”63028″]
Categories
Forex Basic Strategies Forex Fibonacci

Perfecting The Fibonacci Retracements Trading Strategy

Introduction

The Fibonacci tool was developed by Leonardo Pisano, who was born in 1175 AD in Italy. Pisano was one of the greatest mathematicians of the middle ages. He brought the current decimal system to the western world ( learned from Arab merchants on his trips to African lands). Before that, mathematicians were struggling with the awkward roman numerical system. That advancement was the basis for modern mathematics and calculus.

He also developed a series of numbers using which he created Fibonacci ratios describing the proportions. Traders have been using these ratios for many years, and market participants are still using it in their daily trading activities.

In today’s article, we will be sharing a simple Fibonacci Retracement Trading Strategy that uses Fibonacci extensions along with trend lines to find accurate trades. There are multiple ways of using the Fibonacci tool, but one of the best ways to trade with Fibonacci is by using trend lines.

With this Fibonacci trading strategy, a trader will find everything they need to know about the Fibonacci retracement tool. This tool can also be combined with other technical indicators to give confirmation signals for entries and exits. It also finds its use in different trading strategies.

Below is a picture of the different ratios that Leonardo created. We will get into details of these lines as we start explaining the strategy.

Strategy Prerequisites

Most of the charting software usually comes with these ratios, but a trader needs to know how to plot them on the chart. Many traders use this tool irrespective of the trading strategy, as they feel it is a powerful tool. The first thing we need to know is where to apply these fibs. They are placed on the swing high/swing low.

  • A swing high is a point where there are at least two lower highs to its right
  • A swing low is a point where there are at least two higher lows to its right

If you are uncertain of what the above definitions meant, have a look at the below chart.

Here’s how it would look after plotting Fibonacci retracement on the chart.

In an uptrend, it is drawn by dragging the Fibonacci level from the swing high all the way to swing low. In case of a downtrend, start with the swing high and drag the cursor down to the swing low. Let’s go ahead and find out how this strategy works.

The Strategy

This strategy can be used in any market, like stocks, options, futures, and of course, Forex as well. It works on all the time frames, as well. Since the Fibonacci tool is trend-following, we will be taking advantage of the retracements in the trend and profit from it. Traders look at Fibonacci levels as areas of support and resistance, which is why these levels could be a difference-maker to a trader’s success.

Below are the detailed steps involved in trading with this strategy

Step 1 – Find the long term (4H or daily time frame) trend of a currency pair

This is a very simple step but crucial, as well. Because we need to make sure if the market is either in an uptrend or a downtrend. For explanation purposes, we will be examining an uptrend. We will be looking for a retracement in the trend and take an entry based on our rules.

Step 2 – Draw a line connecting the higher lows. This line becomes our trendline.

The trend line acts as support and resistance levels for us. In this example, we will be using it as support.

Step 3 – Draw the Fibonacci from Swing low to Swing high

Use the Fibonacci retracement tool of your trading software and place it on swing low. Extend this line up to the swing high. Since it is an uptrend, we started with a 100% level at the swing low and ended with 0% at the swing high.

Step 4 – Wait for the price to hit the trend line between 38.2% and 61.8% Fibonacci levels.

In the below-given figure, we can see that the price is touching the trend line at two points (1 and 2). There is a significant difference between the two points. At point 1, the price touches the trend line between 78.6% and 100%, whereas, at point 2, the price touches the trend line between 38.2% and 61.8%.

The region between 38.2% and 61.8% is known as the Fibonacci Golden Ratio, which is critical to us. A trader should be buying only when the price retraces to the golden ratio, retracements to other levels should not be considered. Therefore, point 2 is where we will be looking for buying opportunities.

Step 5 – Entry and Stop-loss

Enter the market after price closes either above the 38.2% or 50% level. We need to wait until this happens, as the price may not move back up. However, it should not take long as the trend should continue upwards after hitting the support line.

For placing the stop loss, look at previous support or resistance from where the price broke out and put it below that. In this example, stop loss can be placed 50% and 61.8% Fibonacci level because if it breaks the 50% level, the uptrend would have become invalidated. The trade would look something like this.

Final words

The Fibonacci retracement tool is a prevalent tool used by many technical traders. It determines the support and resistance levels using a simple mathematical formula. Do not always rely only on Fibonacci ratios, as no indicator works perfectly alone. Use additional tools like technical analysis or other credible indicators to confirm the authenticity and accuracy of the generated trading signals. One more important point that shouldn’t be forgotten is not to use Fibonacci on very short-term charts as the market is volatile. Applying Fibonacci on longer time frames yield better results.

We hope you find this strategy informative. Try this strategy in daily trading activities and let us know if they helped you to trade better. Cheers!