Categories
Forex Basic Strategies

Trading The High Low Breakout ‘Asian Forex Session’

The significant advantage of the forex market is it opens 24 hours a day, which provides a couple of trading opportunities to traders around the globe. There are four major trading sessions that exist, the first one of Asia, followed by Frankfurt, London, and New York. All of these are the significant sessions that allow investors to trade even in opening sessions or even in the middle of the night. But not all the trading sessions are equally volatile; for example, London and New York are the biggest sessions where a lot of volume traded, and on the other hand, traders believe that the Frankfurt and Asian sessions are the least traded session in the market.

So this mentality stops the traders from trading the Asian session. Another reason might be that when the Asian session opens, half of the world slept, that’s why the price action is less volatile in the market. In a less volatile market, simply it is difficult for the traders to seize the more significant gains, and even in less volatile conditions, traders hate to trade the markets, and if you are the one who is always looking to make quick bucks in the volatile conditions. In this article, we will show you the strategy we created, especially to take advantage of the Asian markets.

We believe you know that London is the most significant trading session in the market, which provides where most of the traders around the globe, bankers, and institutions trade the market. In the London market, most of the currencies show a lot of volatility, and you can trade all of it, but it is advisable to give preference to the GBP, CHF, USD, and EUROS.

Trading Strategy

First of all, we suggest you follow the link below and find out when the London session starts according to your country’s time.

https://forex.timezoneconverter.com/

After finding out the opening time of the London session according to your local time, the next step is to sit on your desk one hour prior to the London opening and find out which of the currencies performed better in the Asian session and mark the Asian session High and Low. The next step is to wait for the London opening and in London session when the price action breaks the Asian session high or low take trade in that direction. As you know, London is the biggest session, so always expect longer moves.  This strategy is specially created for intraday traders, so always trade the Asian high and lows on lower timeframes, such as 5, 15, or 30 minutes.

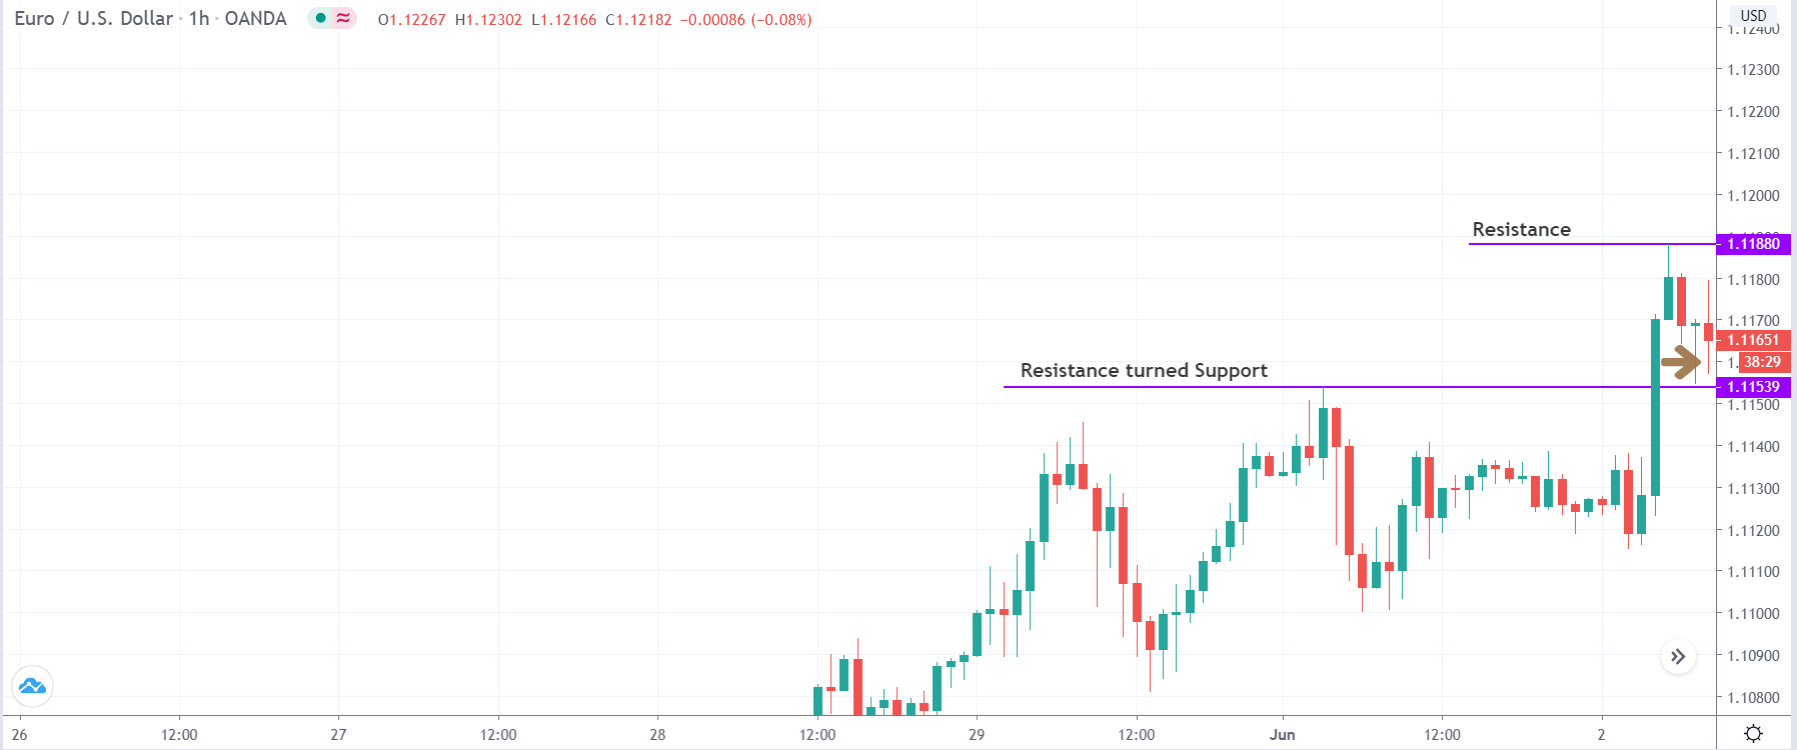
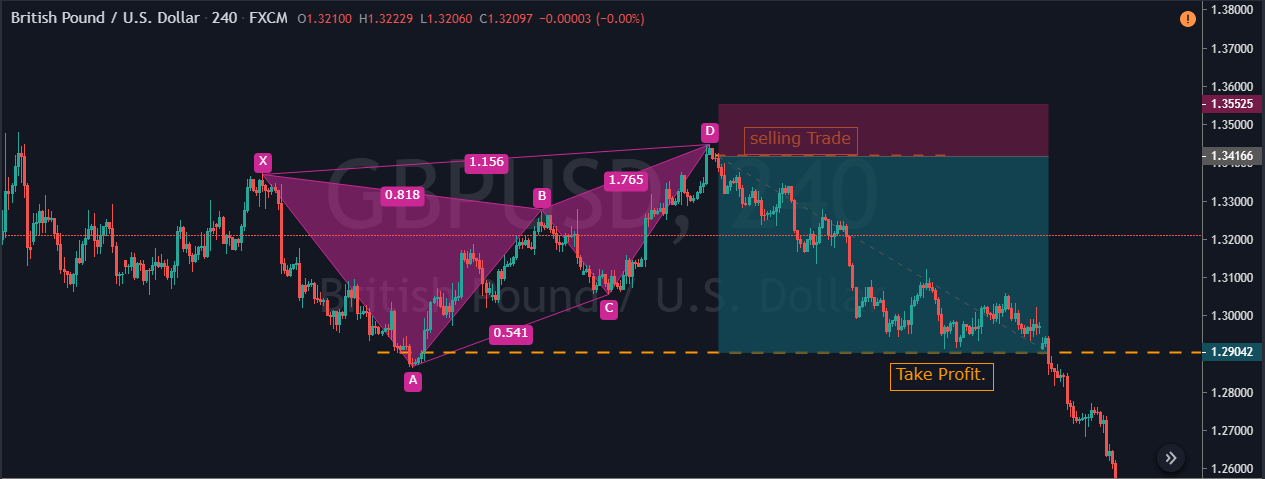
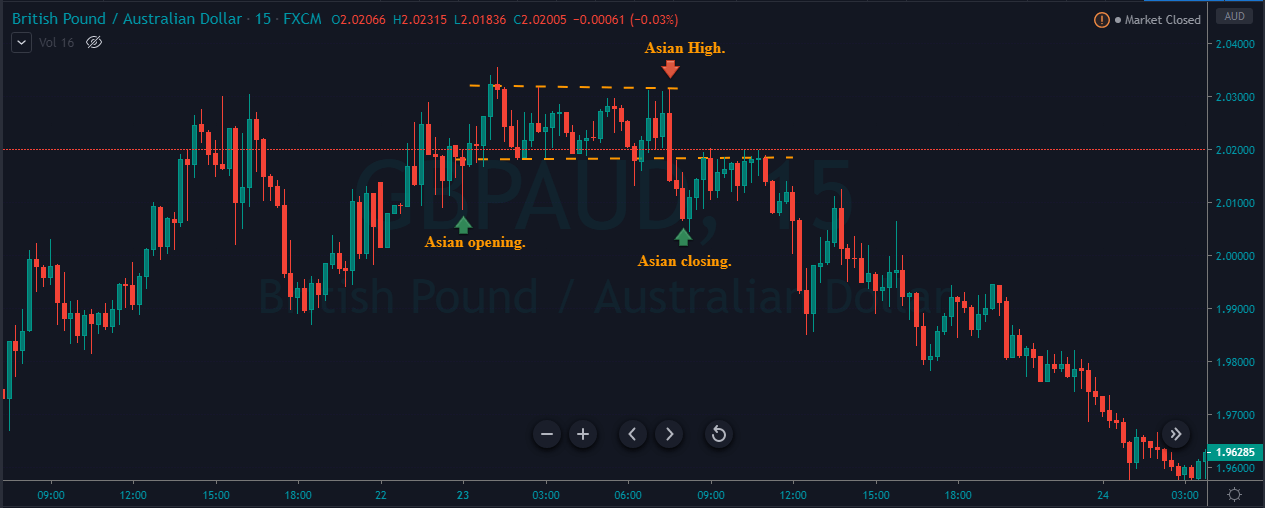
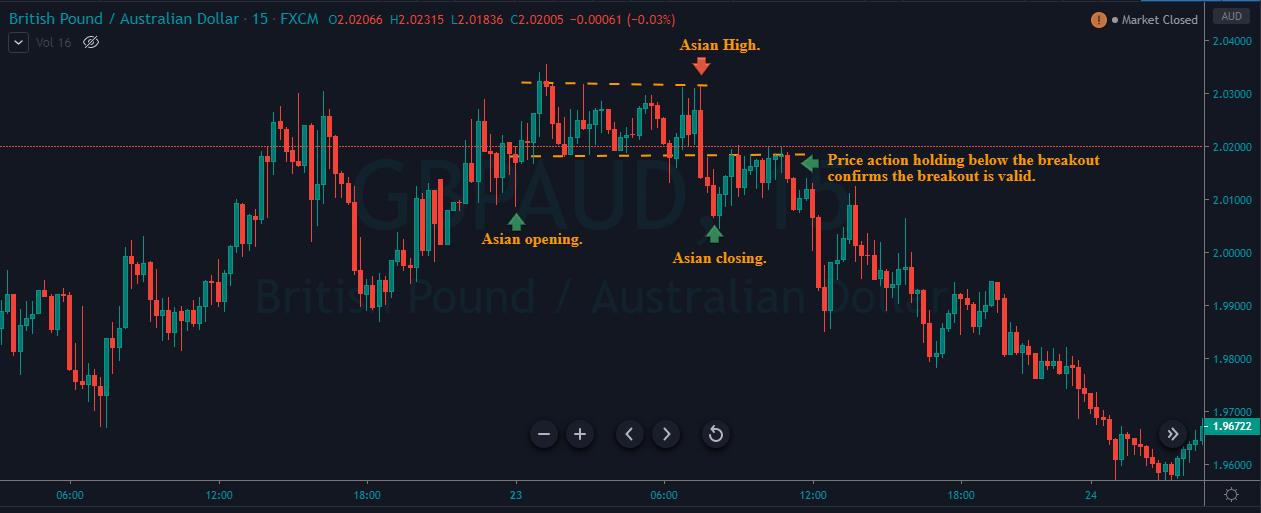
According to the GMT, the Asian session opens at Midnight and closes at Morning 08:00, and the London session also opened the morning at 8:00 AM, so before the London, opening finds out the Asian high low to take the trade. The image represents the opening, high, and close of the Asian session, the below image clearly represents that the GBPAUD forex pair, didn’t move much in the Asian session and even it turned into a range to give us trades in the London Session.

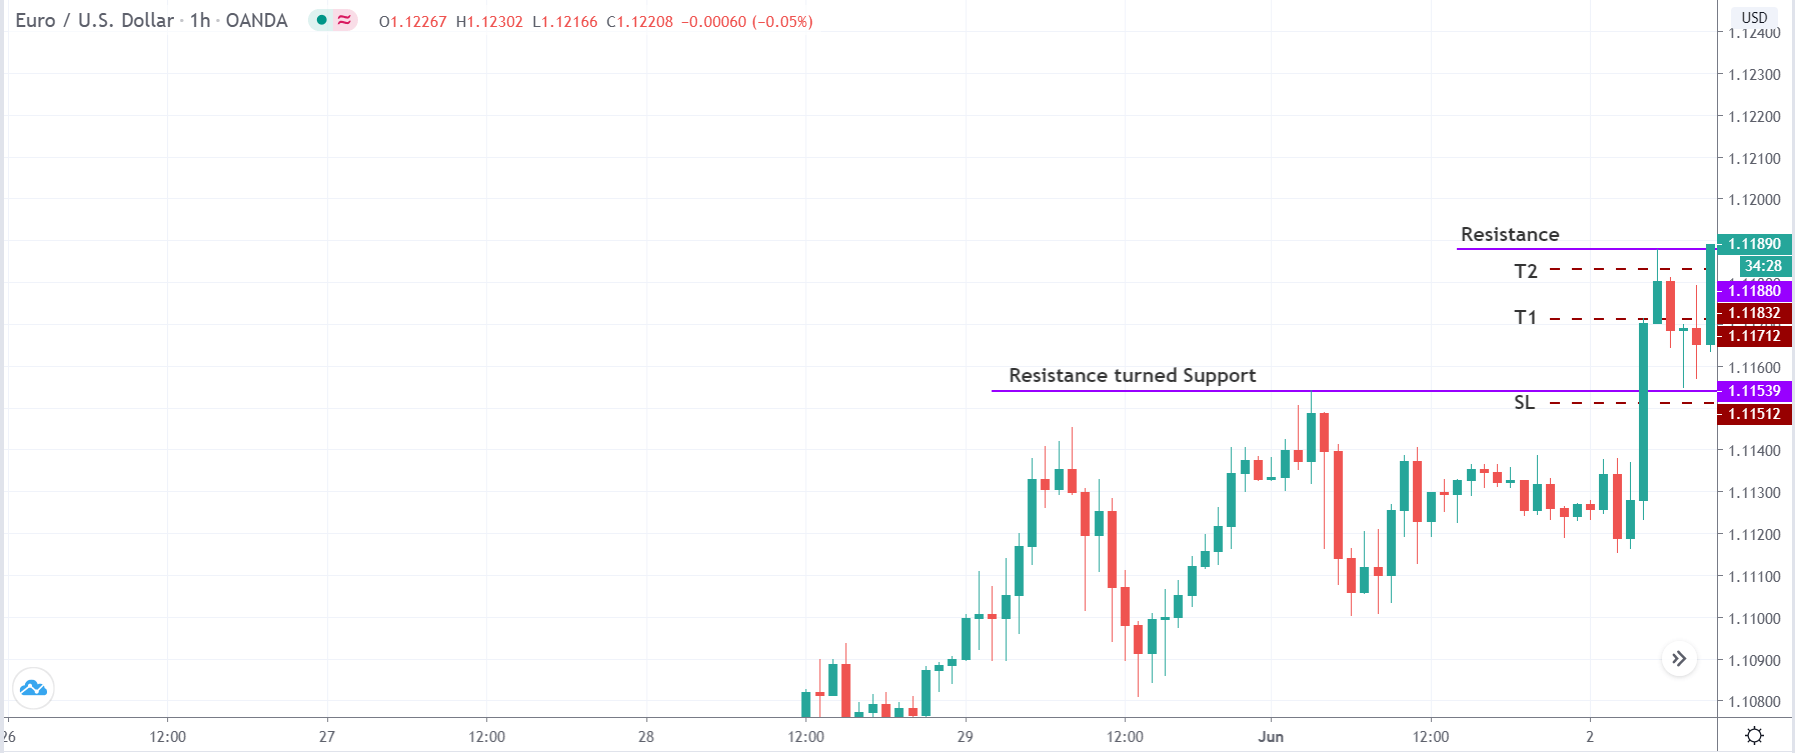
The major mistake most of the breakout traders made is they don’t wait to confirm the breakout, and sometimes price action came back into the range, and they end up losing side. So it is advisable to confirm the breakout first then only activate your trade. As you can see in the below image, when price action breakout the Asian high and low in the London session, it started holding below the breakout line, which confirms that the breakout is real.

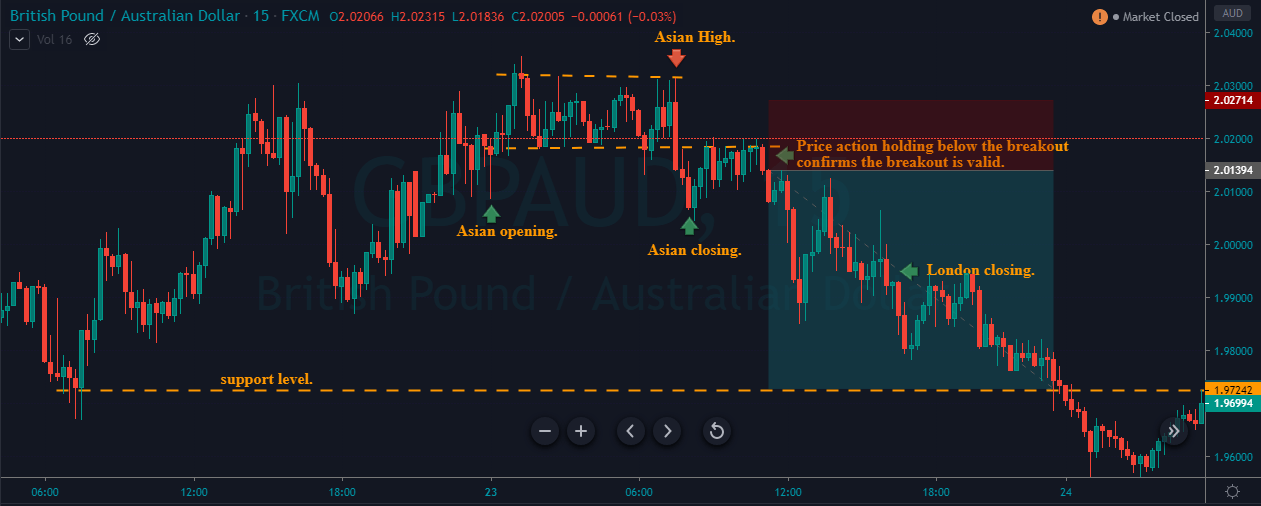
The image below represents our entry, exit, and take profit in this forex pair; we took entry when the price action holds below the breakout line. The stop loss was just above the breakout; the reason for the smaller stops is that the holding below the breakout line confirms the stability of the breakout. Some traders like to trade only the London session, and they exit their positions as the London session closes. It is your personal preference. However, we recommend you hold your positions for the more extended targets because the London session overlaps with the US session, and the US is the biggest session in the industry, where the traders with deep pockets trade the markets. So just like London, if the markets allow you to hold your position for the US session, then go ahead and milk the market. The last green on the below image represents the London closing, but we decided to go for the deeper targets because the trend of the market was quite healthy, which is a sign for us to hold our winning position.

The image below represents the Asian, opening, high, low, and close on the GBPAUD forex pair.

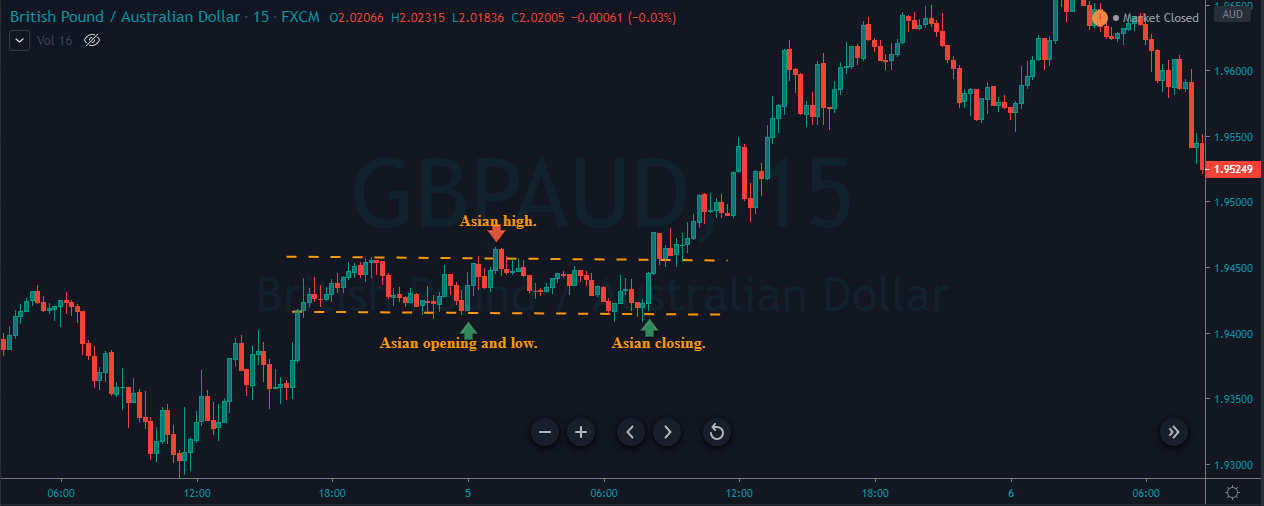
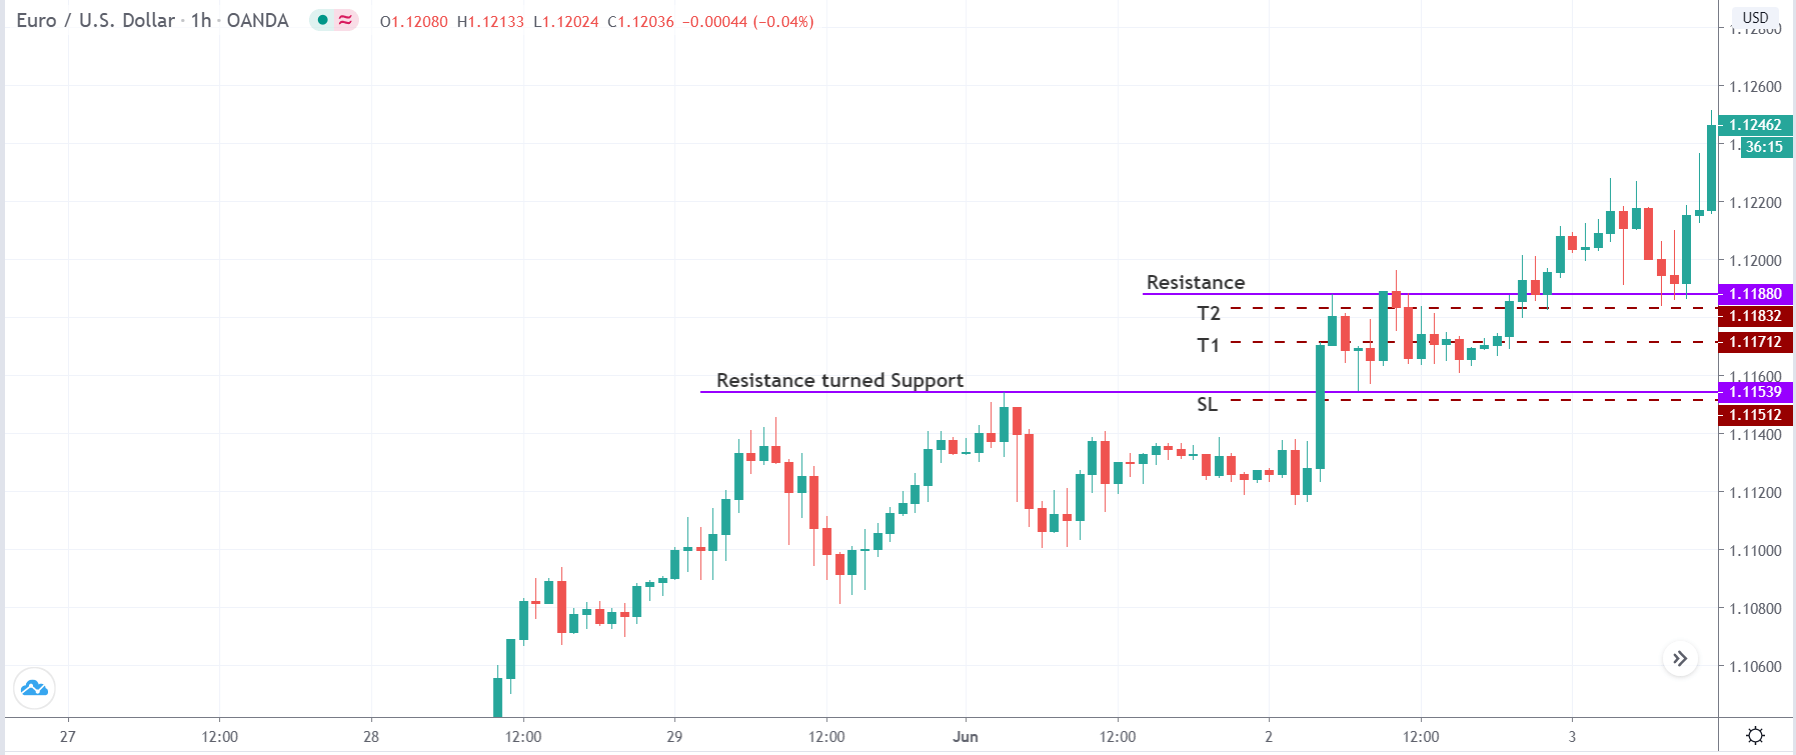
The image below shows that the Asian session failed to make any move in this pair, and it just holds sideways because it was waiting for London to open so that the increased volatility moves the market. When London opens then price action immediately breakout the range, it started holding above the range, which was a confirmation to go long in this pair.

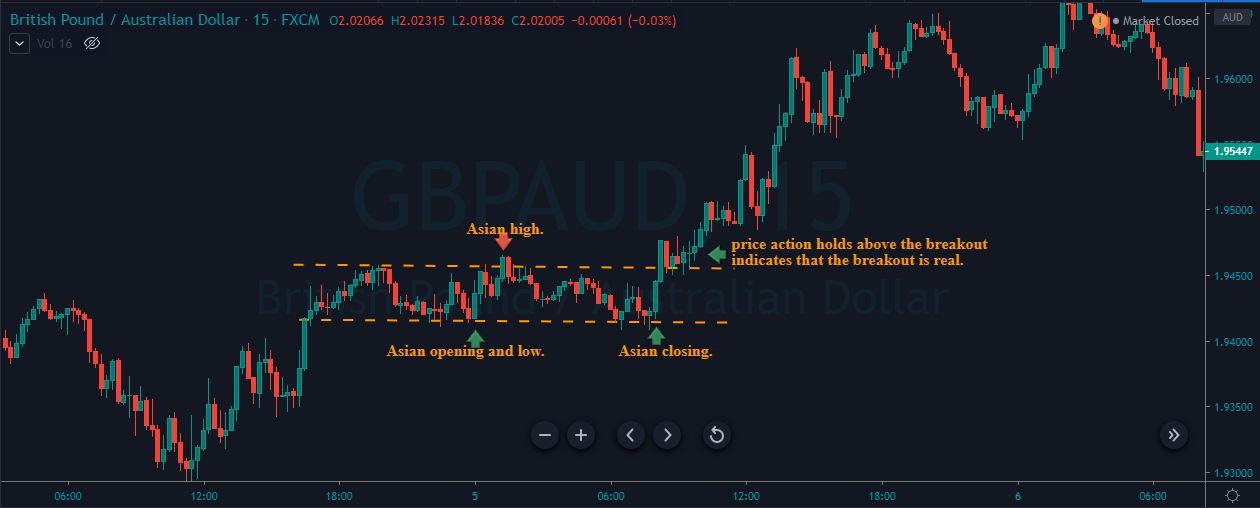
The below image represents our entry, exit, and take profit in this pair; we took entry when price action holds above the breakout line. The stops were just below the breakout, and for the take profit, we decided to lose our position at the major resistance line in the US session.

Conclusion

Asian session high low breakout is an intraday strategy; it helps you to trade all the sessions in the market. You can take data from the Asian session and use it in the London session to take an entry, and the volatility and strength of the US session help you to exit your position at more significant gains. This is the beauty of this strategy, which makes you active in all the sessions. The more you use this strategy, the better your trading will be, and the deeper understanding you will have of all the trading sessions.

Categories
Forex Basic Strategies

Trading The Forex Market Using The ‘Pendulum Strategy’

Introduction

In the previous set of articles, we developed techniques and strategies using the most important technical analysis indicators. We also discussed how one could enter the market and make the most out of those strategies. In today’s strategy, we shall discuss a technique that will help us to anticipate a range and trade in the later stages of the range formation.

Time Frame

The suitable time frame for this strategy is the hourly (H1) or 4-hourly (H4) chart. This means each candle on the chart represents 1 hour or 4 hours of price movement, respectively. This does not mean one cannot use the strategy on the 15 minutes or daily time frame. The only difference is that it is difficult to spot trading opportunities on those time frames.

Indicators

We will not be using any indicators for this strategy. The strategy is more price action based.

Currency Pairs

One should note that this strategy is suitable for all currency pairs listed on the broker’s platform. However, it is recommended to trade only in the seven major currency pairs, as the patterns are clearer in these currency pairs.

Strategy Concept   

A pendulum in motion swings back and forth because gravity is pulling it back to the normal position every time it swings away from it. The pendulum reaches a maximum height before it starts to fall back. However, if the swinging force is a lot, the string holding the pendulum will be cut, and the pendulum will fly off.

A ranging market acts similarly to the pendulum. Every time prices pull away from the mid-point of the range towards the top or bottom end of the range, market forces pull it back towards the mid-point of the range. However, sometimes when the market gains enough momentum, prices will break the support and resistance of the range and move into a trend.

In this strategy, we wait for the pendulum to reach it’s optimal height and fall before entering the trade. We do this by executing a trade after the prices bounce back at the 10% market from either support or resistance. Our first target is set at 50% of the range, and the second target is set at the 90% mark of the range.

Trade Setup

We used the EUR/USD currency pair to illustrate the strategy, where we will be discussing a ‘long’ trade. Here are the steps to follow in order to execute the pendulum strategy.

Step 1

The first step of the strategy is to look for established levels of resistance turned support. By established, we mean the resistance which has now turned into support should be quite strong. It will be prominent if the breakout happens with strength, or essentially which happens after a news release.  After that, we need to mark our resistance, or ‘high’ from the market retraces to our support. These two important levels are marked in the below figure.

Step 2

The next step is to wait for the price to bounce off from the support area by 10% of the range that is created between the two lines marked. In the above example, the arrow mark points at the 10% value of the range, as shown in the below image. We will be entering the market for a ‘buy’ exactly after this 10% bounce. The stop loss for this strategy is placed somewhere at a price where the resultant risk to reward is 1.

Step 3

The best part of this strategy is that many emphases are put on trade management. In this step of the strategy, we remove 50% of our positions at the 50% mark of the range and 90% of the positions at the 90% mark of the range. In this, we ensure that even if the market reverses from the middle of the range and breaks below the support, we will still be profitable and would not any money even if the price hits our stop loss.

The points of the first and second targets are shown in the below figure, represented by brown dashed lines. One can also see the position of the Stop Loss marked by a brown dashed line.

We can see in the image below that the market finally breaks out and continues its upward momentum. When critical levels of resistance turned support and support turned resistance are found in an uptrend and downtrend respectively, traders can wait for the market to make new ‘highs’ or ‘lows’ and then book their profits.

Strategy Roundup

This strategy is applicable as long as the market is swinging back and forth in the form of a range. However, the main requirement of the strategy is to find strong levels of resistance turned support in an uptrend (preferably) and support turned resistance in a downtrend (preferably). If the breakout or breakdown does not occur with strength, the strategy might not yield the desired result, or the trade might work just a little bit. Although it looks like trading simple support and resistance strategy, establishing key levels at the beginning of the strategy and application of trade management is what makes this strategy different from trading traditional support and resistance.

Point of Caution

Previously, we mentioned to look out for key levels in trending markets, but at the same time, one needs to be cautious while determining these levels. One needs to check if the market is overbought, in case of an uptrend, or oversold, in case of a downtrend. An indicator that can help us determine the overbought and oversold conditions of the market is the Stochastic indicator.

Categories
Forex Course

124. Trading The Bullish & Bearish Butterfly Pattern

Introduction

Bryce Gilmore and Larry Pesavento are the ones to first discovered the Butterfly pattern. It is a harmonic reversal pattern, and it is composed of four legs. The trading of this pattern is similar to the trading of Gartley and Bat patterns that we have learned in previous lessons. The Butterfly pattern helps us in identifying the end of the current move so that we can take the trade. There are both bullish and bearish Butterfly patterns, and we must be going long if we find a bullish butterfly and vice-versa.

Four legs of the Butterfly Pattern

XA – In its bearish version, the first leg of the pattern forms when the price action drops from the point X to A.

AB – The AB leg reverses its direction and retraces to 78.6% Fib level of the distance covered by XA.

BC – In the BC leg, the price action changes its direction and moves back down. It then retraces between 38.2% and 88.6% Fib levels of the distance covered by AB.

CD – This is the final leg of the pattern, and if this leg goes wrong, we can consider the pattern formed till now as invalid. The CD leg must reach between 127% and 161.8% Fib extension of the AB leg. Take the sell trade at point D.

How To Trade The Butterfly Pattern?

Bullish Butterfly Pattern

We have identified the formation of the Butterfly pattern in the USD/JPY Forex pair. The first push ‘XA’ was a random leg on the price chart. The second leg is a countertrend move, and it retraces to the 78.6% Fib level of the XA leg. For the third leg, price action goes up, and the BC leg reaches 88.6% of the AB move. Finally, the CD leg enabled the price to the 161.8% level of BC move.

Since all the legs are formed according to the instructions, we can consider this a Bullish butterfly pattern. When price action completed the last leg, we activated our buy trade in this pair. The stops are placed below the trade, and the take profit was placed at point A.

Bearish Butterfly Pattern

The chart below represents the formation of a bearish butterfly in a downtrend. The first XA bearish leg was any random move in the market. The AB leg goes countertrend, and it retraces 78.6% of the XA leg. The BC move was bearish again, and it retraces to 38.2% of the AB move. Now that the three legs are completed, all we need is to confirm the last leg to ho short in this pair. For printing the last leg, price action again goes back up, and it reached the 161.8% of the BC move.

After all these legs, price action prints a bearish butterfly pattern, and the trade activation was at point D. The first take-profit was at point C, and the second take profit was at point A. We have placed the stop-loss order below the point D. The reason for shallow stops is that if the price goes above point D, the pattern itself becomes invalid.

Conclusion

Placing stop-loss and take-profit order is subjective. If you are an aggressive trader, place your take-profit at point C and for conservative targets place the take profit at point A. For your information, trading the Butterfly is almost as same as trading the Bat pattern. The only difference is the final CD leg. It makes a 127% Fib extension of the initial XA leg in this pattern, rather than the retracement of it. Cheers!
[wp_quiz id=”77249″]