
Introduction
If you have experience trading with the Bollinger Bands indicator, you will find it easy to trade with the Bollinger Band %B indicator. The only difference is that, in this indicator, you can identify the relationship between the price and the bands with at most clarity.
What is the Bollinger Band %B indicator?
It is basically a technical indicator that quantifies the price of an asset with respect to the upper and lower limits of Bollinger Bands. We have derived 6 relations between the price and the indicator.
- The %B is at zero when the currency pair is at the lower band.
- % B will be at 100 when the currency pair is at the upper band.
- The indicator is above 100 when the price of the currency pair above the upper band.
- It is below zero when the price goes below the lower band.
- The %B is above 50 when the price goes above the middle band.
- And it is below 50 when the price goes below the middle band.
The Bollinger band %B uses the 20-day simple moving average (SMA) as the default parameter, just like the Bollinger Bands. This indicator is available on most of the trading platforms and terminals.
Bollinger Band %B formula
%B = (Price – Lower Band) / (Upper Band – Lower band)
Things to know
Before understanding the strategy, it is necessary to know a few things about the indicator as these concepts will be used in every step of the strategy. Below is the chart of a forex pair with the Bollinger Band %B indicator plotted to it.
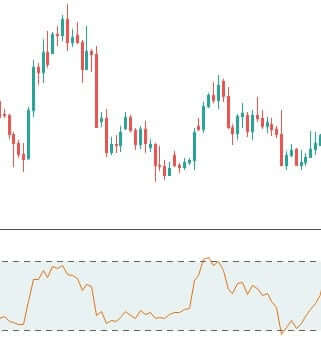
- The upper dashed line represents the 100% level of the %B indicator also known as the upper band.
- The lower dashed line represents the 0% level also known as the lower band of the indicator.
- The area in between the two dashed lines is known as the middle band.
These bands help us in identifying different trading opportunities. Hence, one needs to know about it before knowing the strategy.
The Strategy
Step 1: Identify the major trend
To identify the overall trend of the market, the trader needs to shrink the chart and determine the trend.
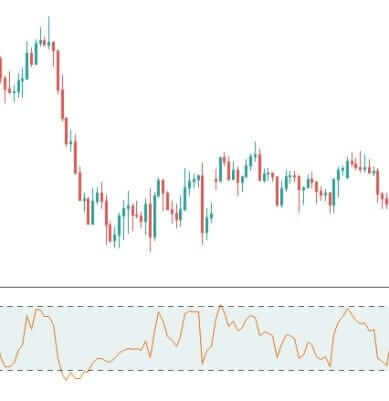
An uptrend is defined as a series of higher highs and higher lows, while a downtrend is defined as a series of lower lows and lower highs. In this strategy, we have taken the example of a downtrend, as shown in the figure. One can also see lower lows and lower highs in the above chart.
Let us see how the strategy works.
Step 2: Find the price where %B is above 100 or below 0 in the currency pair.
In this step, we are looking for the price where the indicator is above the upper band or below the lower band. This extreme price action is said to continue for long after taking a suitable entry.
A sell setup is formed when the indicator crosses below the lower band, and a buy setup is formed when the indicator crosses above the upper band. This strategy is almost reverse of other strategies (as oversold indicates buying in other strategies).

The above chart shows the crossing of the indicator below the lower band, which is apt for a sell trade. Just because the price is below the dashed line, we cannot take an entry immediately.
The next step is to find a pullback and then make an entry. We will then see how and where to take profits.
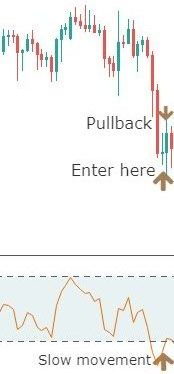
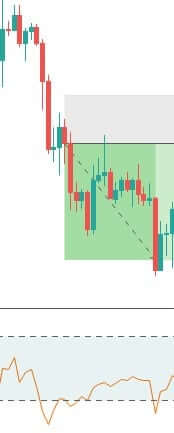
Step 3: Take an entry only at a suitable pullback.
By suitable pullback, we mean the opposite color candles should not be swift candles and should not make higher highs. If this happens, the current trend can be weak and may not sustain. The %B indicator can also assist us with the same, as the indicator should move slowly after crossing the lower band. If the indicator reacts and moves fast, it means the pullback is strong and could also result in a reversal. Finally, an entry can be taken after the close of at least two pullback candles.
The below figure explains the above paragraph clearly.
Step 4: Determining how to take profit
In this strategy, we follow a rule-based system for making profits which are again based on our indicator. A trader needs to cover his position after the indicator crosses the lower band once again and goes above the dashed line. This style of taking profit is different than in other strategies where it is based on a fixed percentage. This way of taking profits ensures that a trader is trading based on rules and guidelines which is a disciplined approach.
The below figure explains how profit is taken and the position is covered.
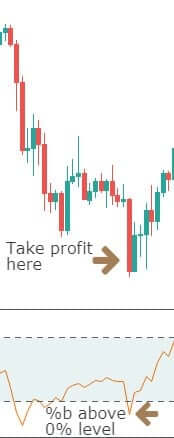
When the indicator goes above the 0% (lower band) level after crossing below, it means profit can be taken now and the trade can be closed.
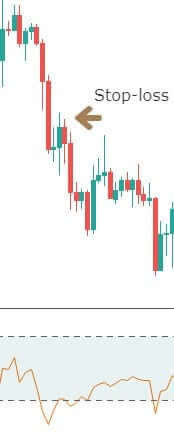
Step 5: Place a protective stop
Stop-loss is a mandatory and essential part of risk management, hence it needs to determined before entering a trade. For this strategy, stop-loss is placed above the high of the pullback which makes it an optimal place. The stop-loss, in this case, is very small which increases the risk to reward ratio (RR) considerably.
Here is exactly where it is recommended to put the stop loss.
The final trade setup would look something like this 👇
This results in a minimum of 2:1 RRR.
Final words
This is one of the easiest strategies which can be learned by new and experienced traders. It makes use of simple Bollinger bands added with a %B indicator. This indicator can also be combined with several other technical indicators and trading systems, but this alone, too, has a very good level of accuracy. Now, we have to follow the money management principles to take the best trades and make huge profits from the same strategy. For this, you can also refer to our money management article series, which talks on various risk management topics. Cheers!