Out of the thousands of indicators out there that technical forex traders add to their charts, there is one that is often overlooked. Sometimes even ignored. Indeed, though it is used relatively frequently, many traders often forget that it is part of their process. Yet, in reality, it is one of the most important indicators to have in your toolkit.

That indicator? It is, of course, the ATR.
What Is ATR?
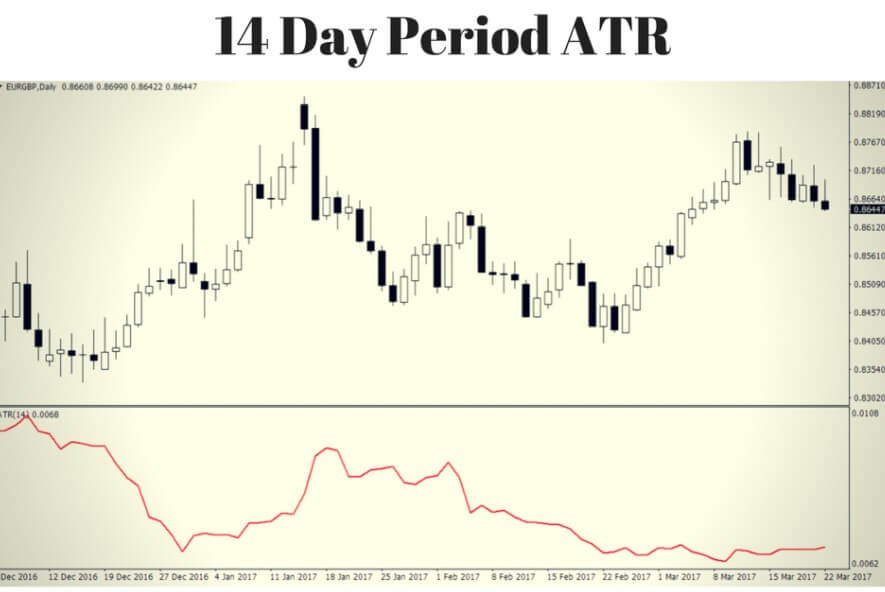
Many of you will, of course, already know what ATR is and how it works as well as you know the back of your hand. It never hurts, however, to refresh that knowledge and take another look at it. Put as simply as possible, Average True Range is a measure of volatility. What it does is take a look at the last fourteen candles (it doesn’t have to be fourteen but that’s usually the default setting) and tells you how much movement there has been. This will be expressed in the number of pips the currency combination you have selected has moved, on average, over those last fourteen candles.
It’s a moving indicator so you need to take care when you’re measuring it and whether the most recent candle is throwing off the rating in some way. So, if you’re day trading, for example, it is best to wait to measure the ATR just as the candle you’re currently on is coming to a close. That way your measurement is of fourteen complete candles – which will give you the best reading.
And that’s it. It’s that simple.
But Why Is ATR So Important?
The thing is, ATR is simply not one of those glamorous indicators. Which is probably why it often goes so unnoticed. In fact, many traders don’t even have it up on their chart the whole time. But that doesn’t mean it isn’t a key part of their system. Perhaps even the most crucial one. That isn’t to say that it is the best indicator or some kind of silver bullet. But it needs to be part of your system because it provides you with two key pieces of information.
Firstly, by telling you how much a currency pair is moving over a given period, it can help you to make sense of your other indicators and tell you when to trade – or rather, when not to. For example, say a currency pair has already moved beyond its average range but your strategy is signaling that you should go long. Combining the ATR into your other indicators can help to show you whether what you’re dealing with is a breakout or whether it would be better to go short or simply not trade at all.
But, here’s the key thing. The ATR is not a silver bullet. No indicator on its own is. It must be just one part of your strategy and not the driving force behind it. You shouldn’t use the ATR on its own to decide whether you should pull the trigger on a trade or not. If you think any single indicator can do that, perhaps it’s time to duck out of trading altogether or, at the very least, get back to the classroom.
It is also useful to give yourself a little history lesson and use the ATR to explore how a currency pair has performed in the past under different circumstances. Crosscheck that with any significant news events you know about and it can provide a useful picture of the volatility of a currency combination – ultimately helping you to have a better understanding of what to expect.
Managing Risk
The second useful thing the ATR can give you – and according to some this should actually be its primary function – is that it can help you to manage how much you risk on a given trade. You should not make a single trade without consulting it. So, how does that work? Well, let’s say you’re doing everything right. You’re avoiding being drawn into trading with the herd. You’re ducking and diving and staying clear of the big players are – avoiding those hotspots where everyone else is trading. 0You’re using your system to identify when the optimal moment is to trade – getting all of your indicators to line up to make sure it’s the right moment and whether to go long or short.
Before you pull the trigger, you need to know how much to trade. And that’s where the ATR comes in. You need to factor it into the process you go through – make it part of your checklist – because in that sense it is probably the most useful indicator you have. It allows you to gauge risk in a measurable way so that you can improve how you manage your money and the amount that you invest per trade for any given currency pair. Now, the number one question here is how much money you put on a trade. But it doesn’t make sense to speak in terms of dollar amounts in this example. The ATR can’t tell you to put, say, USD 5,000 on a yen vs. pound trade. Neither does it make sense to talk in terms of lots, because a lot on the pound/dollar pair will be a different amount to a lot on another currency pair. Instead, it’s better to think of how much you are trading per pip.
To do that, compare the ATR for two currency pairs. For the sake of the example, let’s take a commonly traded pair like GBP/USD. Depending on what’s happening in the news cycle but assuming no dramatic news has been happening, this pair is likely to turn out a pretty low ATR. Perhaps something like 14 pips. If we compare that to the ATR of a more volatile pair, for example, GBP/AUD, here we might see an ATR of 115 pips. Some pairs will blow that out of the water and will easily generate ATRs of 200 or 300 pips regularly. And a lot of traders will look at that volatility and will steer clear of trading in those waters.
Sticking with the example of the dollar/pound and pound/Aussie dollar pairs, it doesn’t take a mathematical genius to look at the ATR and see that 115 pips is about eight times as many as 14 pips. That means the pound/Aussie is moving about eight times as fast as the dollar/pound. As we would expect given the respective volatilities of these pairs. So, armed with that knowledge, how do we trade it? It couldn’t be simpler. Let’s say that in this example you’re trading the dollar/pound at 16 dollars per pip. You can trade the pound/Aussie with full confidence, simply by trading it at eight times less. In short, when trading a faster currency pair, use the ATR to modify your per pip trading amounts to correspond to the increased volatility. In so doing, not only are you managing risk but you are also managing your overall approach to trading.
A Whole New World
Many, if not most, traders out there – particularly the less successful ones – start off by trading equal amounts per pip on different currency pairs, without taking into account the different speeds at which they move. This makes no sense. To all intents and purposes, by doing that they are saying that they have equal confidence in their trades across currency combinations of different volatilities. The danger that exposes them to could really take a chunk out of their account very quickly indeed if things go south. Traders who do that are taking on unnecessary risks because they are not mitigating the risk of greater volatility.
The ATR allows you to see that risk and modify your behaviour accordingly. It can be a tool for managing how much you trade per pip on a given pair and, consequently, it allows you to profile your trades for risk. This ability can introduce you to a whole new world of more exotic currency pairs because it enables you to broaden the spectrum of the pairs you trade. Placing the right amount of money per pip on a trade mitigates the risk of volatile pairs and means that you can add new currency combinations to your trading schedule without the fear of being towed under by fast-moving pairs.
In a Nutshell
The most important thing to take away from all of this is that managing risk and managing your money are the most important functions you have when you approach forex trading. If you can get these two right, you can separate yourself from the less successful or outright unsuccessful traders. It is the thing that will ultimately determine whether your forex trading career is going to result in more money in your bank account or less. And the primary tool you have at your disposal for mitigating risk and managing the money you invest in trades is the ATR. Even if you don’t have it on your actual chart – and many traders chose not to – you should still use it for every single trade you make.